Setting up Google Analytics 4 Custom Events: A Complete Guide
In Google Analytics 4 (GA4), events are specific interactions or occurrences that take place on your website or app.
Events allow you to understand how users behave on your property—how long they stay on your site, how many submit a form, and other such insights.
GA4 has several default and automatically recorded events, but it also allows you to track unique behaviors as custom events.
What Are Custom Events in Google Analytics 4?
Custom events are optional events that you can create in Google Analytics. They allow you to capture data about user interactions on your website or app that Google doesn’t already record.
For example, you can create a custom event to track how many times a specific page was viewed (such as a confirmation page) or see which forms people use most often to sign up for your newsletter.
Custom Events vs. Other Event Types
Google Analytics custom events are distinct in that they’re created by you to track data that GA doesn’t otherwise cover.
Before creating a custom event, you should make sure that the user behavior you wish to track isn’t covered by another event type.
Google has three other event types:
- Automatically collected events: Are basic events automatically recorded in GA4 that can’t be turned off. They include session_start (triggered when a user engages your website or app) and user_engagement (triggered when your webpage is in focus or your app is in the foreground for one second or more).
- Enhanced measurement events: Allow you to track additional events without having to adjust your code or configuring Google Tag Manager (GTM), but they can be turned off. Examples include view_search_results (triggered when a user views a search results page on your website) and file_download (triggered when a user clicks a link to a downloadable file).
- Recommended events: Provide additional insight into user behavior. Unlike automatically collected or enhanced measurement events, recommended events aren’t recorded automatically. Instead, you set them up based on your needs.
Further reading: Google Analytics 4 Events Guide: Event Tracking Explained
How to Create Custom Events in Google Analytics 4
There are two primary ways to create Google Analytics custom events: in the GA4 interface or in Google Tag Manager.
Creating events in the GA4 interface is simpler but only lets you create events based on existing ones. While creating events in Google Tag Manager is more involved but allows you to be more specific in your data collection.
We recommend choosing the method that will best help you measure what it is you want to know.
But first, check that the event you want to track isn’t already collected in GA4. Review Google’s list of automatically collected events (this list includes enhanced measurement events) and recommended events to see if Google can already collect the data you’re looking for.
And get familiar with event names to make sure your custom events don’t use the same name as any of GA4’s automatically collected, enhanced measurement, or recommended events.
Keep the following rules in mind when naming your events:
- Event names must start with a letter
- Event names can only include letters, numbers, and underscores—no spaces or other special characters. We recommend using “snake case” (all lowercase letters and underscores for spaces).
- Event names are case sensitive. Meaning “custom_event,” “Custom_Event,” and “Custom_event” would count as three different events.
- Event names shouldn’t use any of the reserved event names or prefixes. If they do, Google Analytics will display an error message.
Also, keep in mind the character limits for custom event and parameter names:
- Event names have a maximum limit of 40 characters. This is particularly important to note if you want to mark your custom event as a conversion. If it has a name longer than 40 characters, the appended “_c” will be missing and the event won’t be tracked as a conversion.
- Event parameter names have a maximum limit of 40 characters
- Event parameter values have a maximum limit of 100 characters
Now, let’s go over the two methods for creating custom events:
Creating Custom Events in the Google Analytics 4 Interface
The GA4 interface offers a simple way to create custom events based on existing events. It’s not as comprehensive as creating custom events in Google Tag Manager (GTM), but it’s a good option for those who don’t have GTM installed.
Let’s say you want to track downloads of a specific asset—a welcome packet with the file name welcome-packet.pdf—on your website.
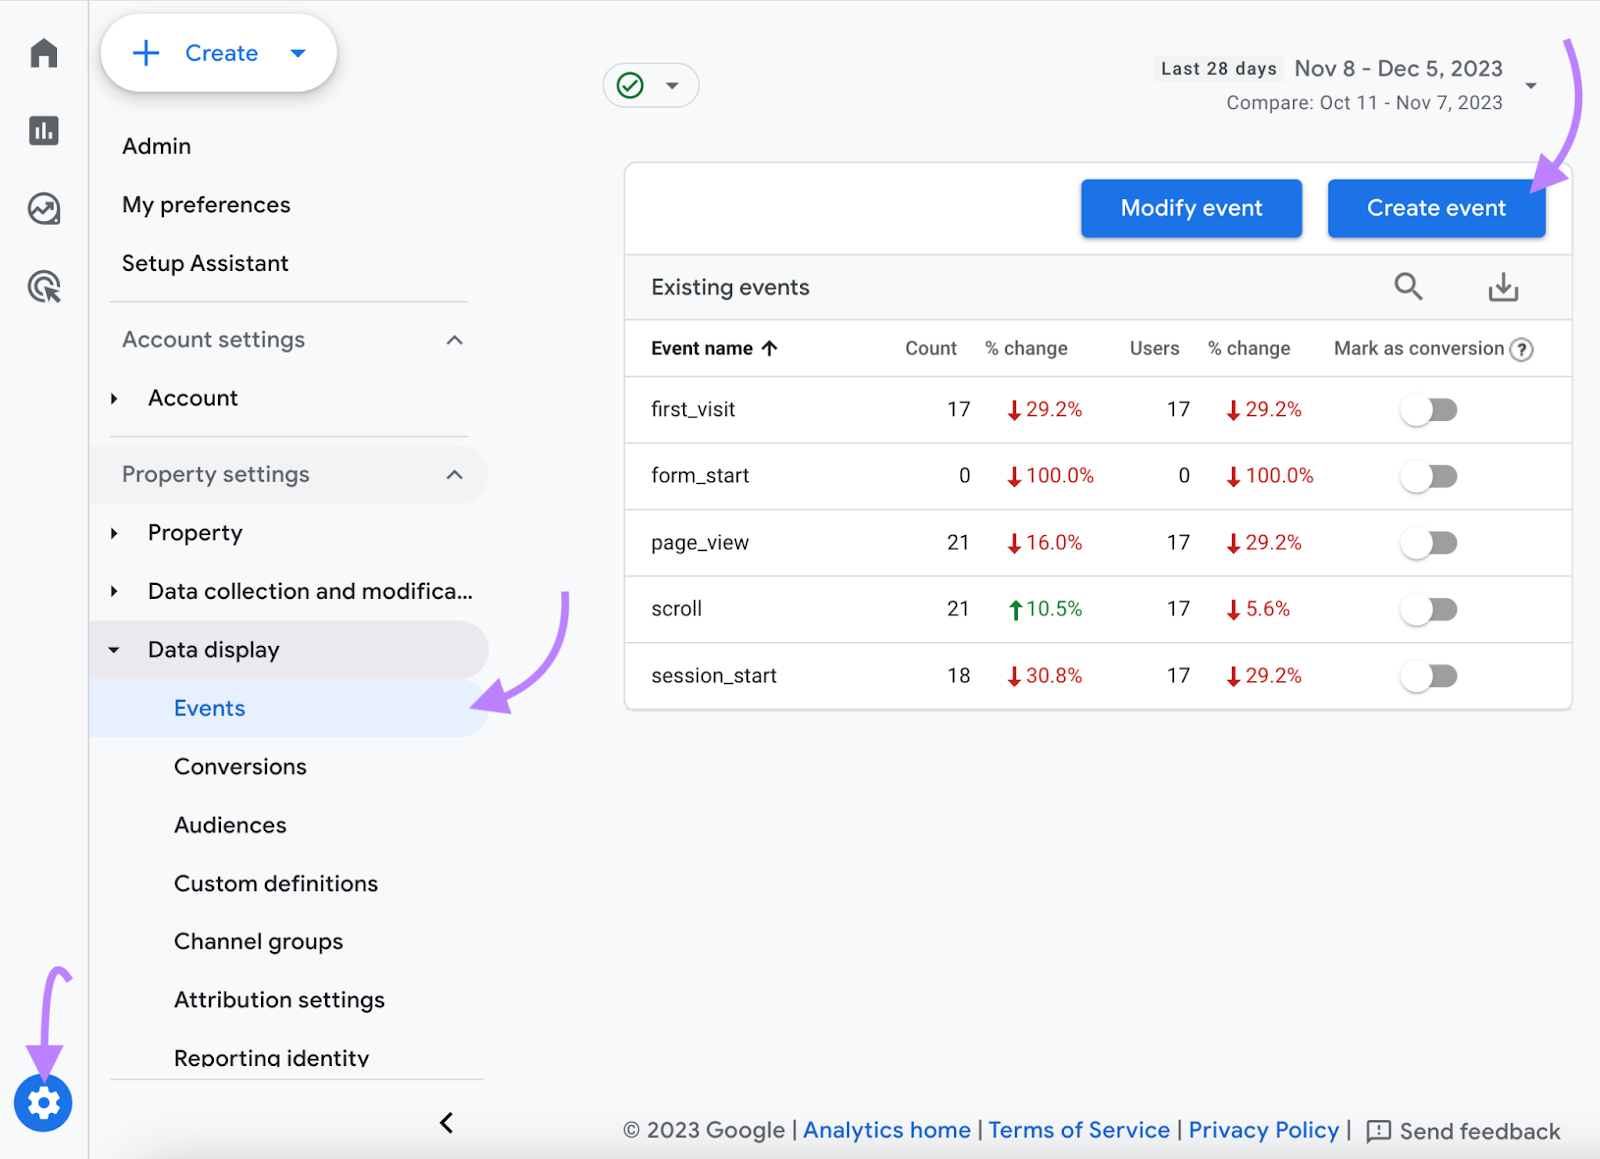
Enter Google Analytics 4, then navigate to the gear icon, click “Events,” and click “Create event.”

Next, click “Create.”

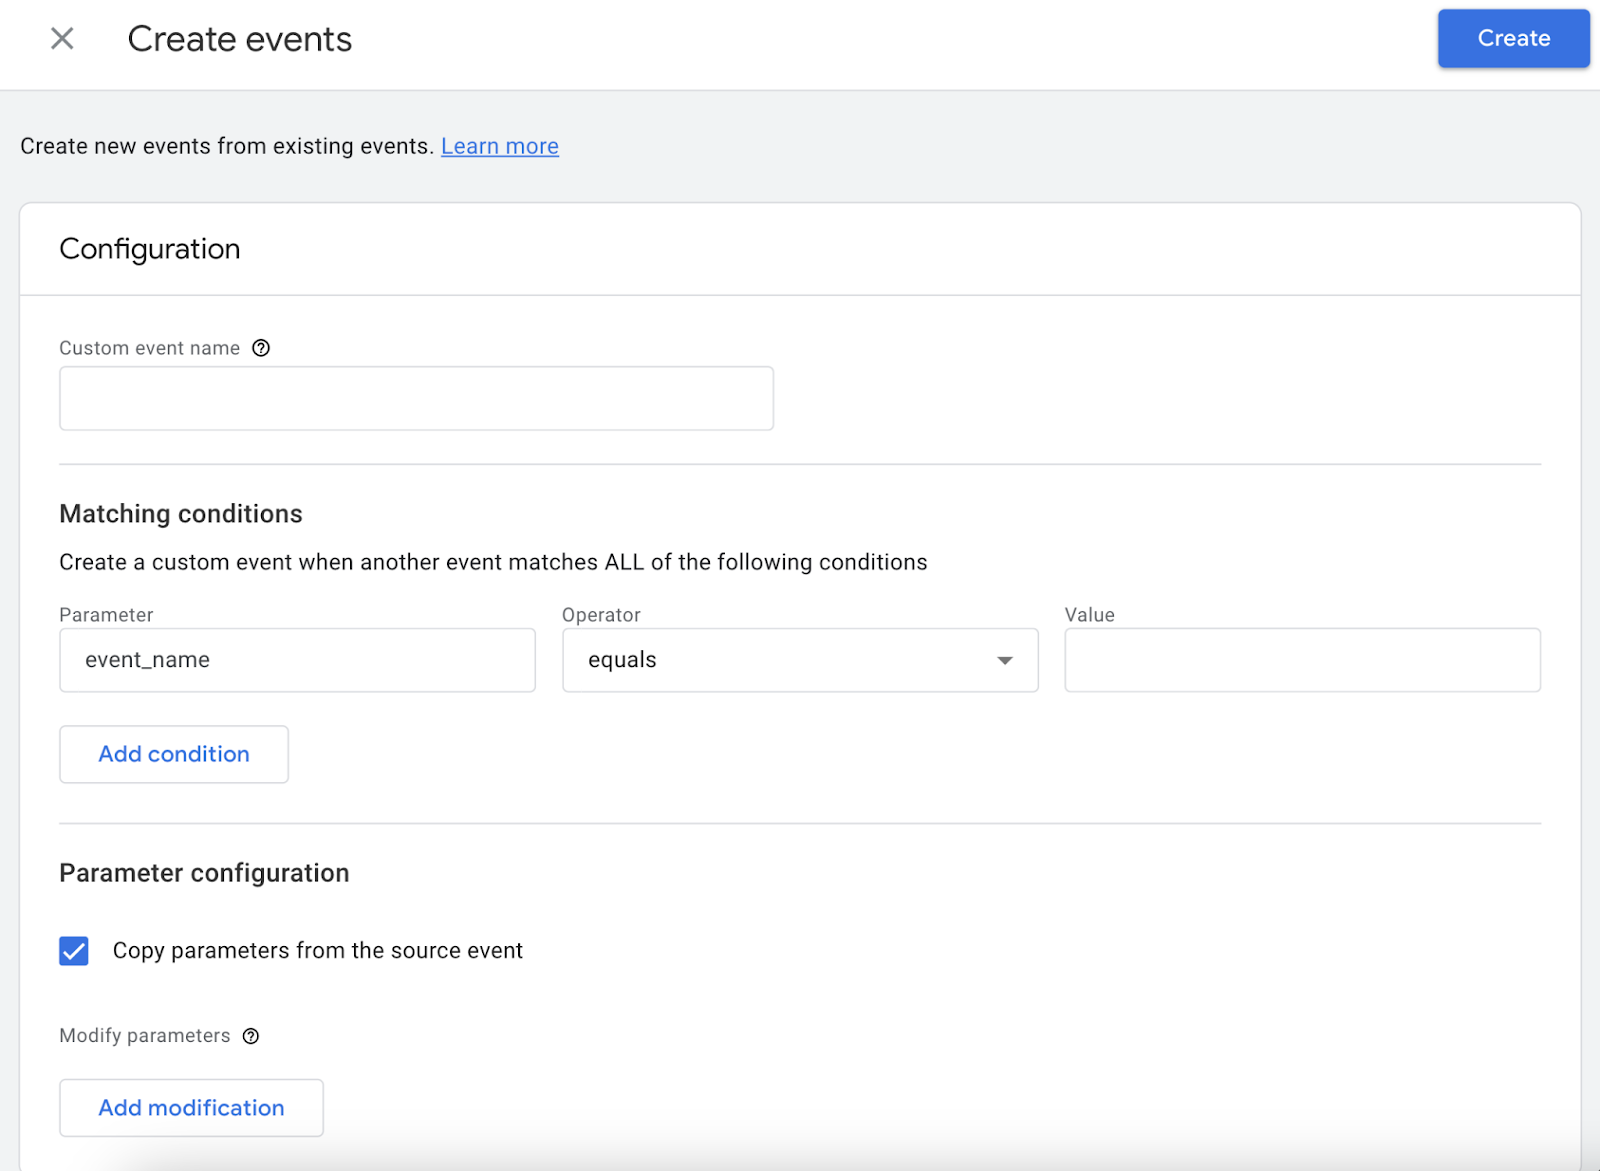
On the next screen, name your custom event and configure its parameters.
For this example, we’ll name the event “welcome_packet_download.” Because this event is based on the existing file_download event, we’ll set the “Parameter” to “event_name,” the “Operator” to “equals,” and the “Value” to “file_download.”
To track downloads of this specific file, we’ll set the parameter “file_name” to contain the “welcome-packet.”
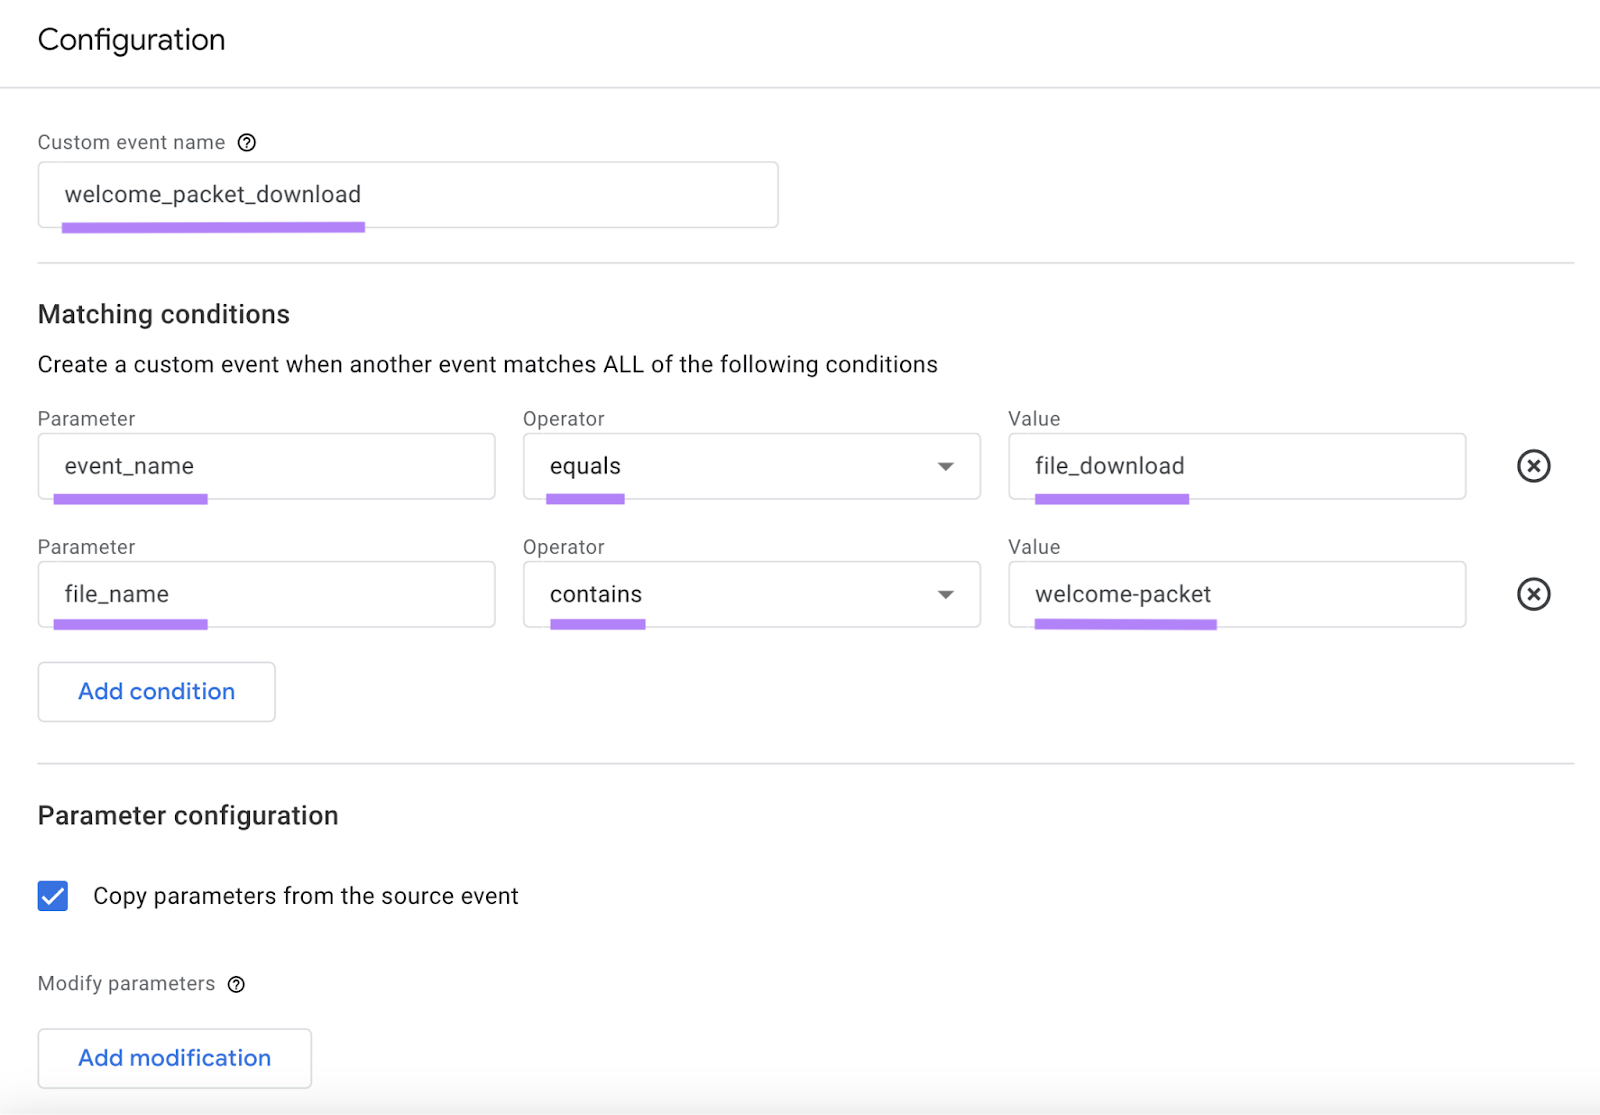
Next, save your new event.
Note that the custom event will only fire when an event occurs on your site or app that matches all of the conditions you’ve specified.
Now that you’ve successfully set up your GA4 custom event, the next crucial step is ensuring it’s accurately tracked. We’ll delve into this later.
Creating Custom Events with Google Tag Manager
Google Tag Manager lets you create completely new events that don’t need to be based on events already sent to Google Analytics.
Now, log in to GTM. And click “New Tag” from the “Overview” screen.
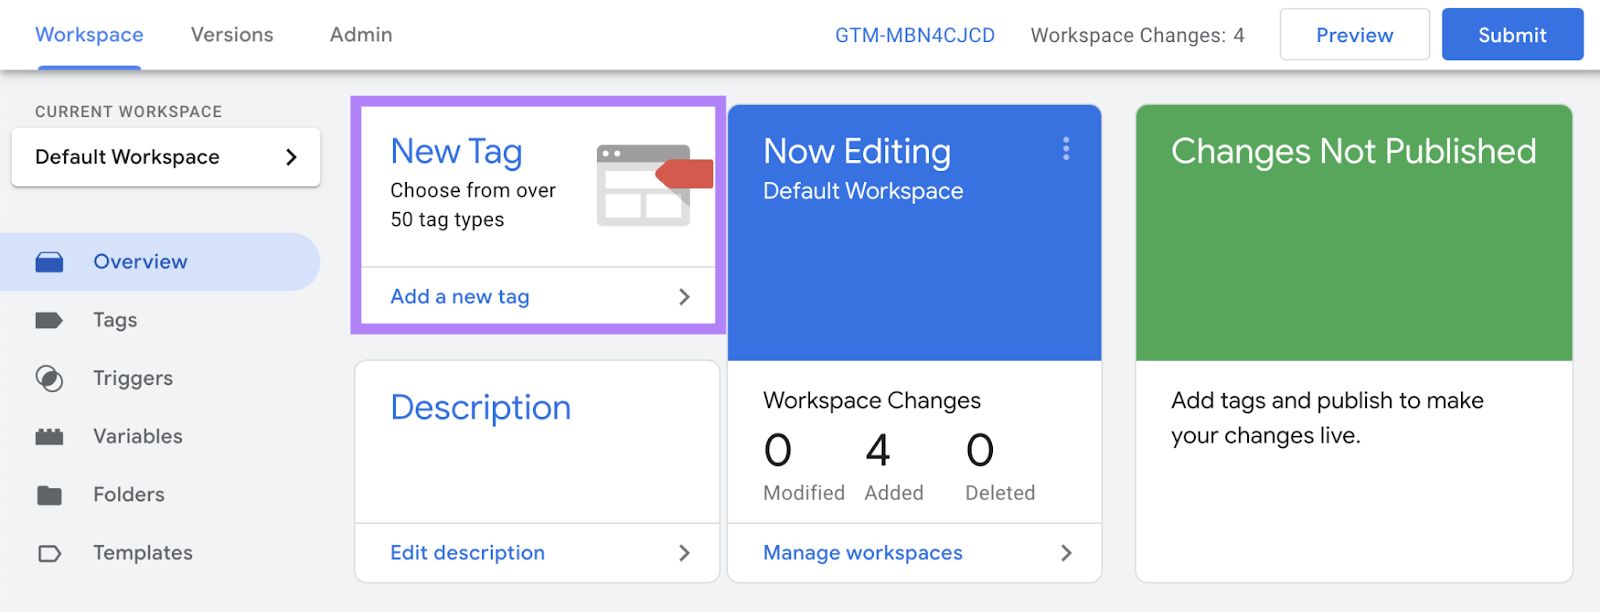
You’ll then see the screen below.
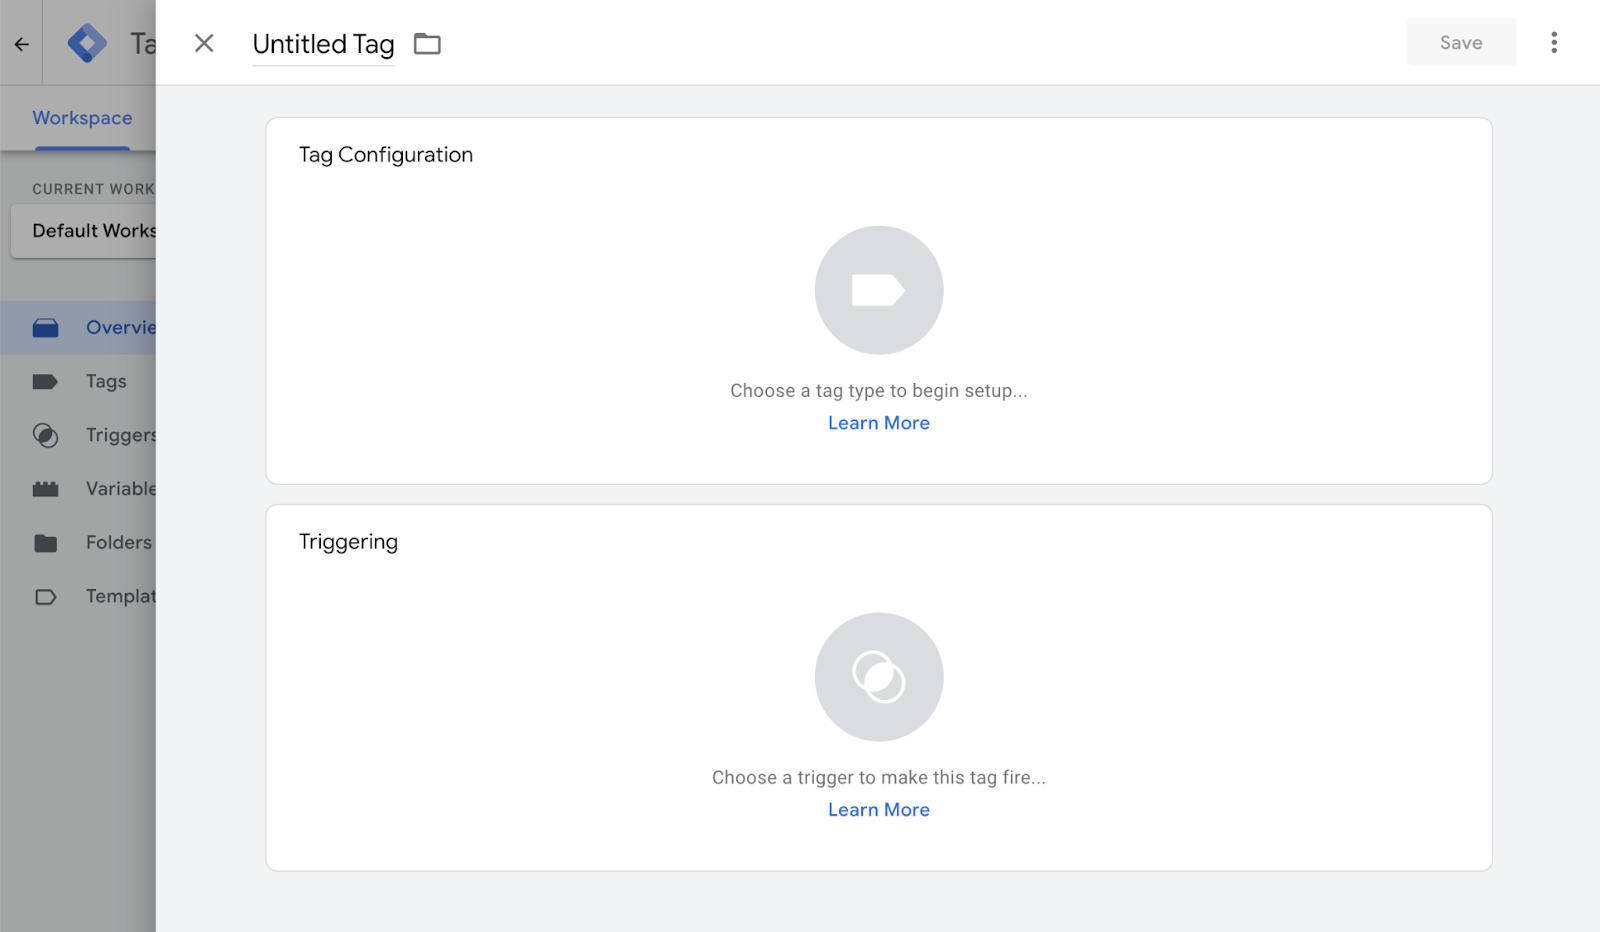
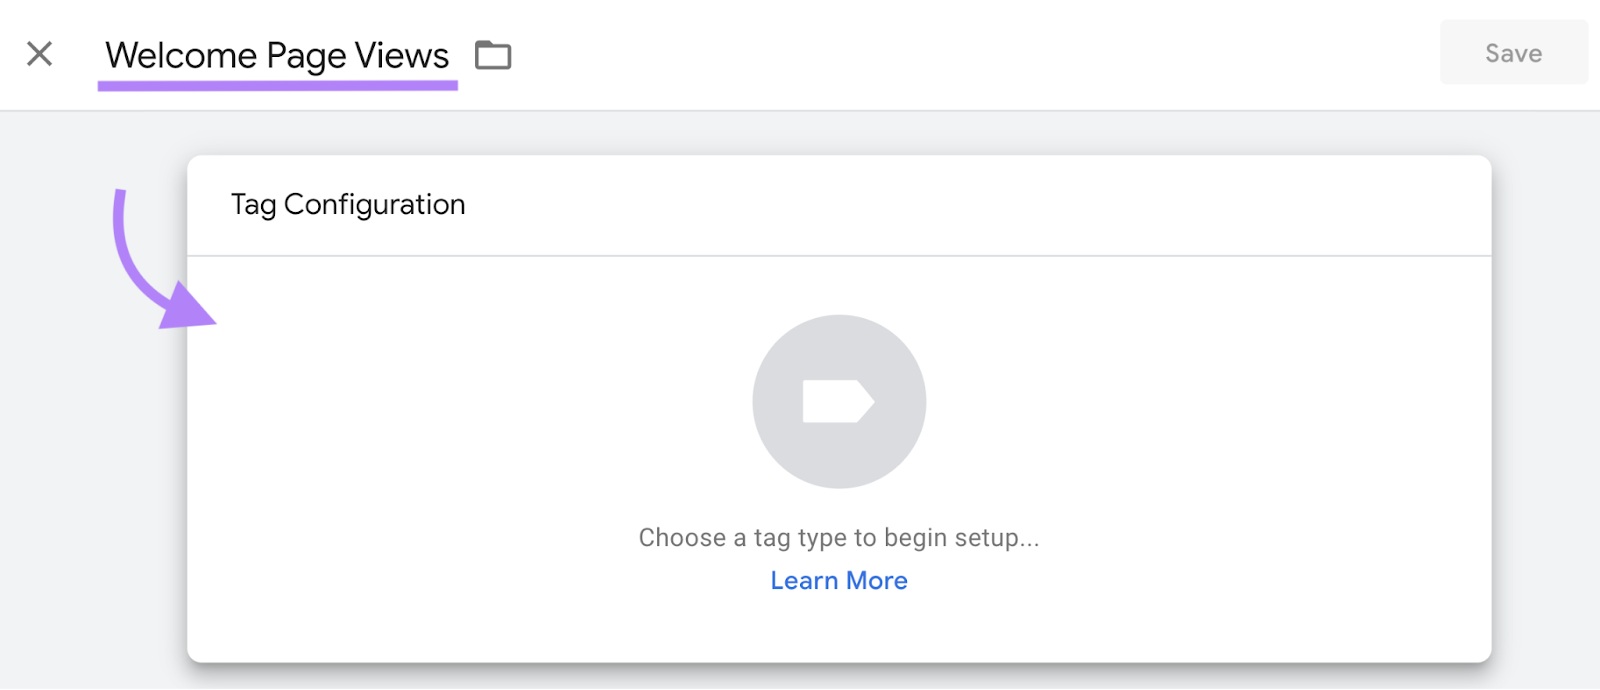
Name your tag something that’s easy to understand. For this example, we’ll track views of a welcome page. Then, click “Tag Configuration.”
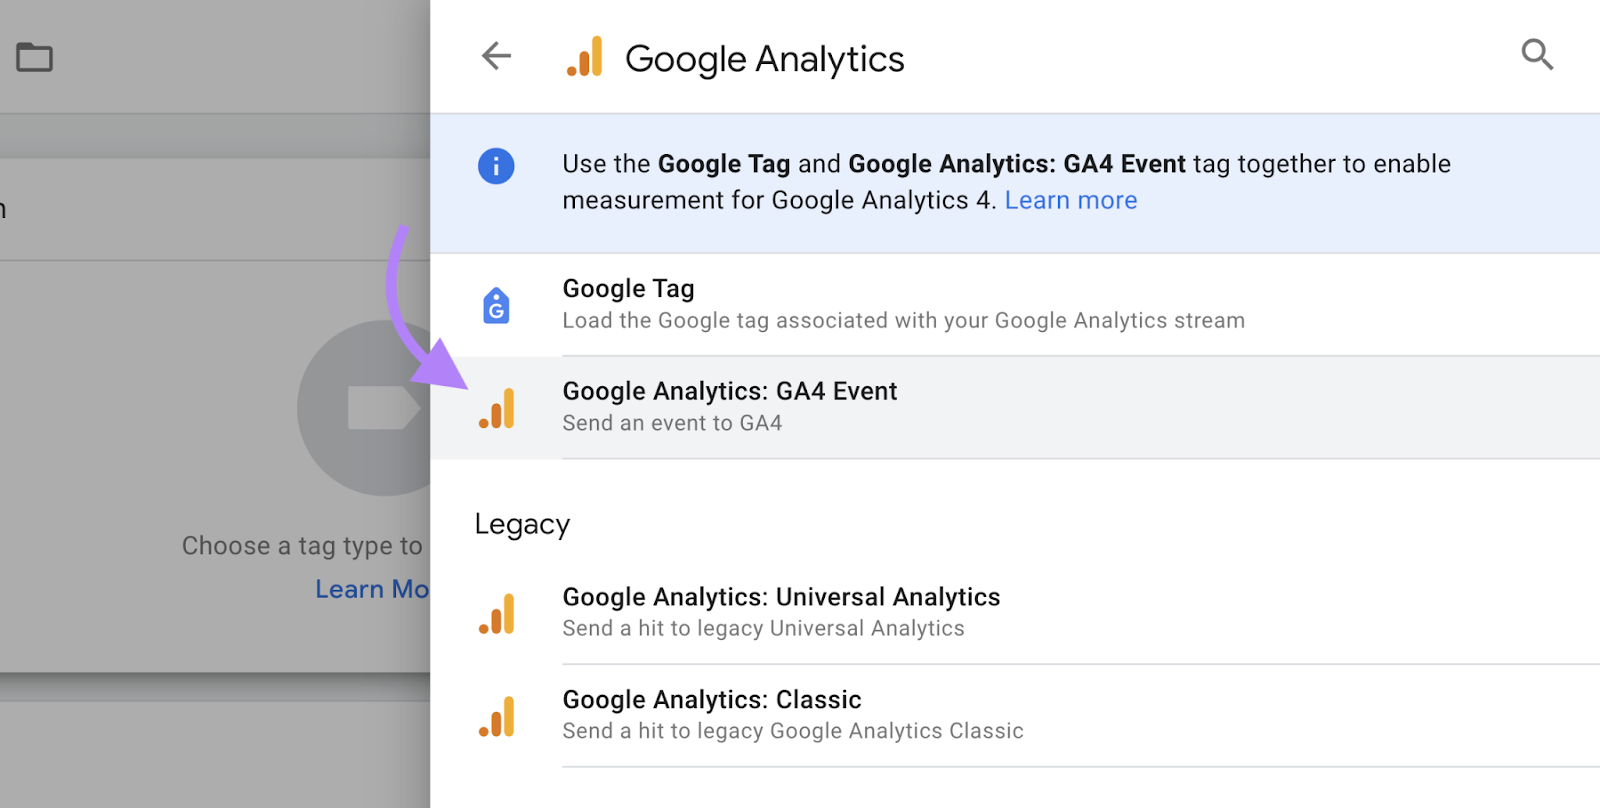
From the menu that appears, select “Google Analytics.”
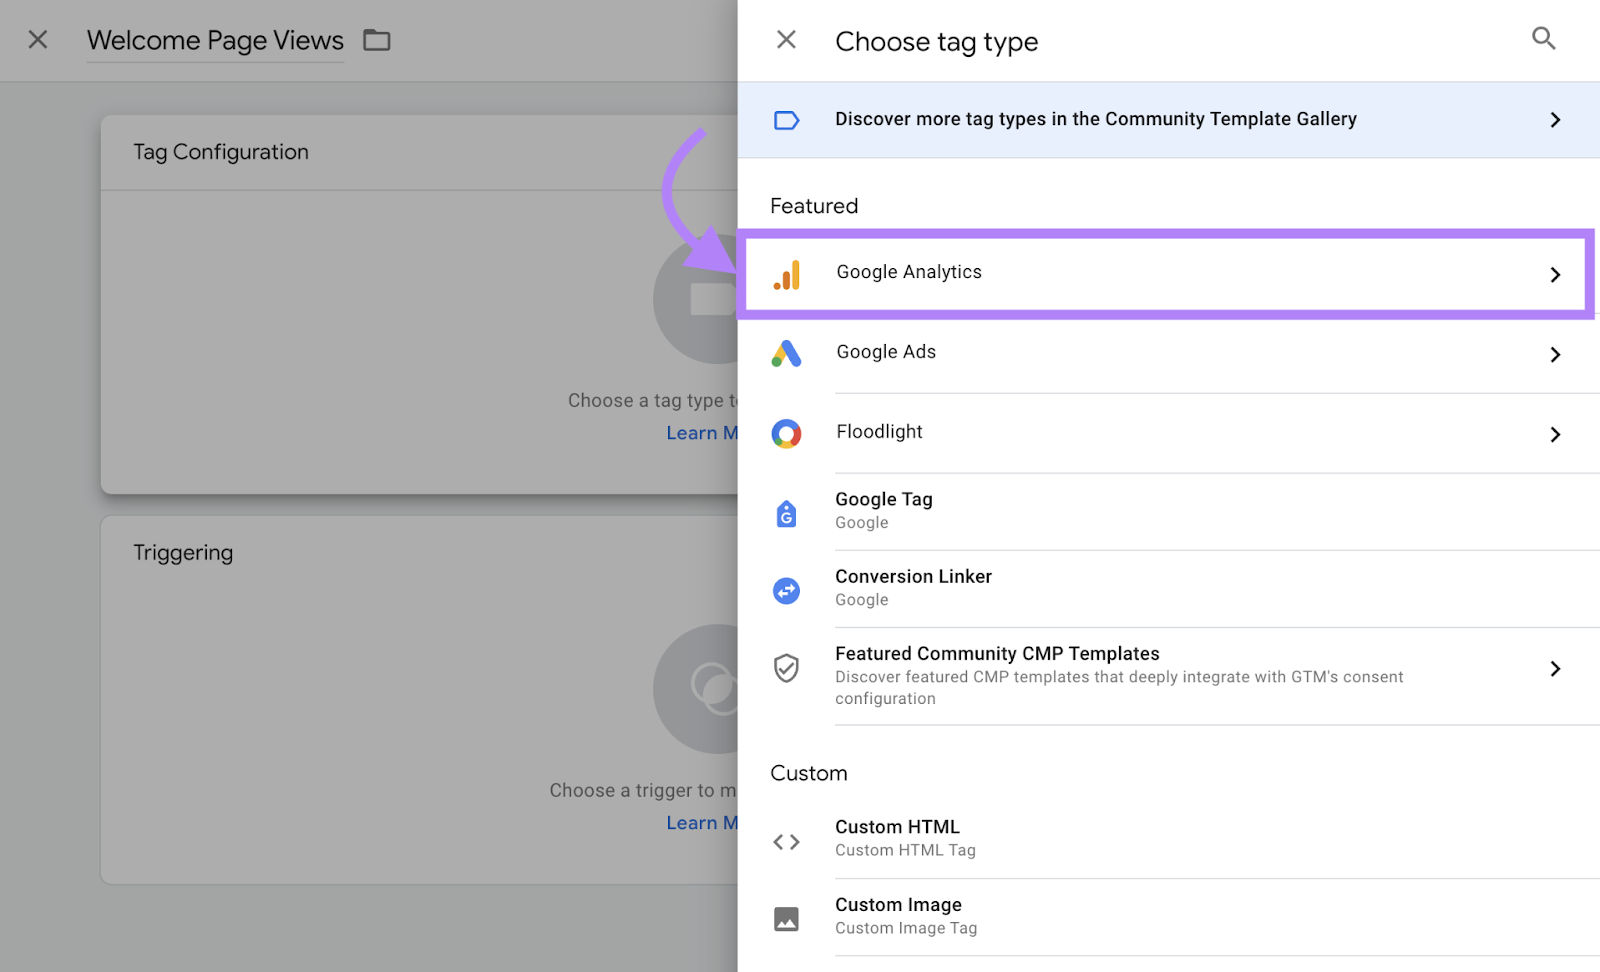
Next, select “Google Analytics: GA4 Event.”
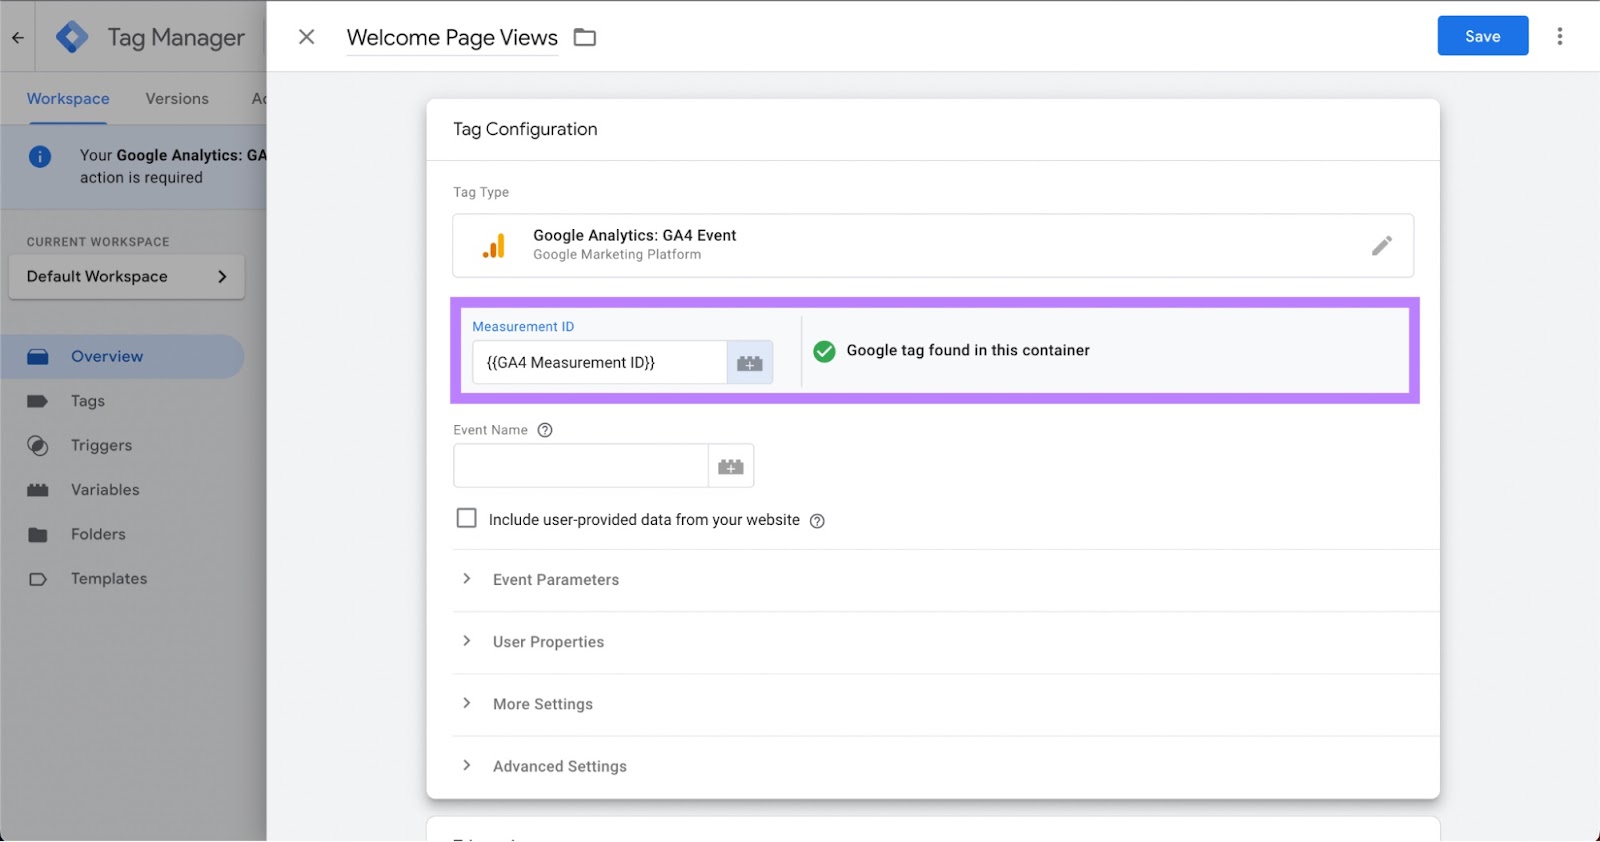
If you haven’t yet, find your measurement ID and save it as a variable that you can re-use by clicking the icon to the right of the “Measurement ID” field. (Otherwise you can copy and paste it in the “Measurement ID” field.)
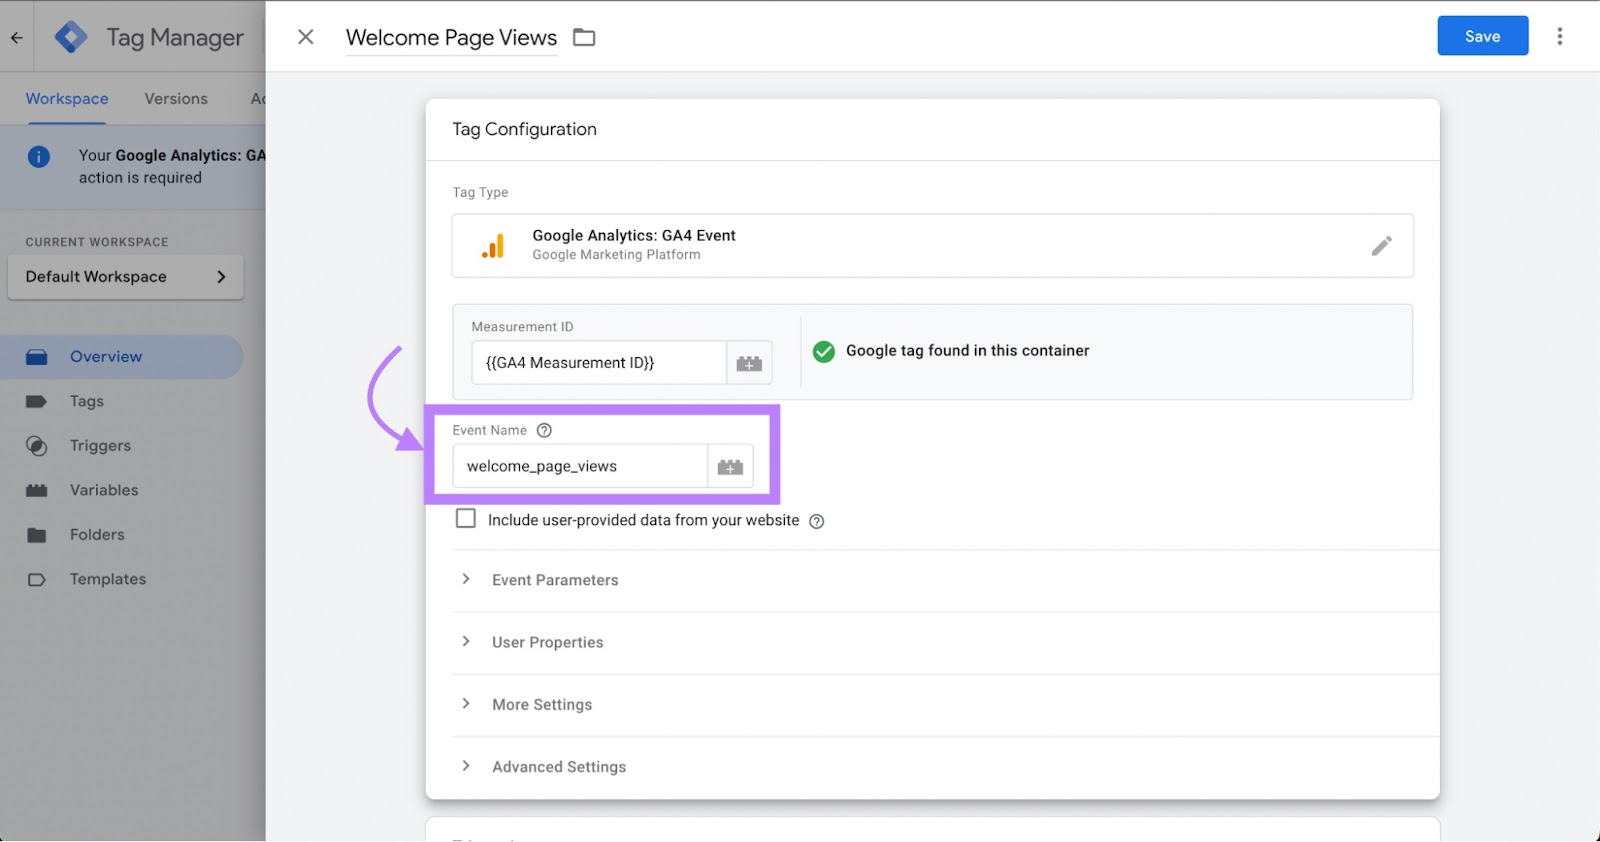
Next, enter your event name, keeping in mind naming best practices. This name will show up in your reports, so make sure it’s easy to understand.
Now, it’s time to define the action that you want to track.
This is known as the trigger. It’s the specific condition or set of conditions that you define to determine when a particular tag should be fired.
For this example, we want to track each time someone views a specific page: a welcome page with “/welcome” in the URL.
Scroll down and click “Triggering” (it appears directly under the “Tag Configuration” module) to open the menu.
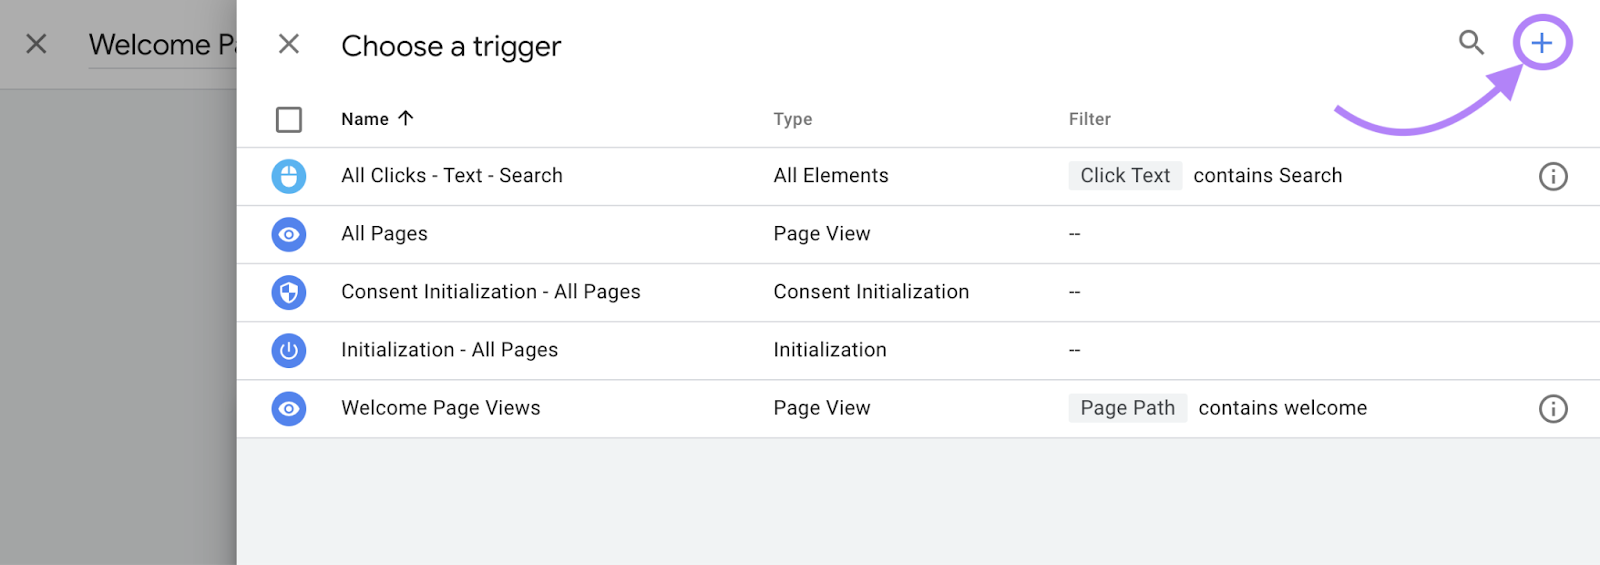
Once the “Choose a trigger” menu opens, click the “+” symbol in the upper right-hand corner. This allows you to set up a custom trigger to fire only on the pages you specify.
In the next screen, name your trigger.
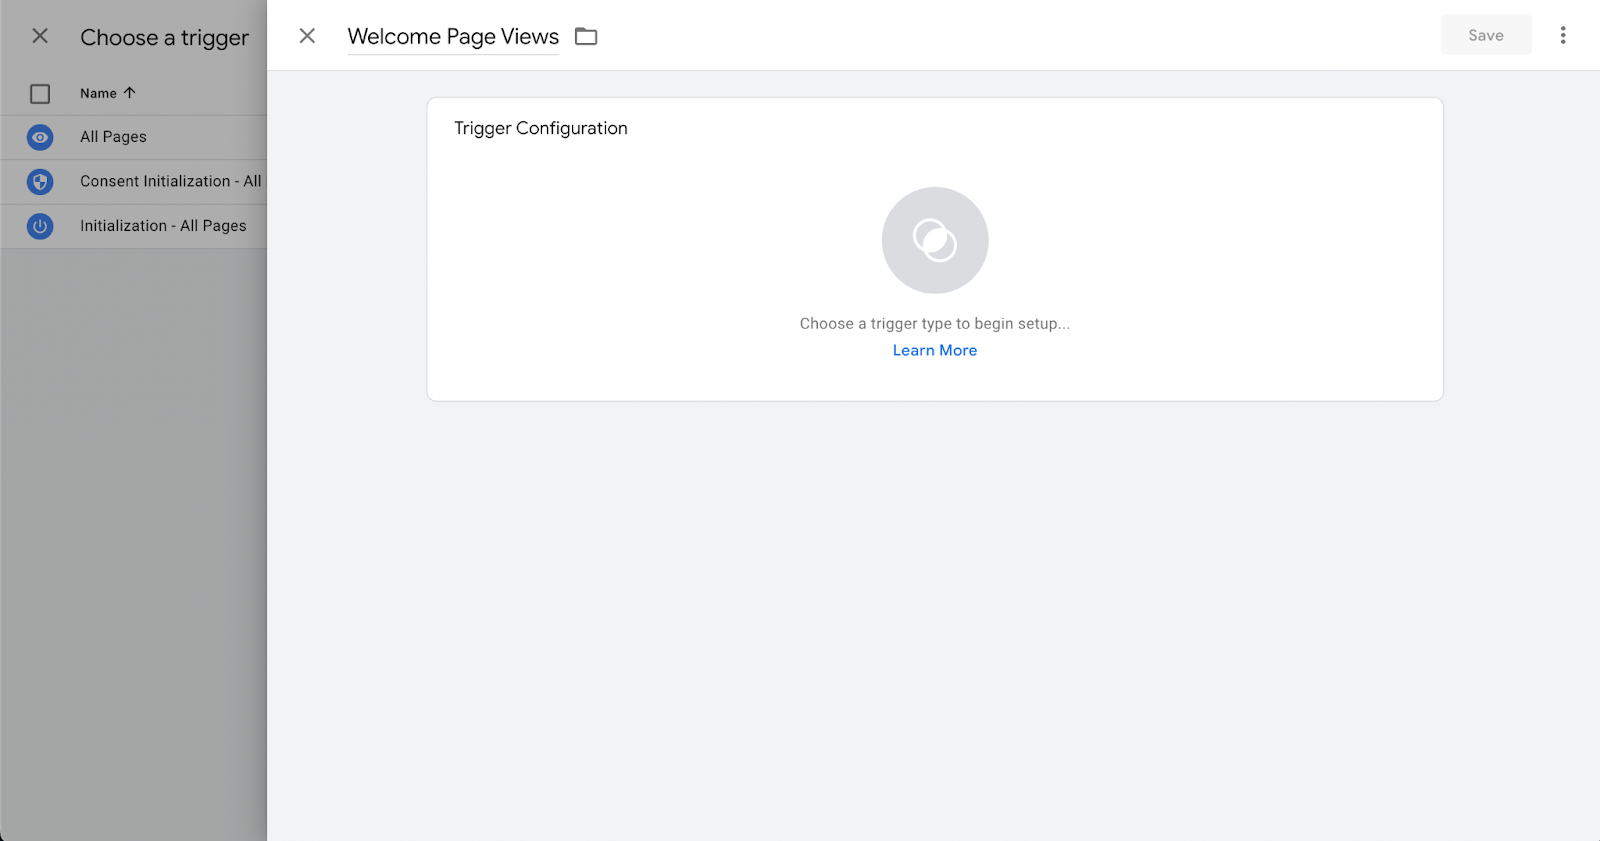
Next, click the “Trigger Configuration” module.
A list of options will appear, and you’ll want to select the trigger that aligns with what you’re trying to track. In this case, we’ll select “Page View.”
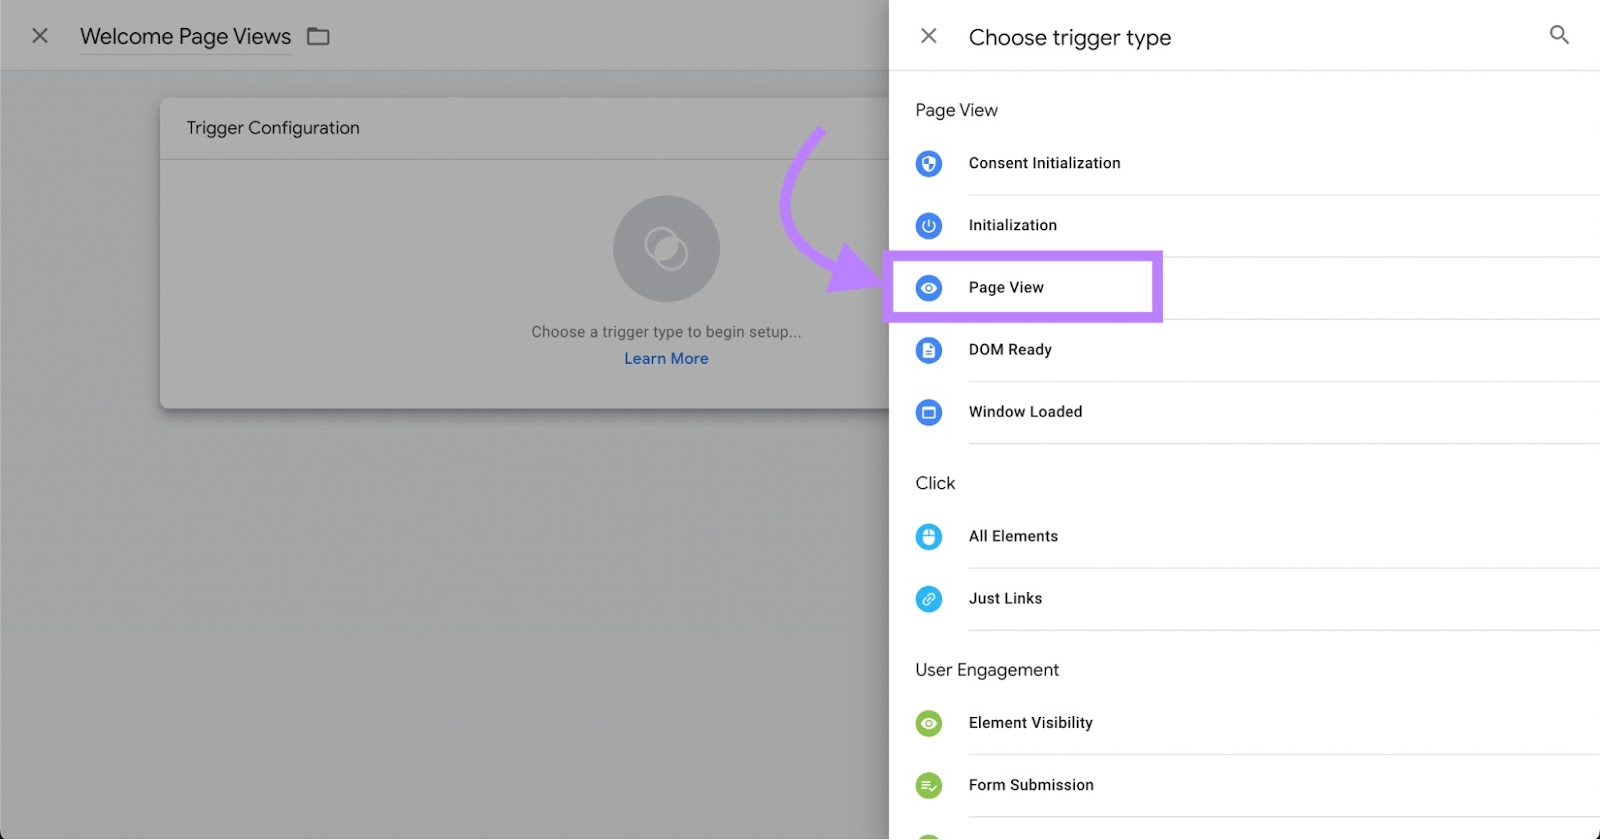
You now have the option to specify which pages the event will fire on. So, select the circle next to “Some Page Views.”
Now, select “Page Path” in the first drop-down menu and choose “contains” in the next drop-down menu. And add “welcome” to the text field. (This specifies that the event will fire when a user views a page with a URL path containing “welcome.”)
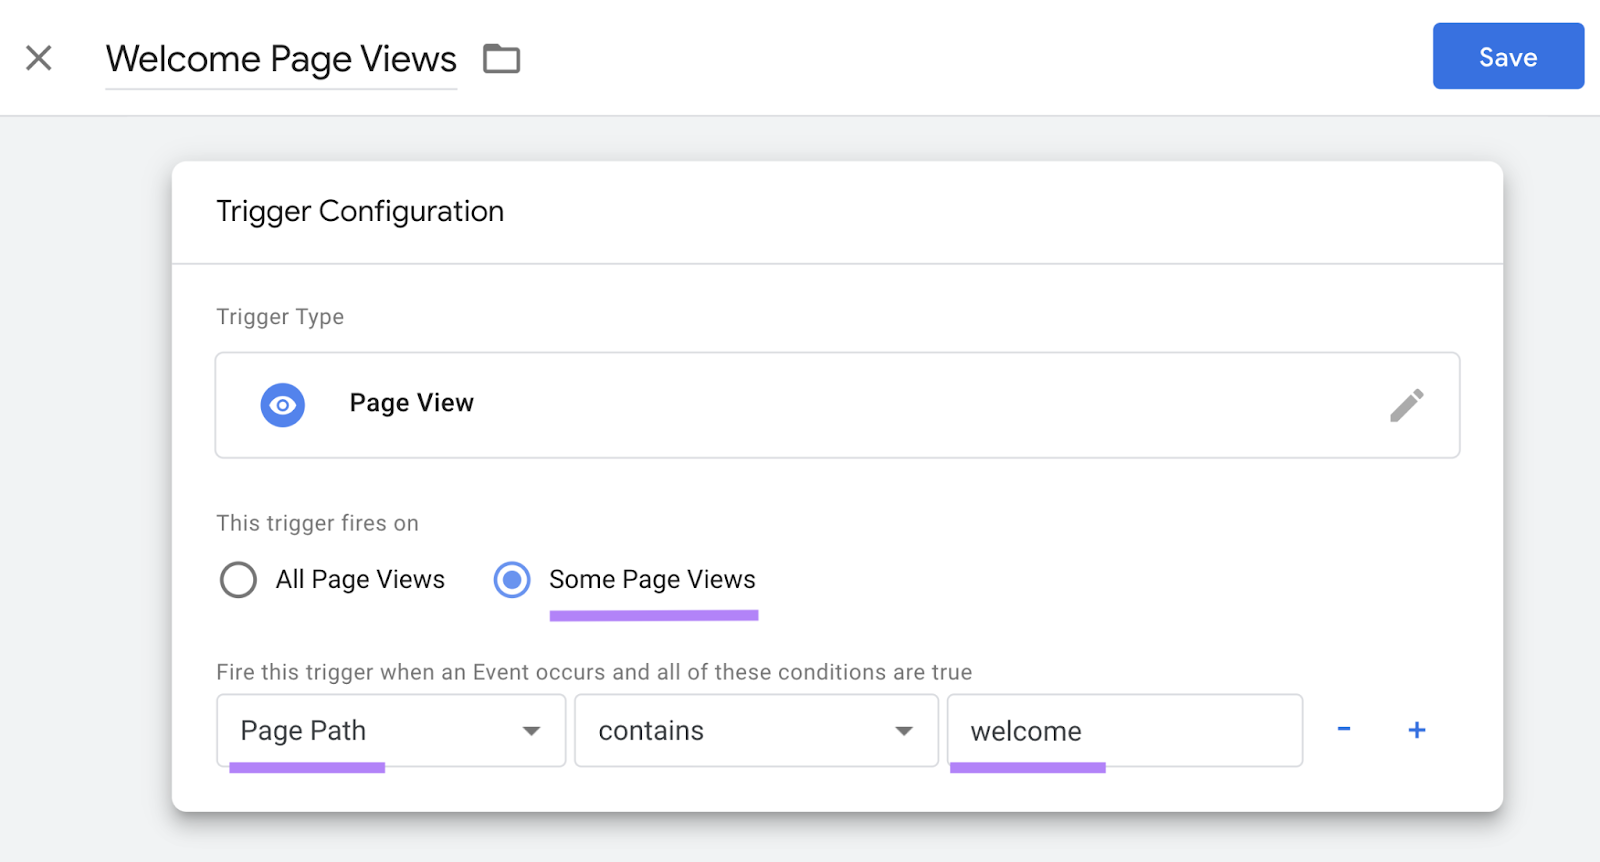
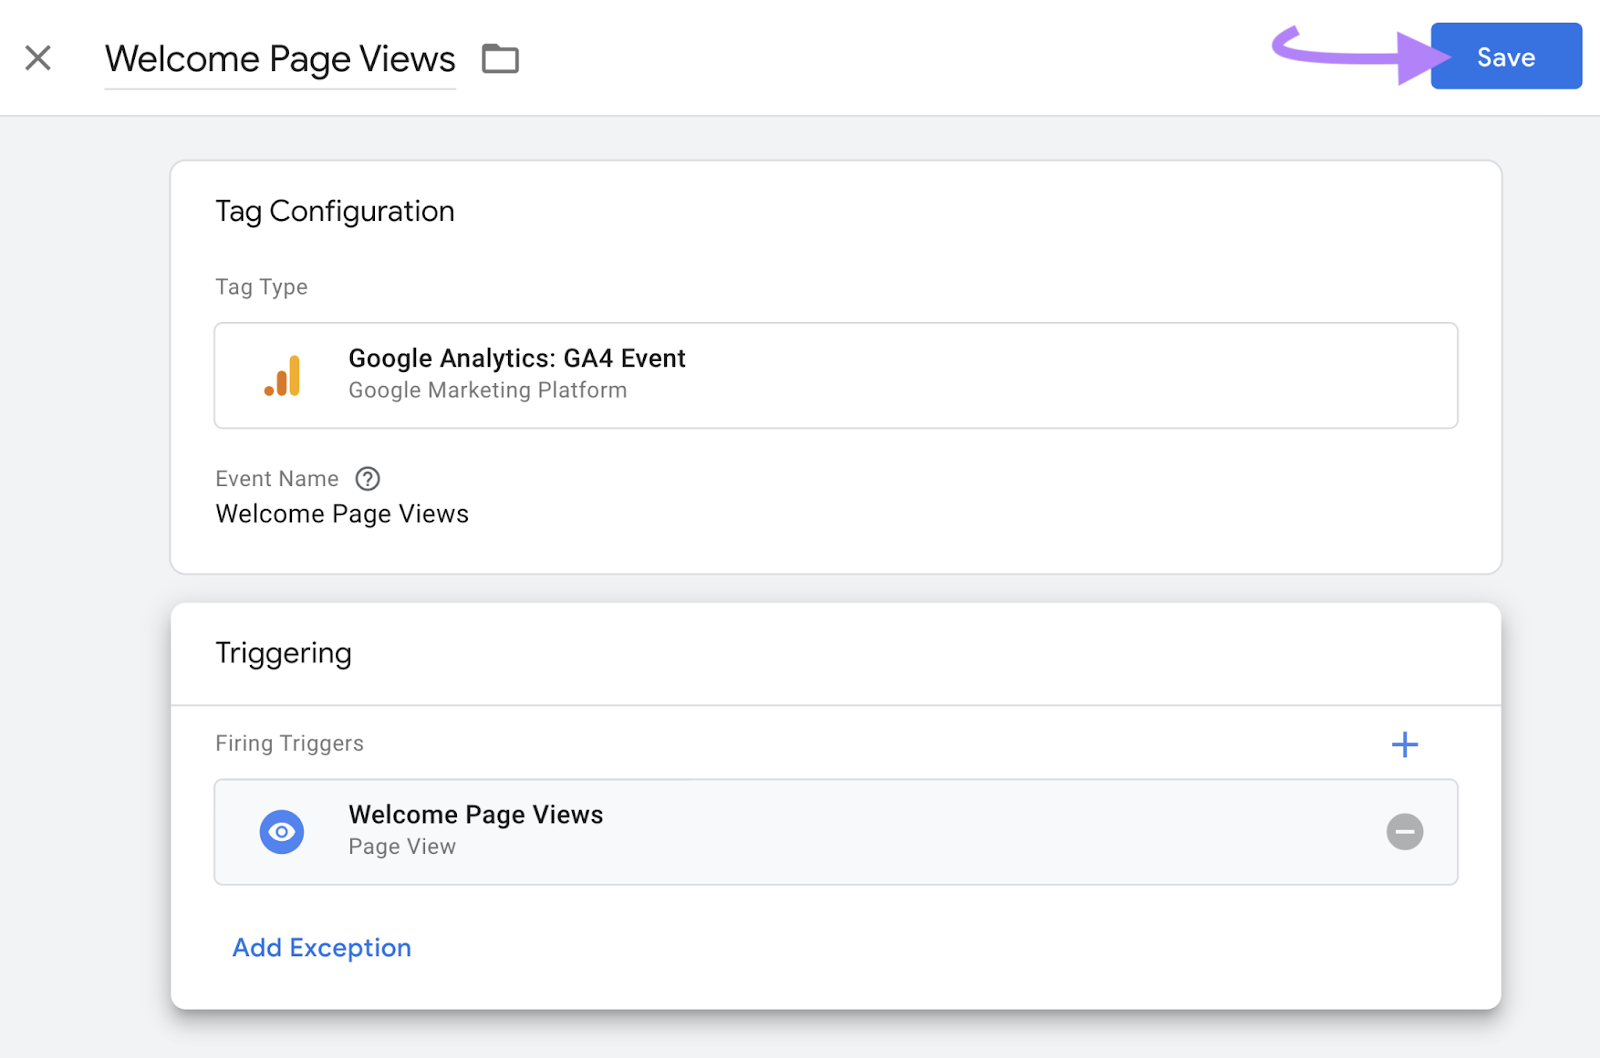
Don’t forget to click “Save” in the upper right corner.
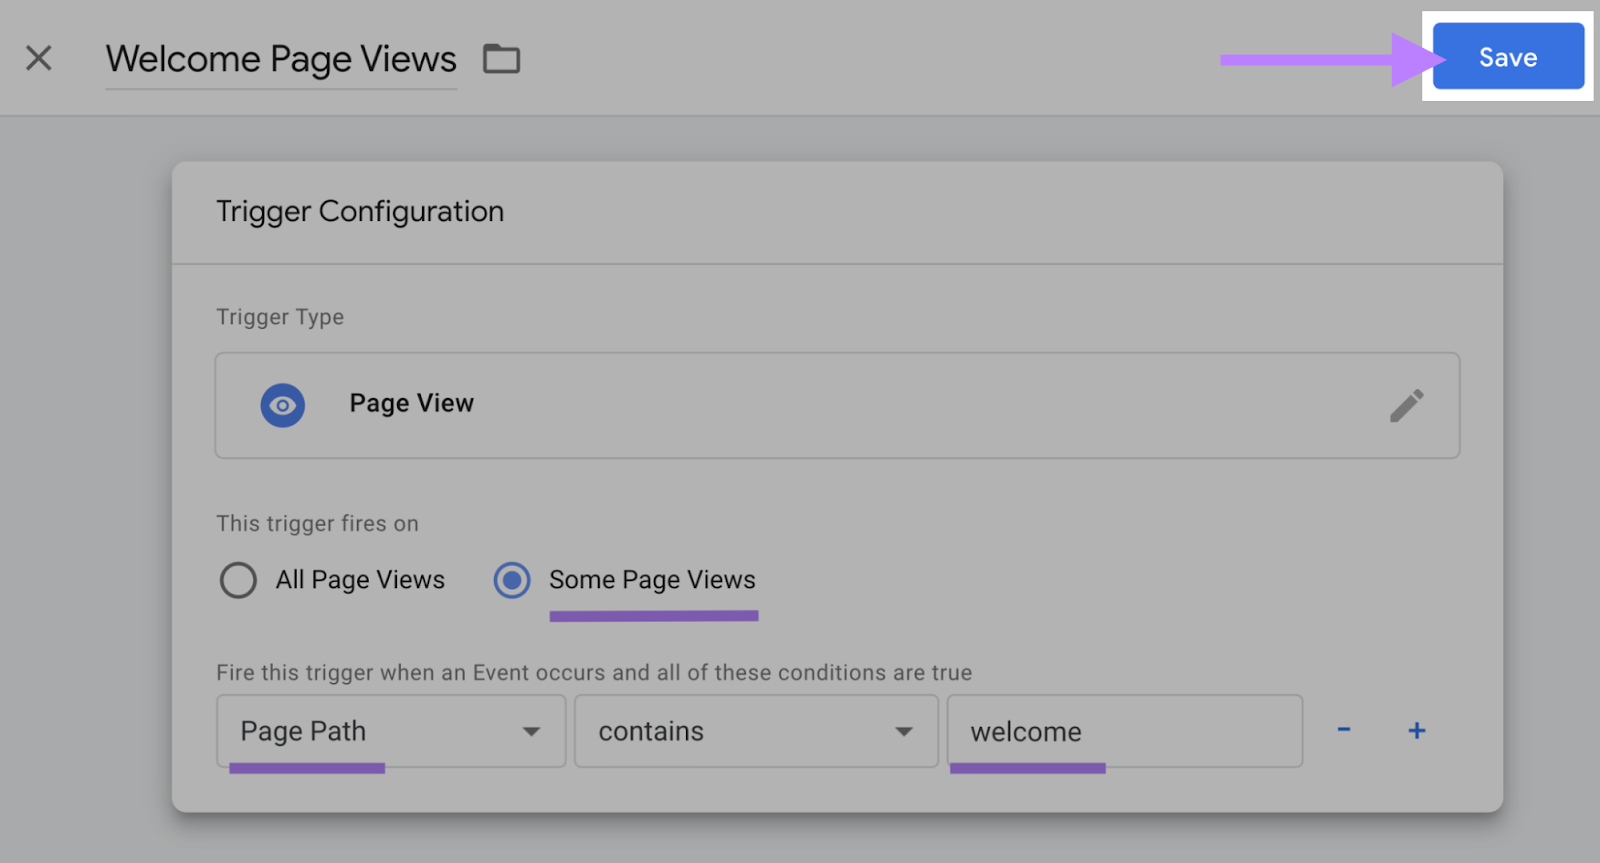
You’ll now be taken back to the screen with the “Tag Configuration” and “Triggering” modules.
Once again, click “Save” in the upper right corner.
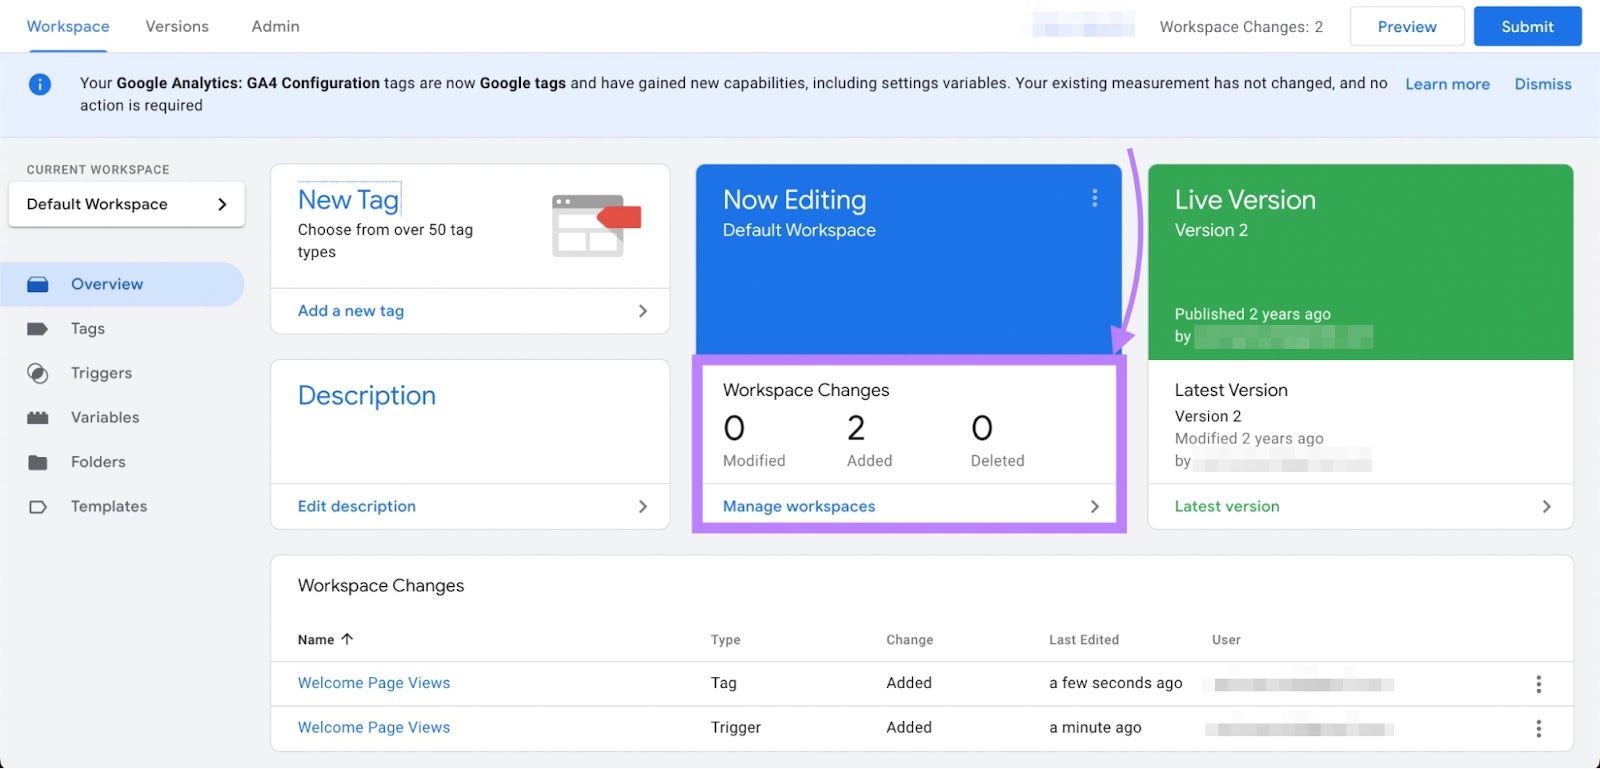
You’ll be taken back to the “Overview” screen. And you can see it now says “2 Added” under “Workspace Changes” to indicate that you’ve created a new trigger and a new tag.
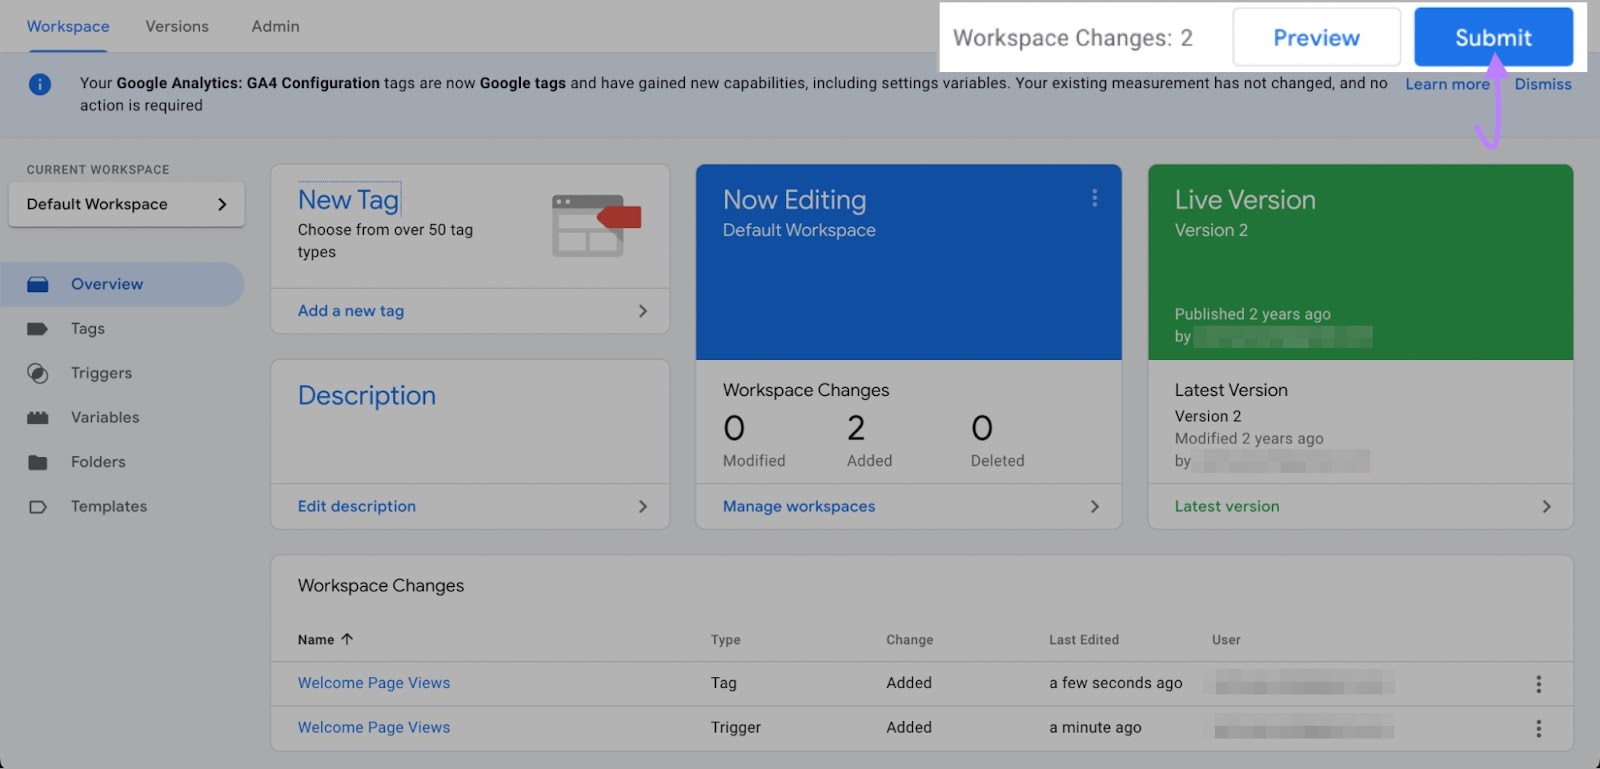
To push the changes live, click “Submit” in the upper right corner.
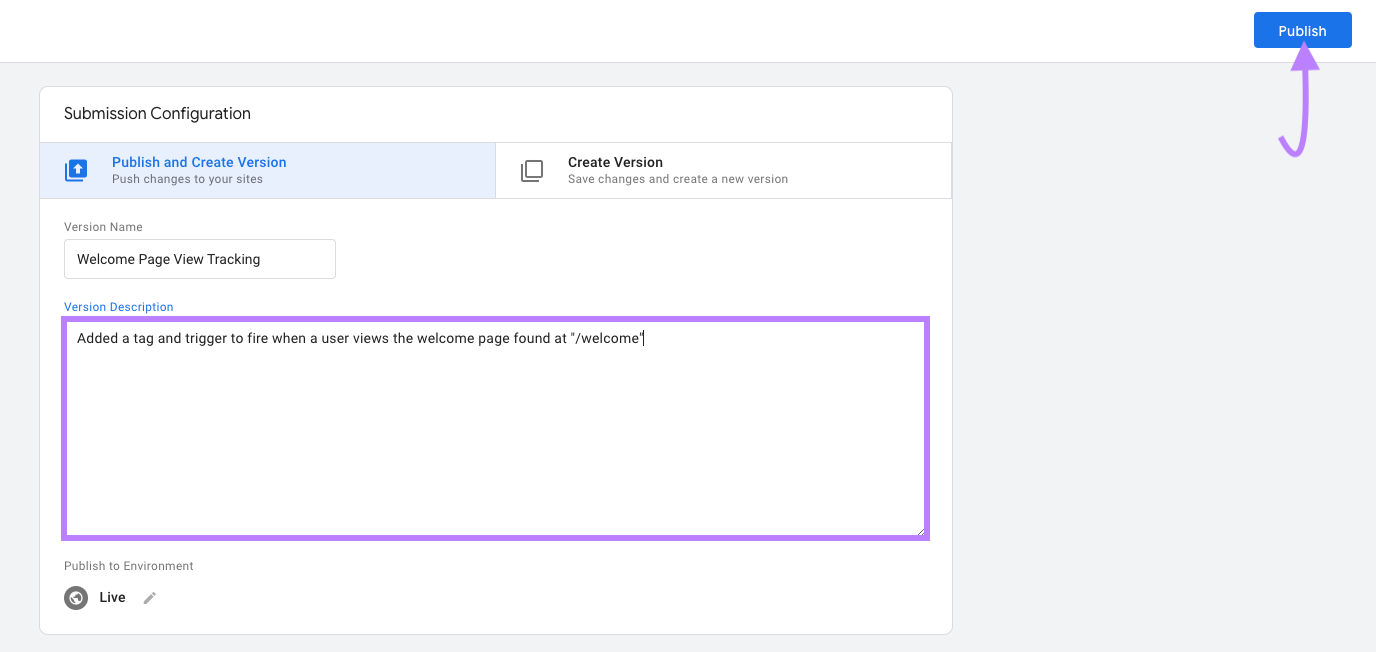
In the screen that appears, you’ll need to add a name in the “Version Name” field and a description in the “Version Description” field.
Then, click “Publish.”
How to Make Sure Custom Events Are Being Tracked in GA4
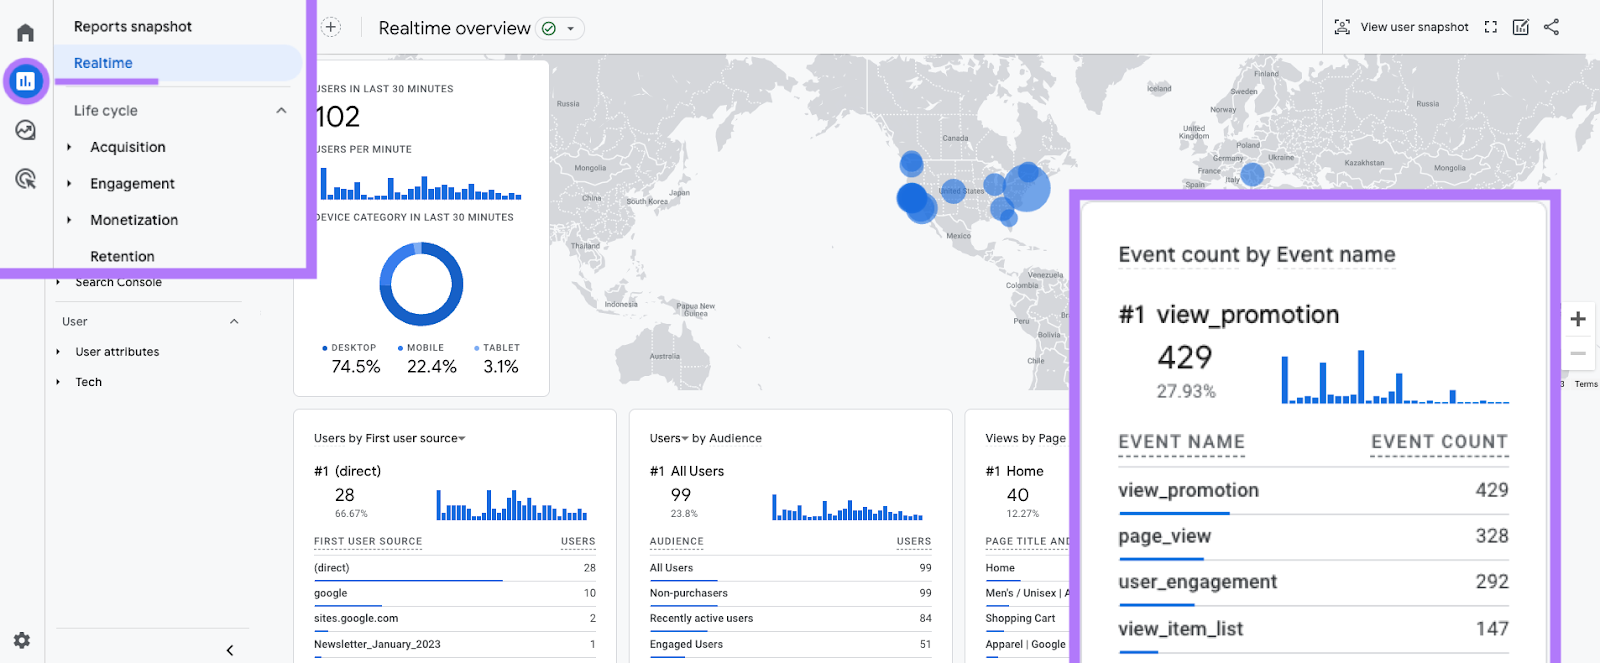
Now that you’ve created your custom event, you’ll want to make sure it’s firing properly using the “Realtime” report. Which shows activity from the last 30 minutes.
In GA4, click “Reports” > “Realtime.” You can manually trigger your event (by viewing your welcome page, in this case). Then, see if it appears in the “Realtime” report.
If your event is being tracked, you should see your “welcome_page_view” event show up under “Event count by Event name.”
Using DebugView in GA4 to Check Custom Events
If you’ve tested your event and aren’t seeing it in the “Realtime” report, try using “DebugView” in GA4.
This feature provides visibility into how your custom events are being captured and processed—ensuring accurate and effective tracking.
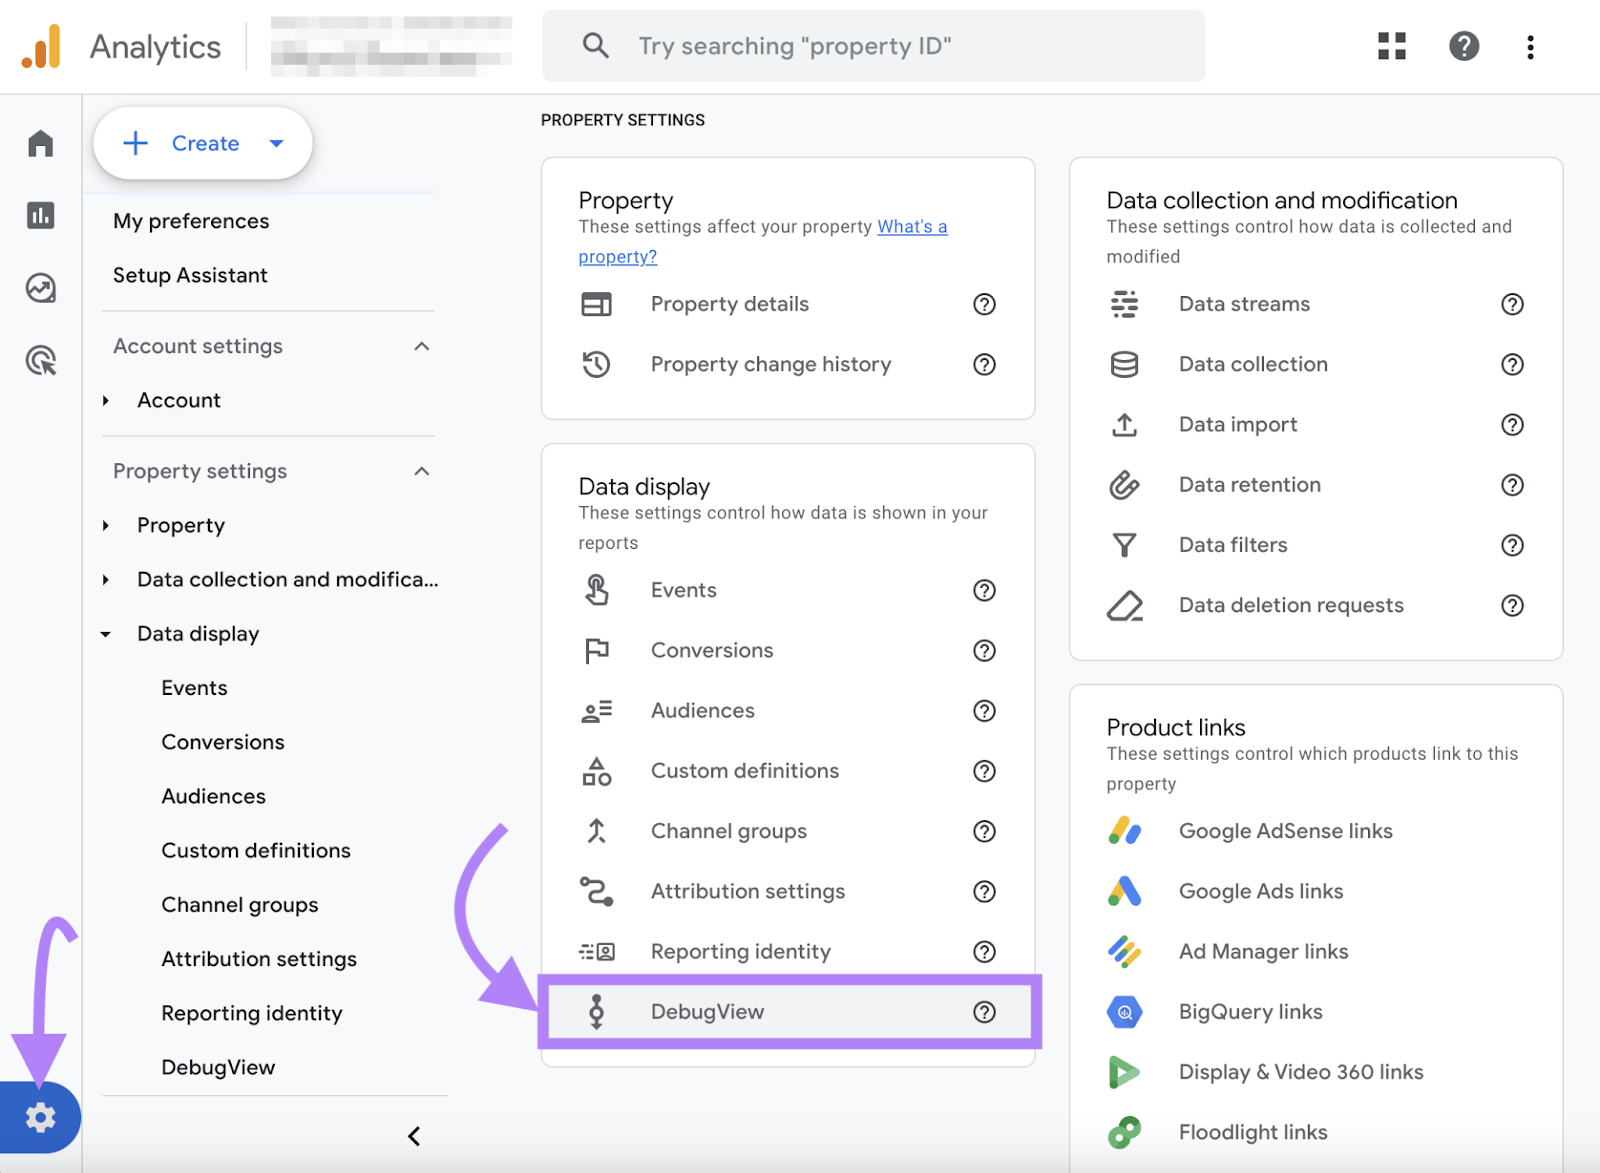
You’ll first have to enable debug mode for the device(s) you’ll be using to test.
Once you do that, click the admin icon and select “DebugView.”
Here, you’ll see a real-time stream of events, allowing you to immediately validate and troubleshoot your custom event implementation.
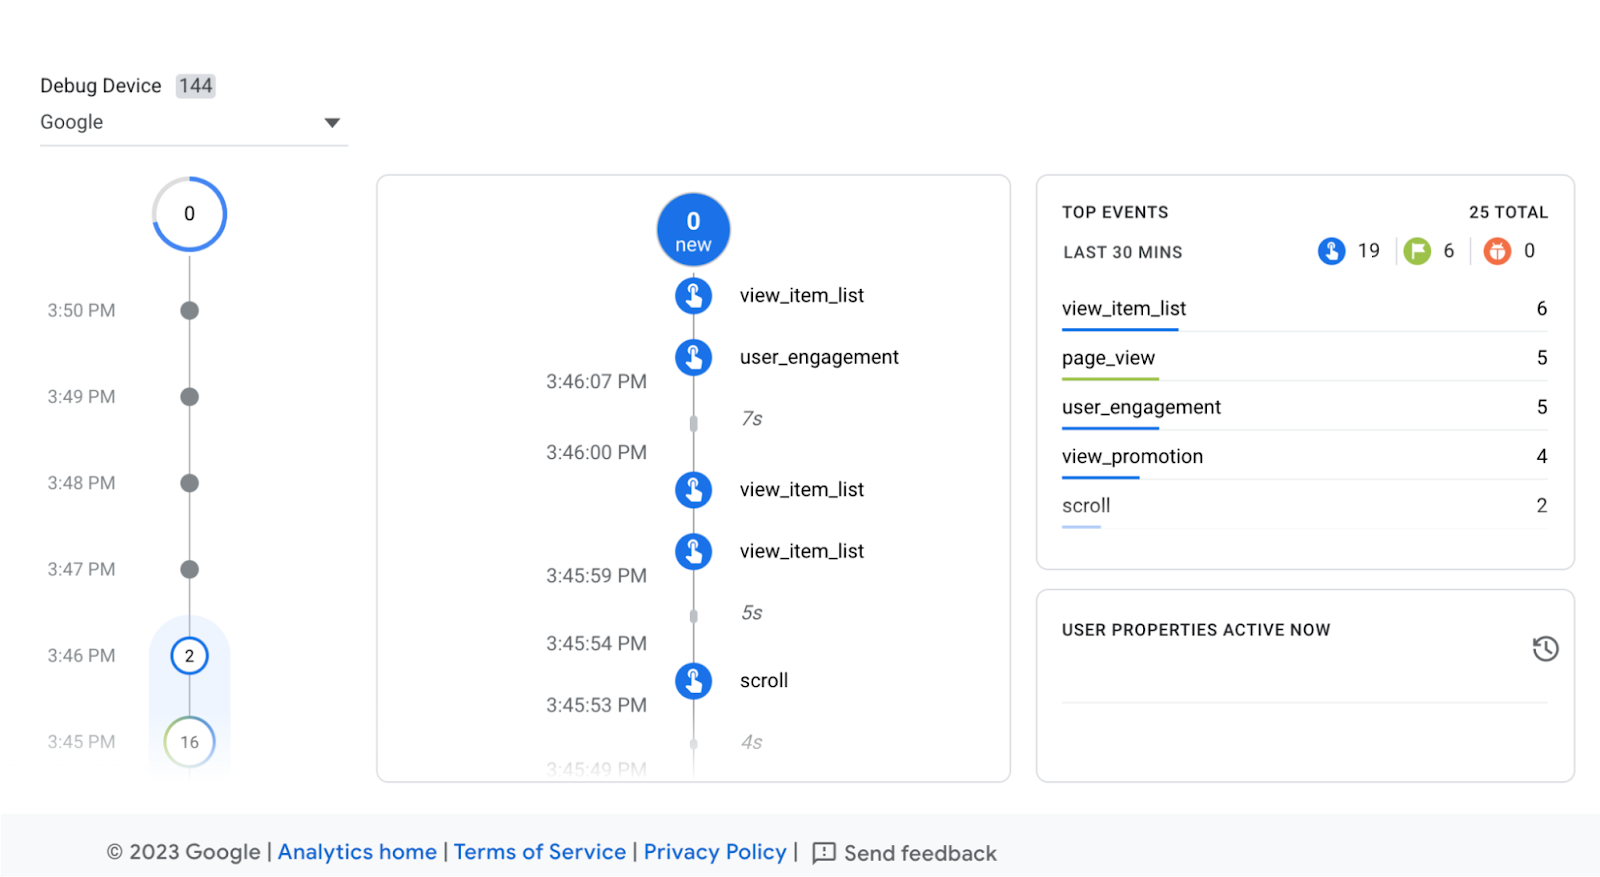
Image Source: Google
How to See Custom Events in GA4 Reports
You’ve created your custom event and checked to see that it works. Now, it’s time to view the data you wanted to track with this event.
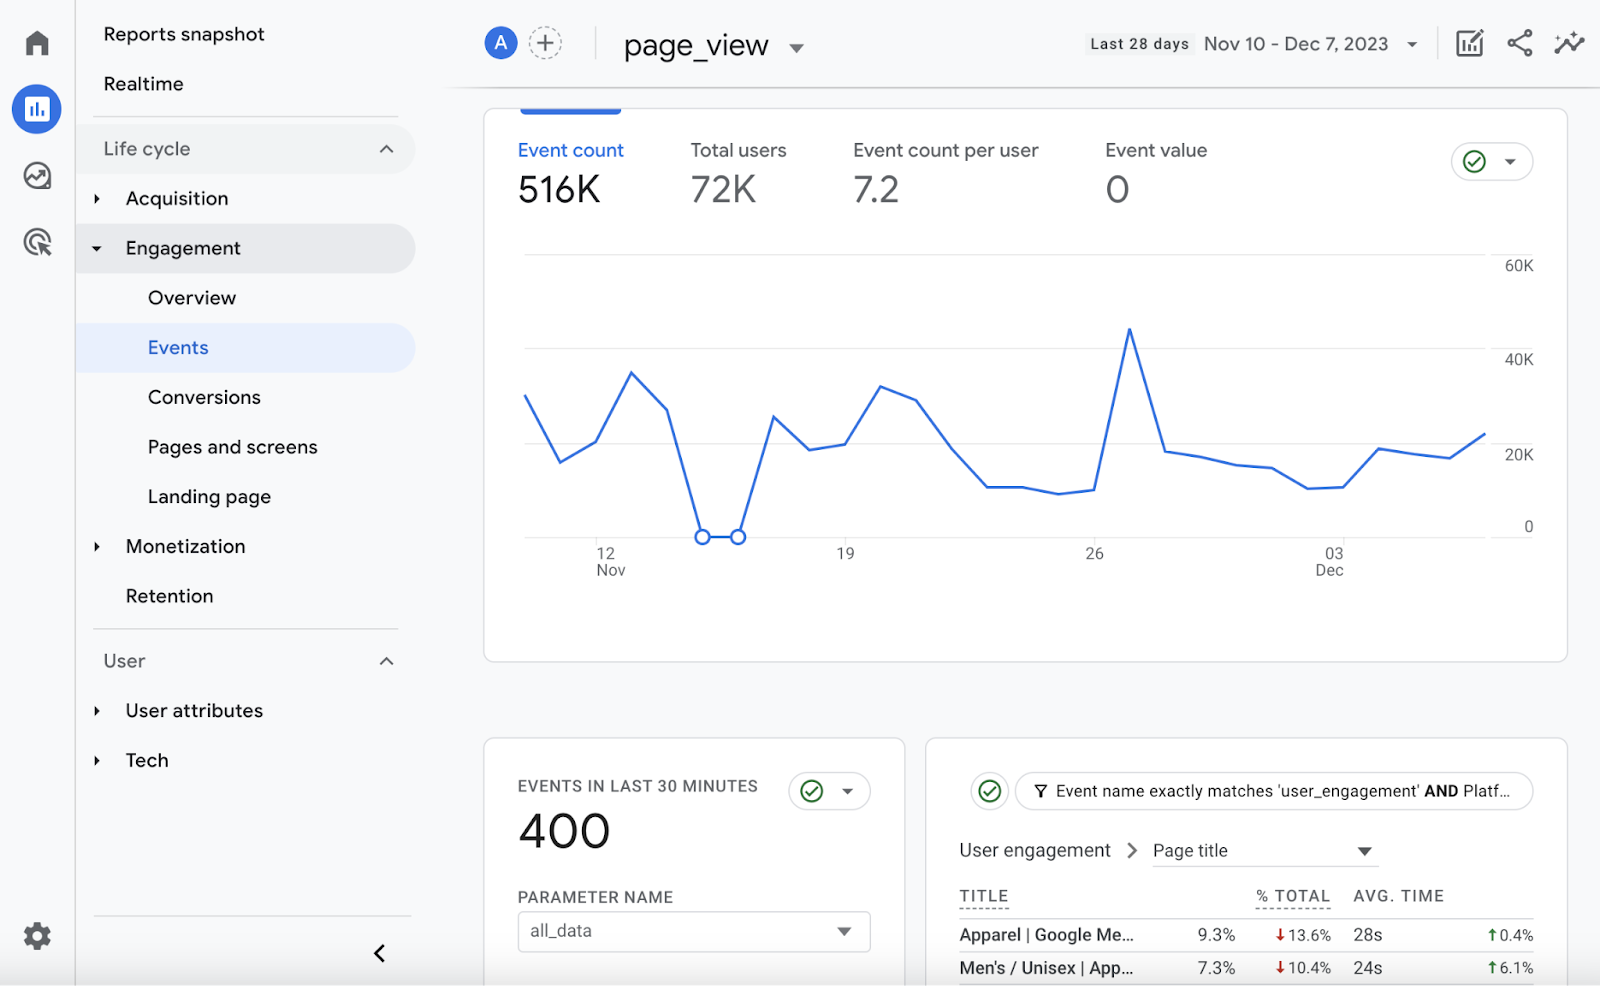
The “Events” report shows all of the tracked events that occur on your site.
In Google Analytics, click “Reports” > “Engagement” > “Events” to view the “Events” report.
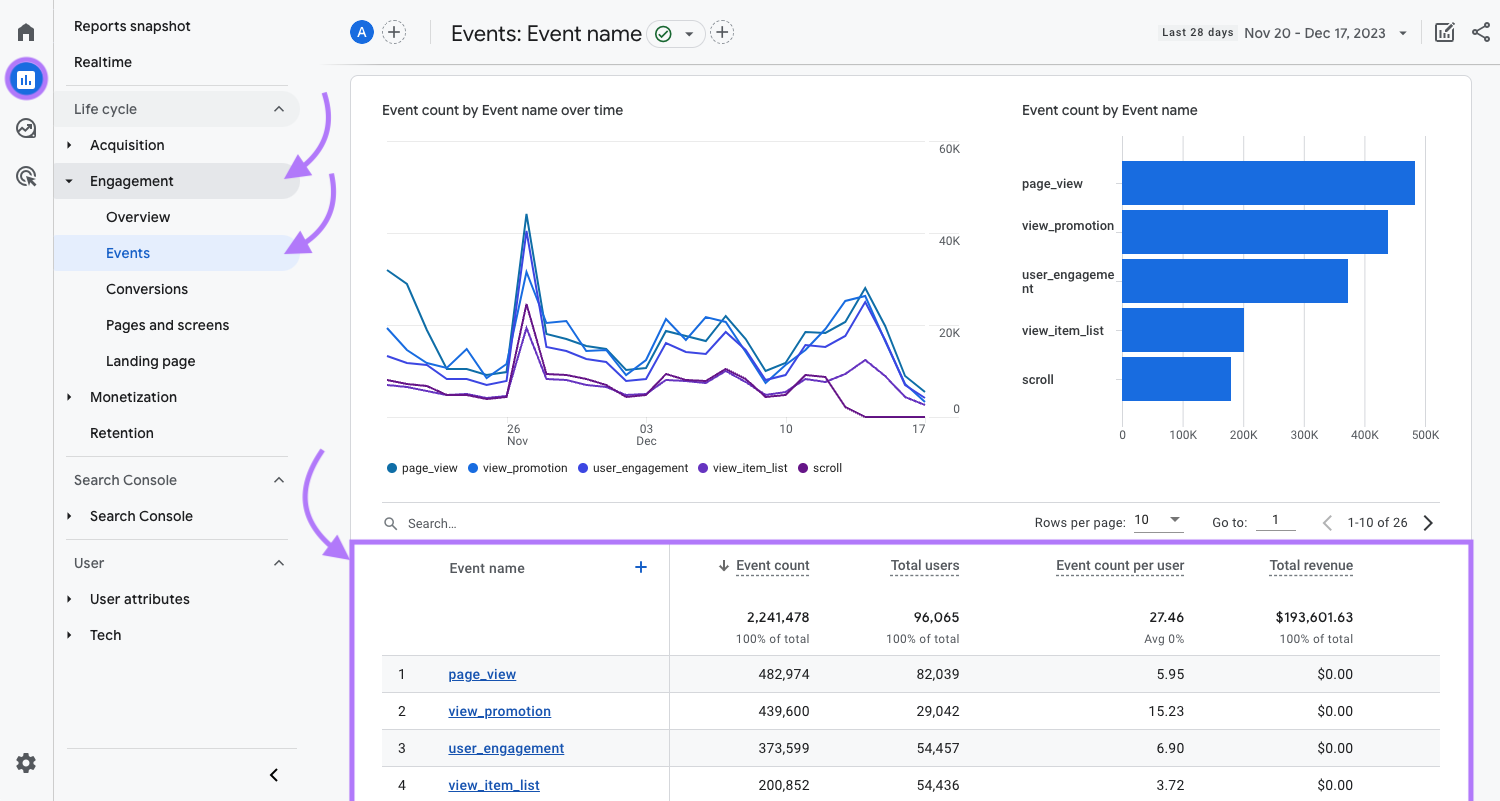
Click on your custom event in the table at the bottom to view more detailed data, such as how many users triggered the event and information about the parameters.
Setting Custom Events as Conversions
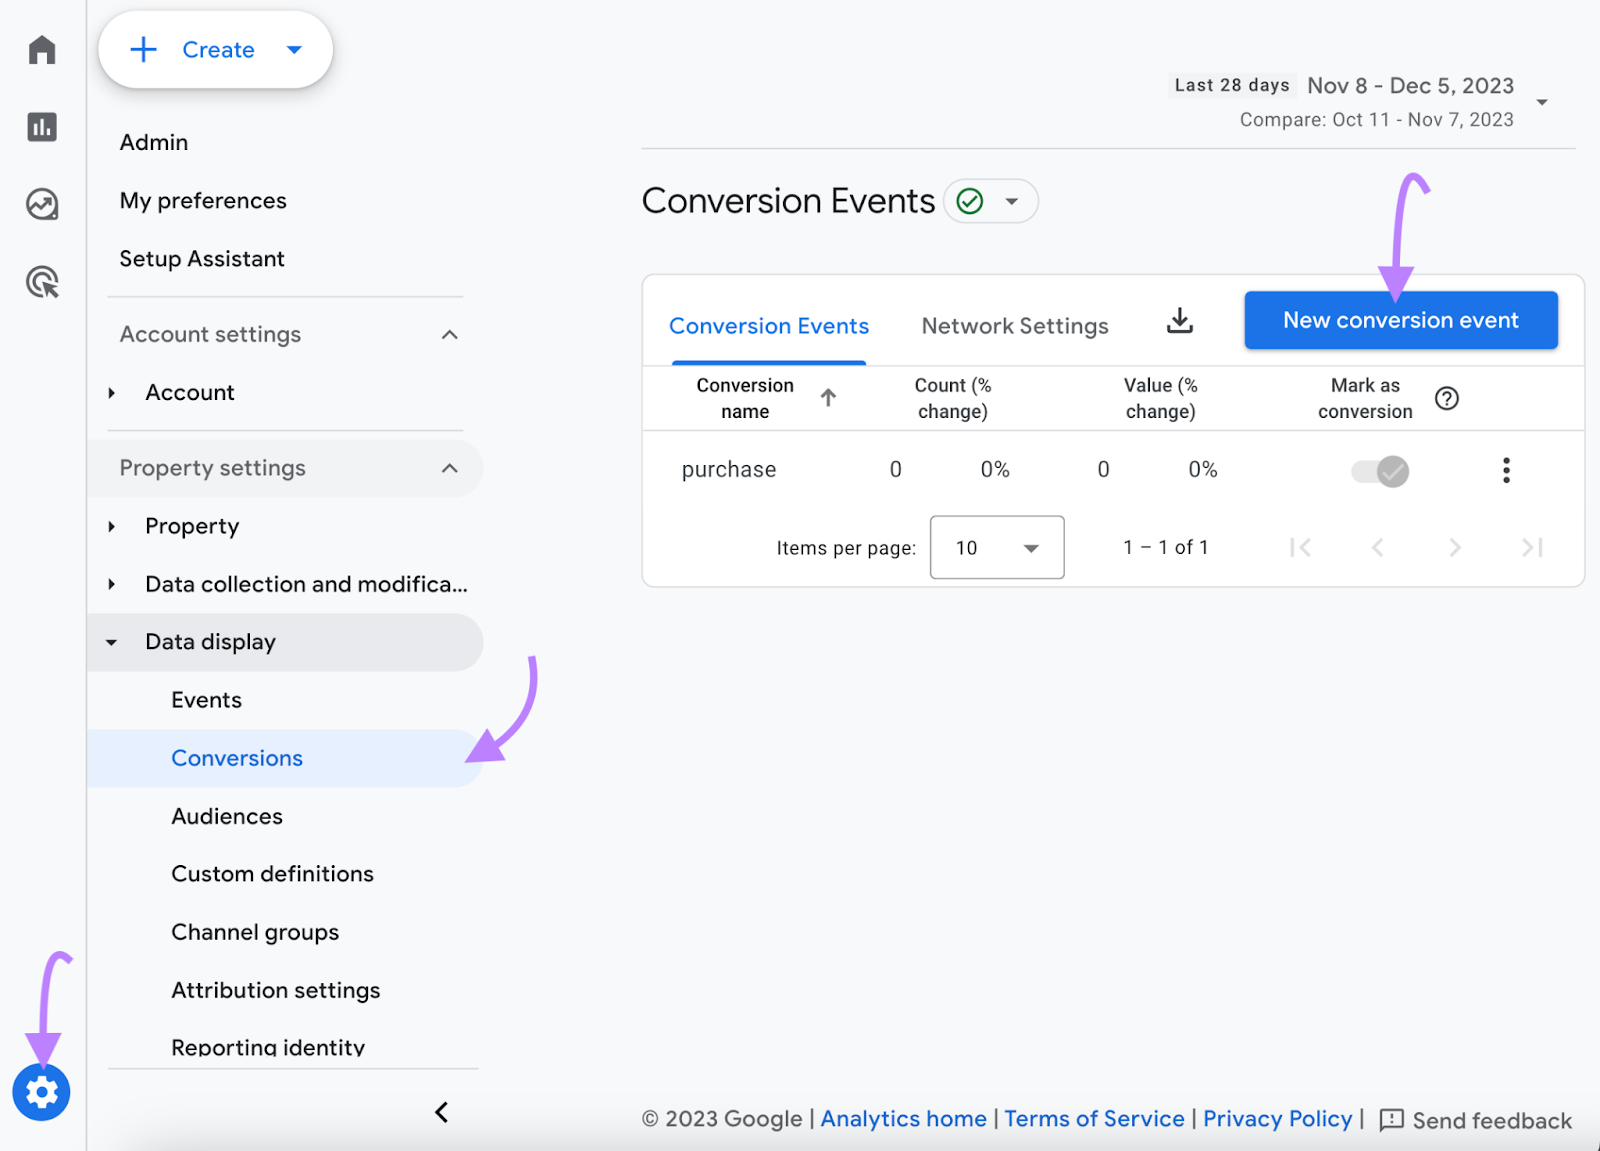
Let’s say you want to designate your newly created event as a conversion in Google Analytics 4. Because it provides valuable insights into your website’s performance or user engagement.
Here’s how:
Navigate to the admin section by clicking the gear icon. Then, go to “Conversions” > “New conversion event.”
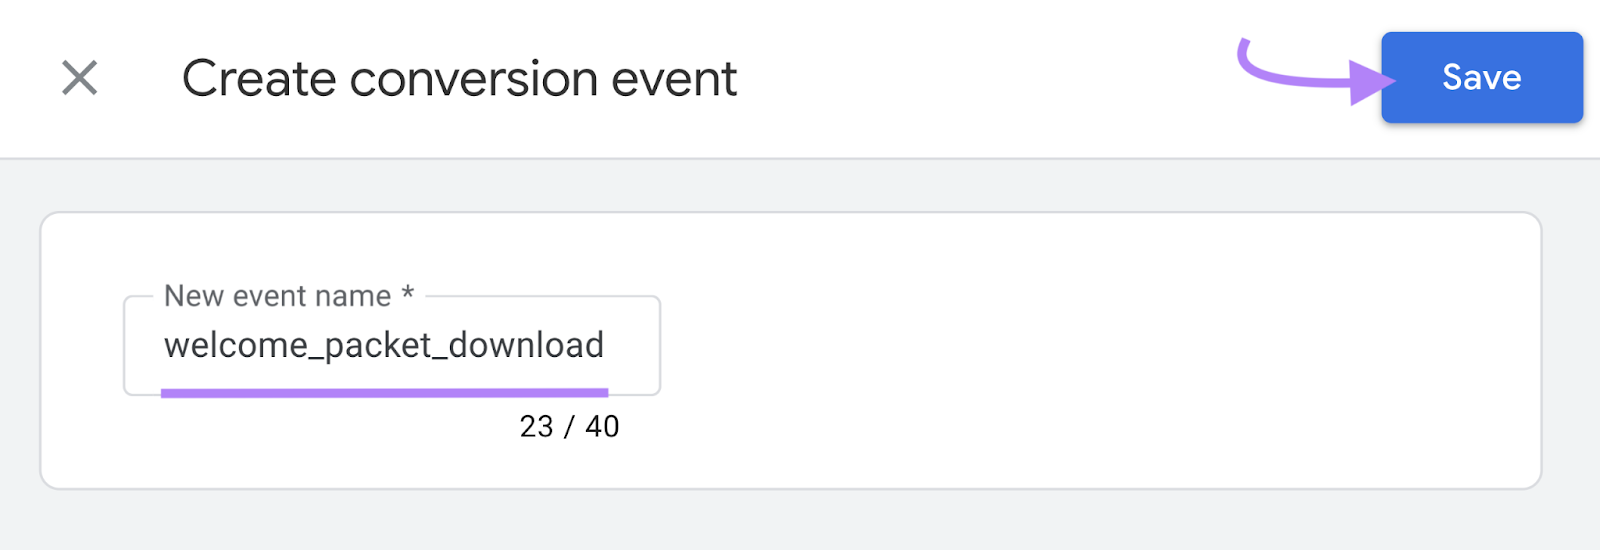
Then, simply add your custom event name and click “Save.”
Unlock Insights with Custom Events
Implementing custom event tracking in GA4 is your key to unlocking nuanced insights into user behavior by monitoring customized metrics that matter to your business. Whether it’s newsletter subscriptions, asset downloads, button clicks, or other crucial interactions.
By tailoring your approach, you can pinpoint specific user activities, drill down into granular data, optimize your strategies, and harness the full potential of GA4.
But that’s just the beginning. You can also use Semrush’s Organic Traffic Insights to combine data from Google Analytics 4, Google Search Console (GSC), and Semrush into a single dashboard.
It allows you to seamlessly analyze landing page performance, keywords, and other crucial metrics—including conversions:
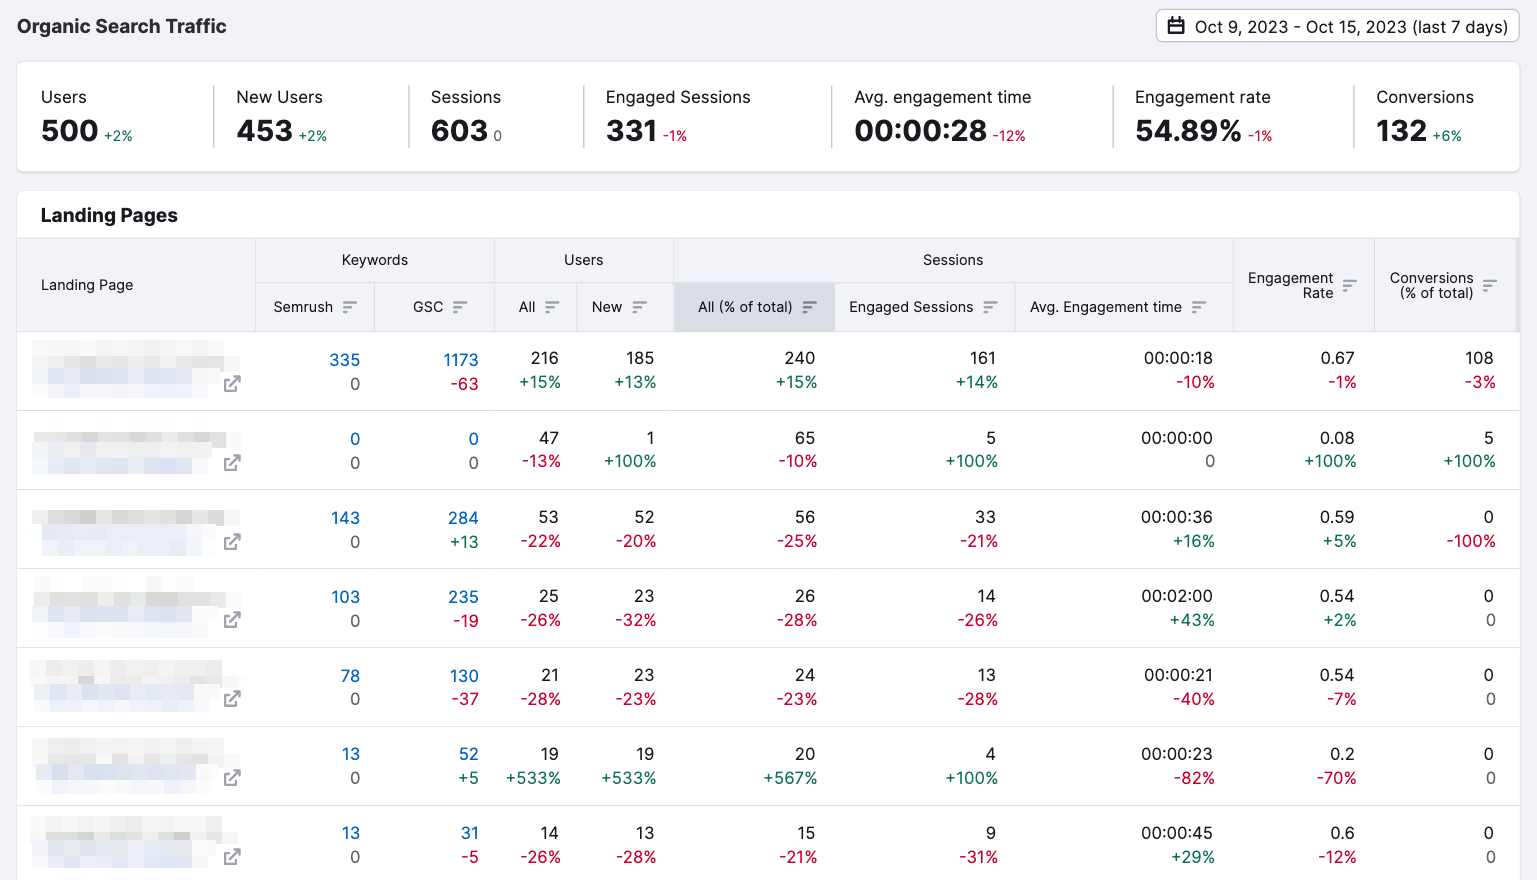
Then, you can leverage this data to inform your decision-making.
Source link : Semrush.com

