This article shows you how to use ConvertKit. You’ll learn how to:
- create an opt-in form
- create an email sequence
- connect an email sequence to a form
- connect your form to a lead capture tool
- send out an email broadcast
- tag subscribers and purchases
- create segments
- use link triggers

ConvertKit is a powerful email marketing service created expressly for bloggers and ‘creative people’ who don’t want to get bogged down with technical stuff.
The automations in some platforms are so complex that you either need to spend a month learning how to use them or hire a specialist to set it all up for you. But this is not the case with ConvertKit.
ConvertKit allows you to automate your email marketing, using email sequences, automations, rules, tags, and segments. But at the same time it’s easy to understand and it won’t take you more than half a day to grasp how it works.
Let’s dive in!
#1 – The ConvertKit User Interface
The ConvertKit User Interface is easy to understand and quite intuitive. It has five main areas:
- Subscribers
- Automations
- Landing Pages & Forms
- Sequences
- Broadcasts
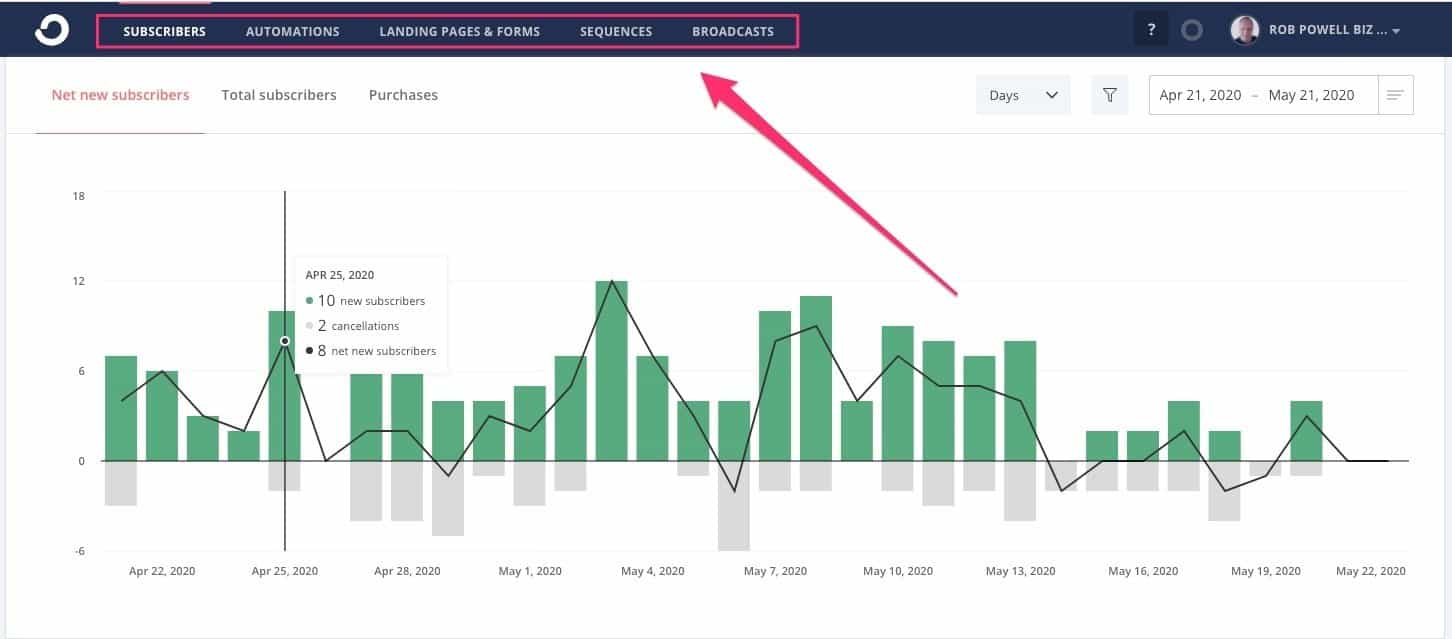
In this tutorial, we’ll be visiting each of these five areas.
#2 – Creating Your First Opt-in Form
Email marketing begins with lead capture – adding email address to your list.
And for that, you need an optin form.
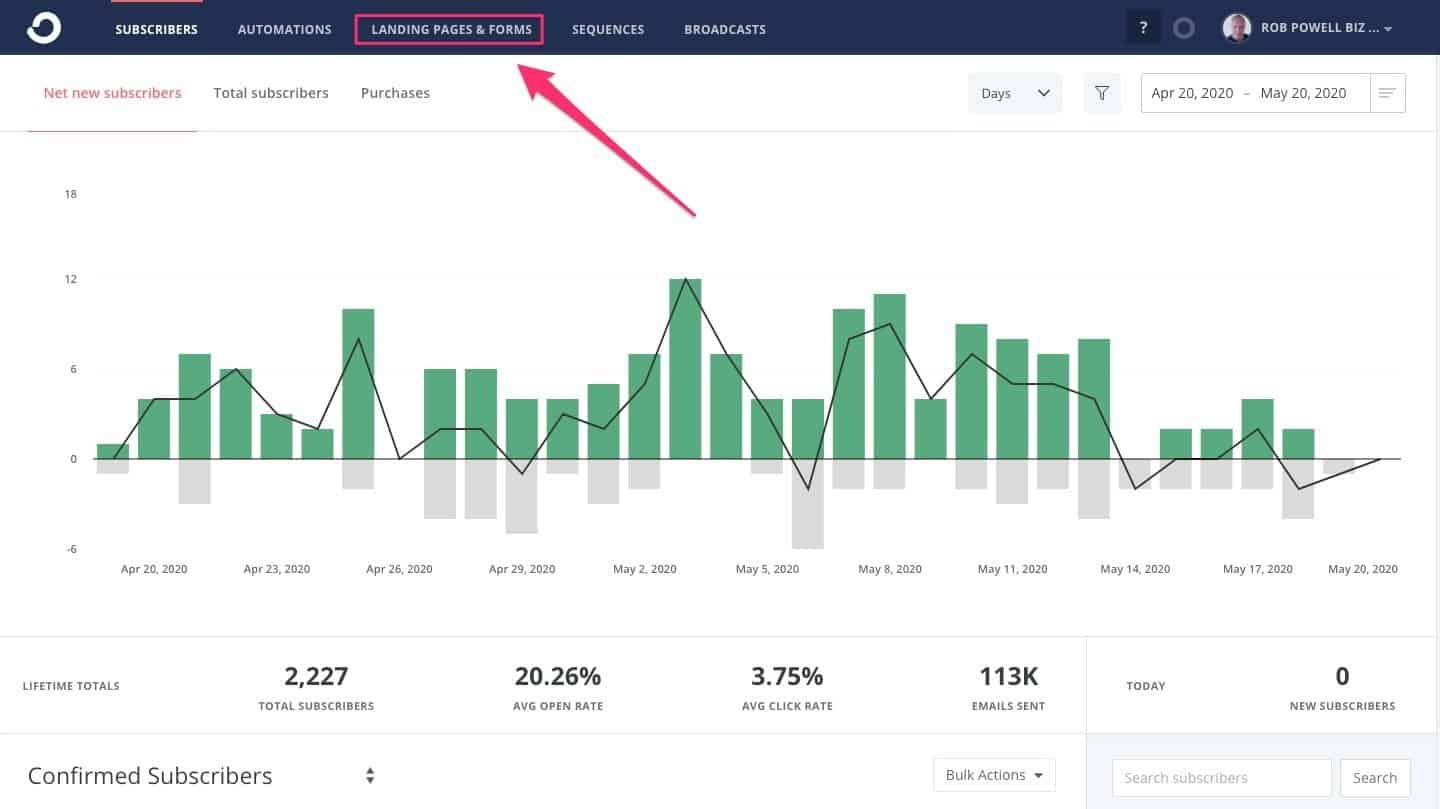
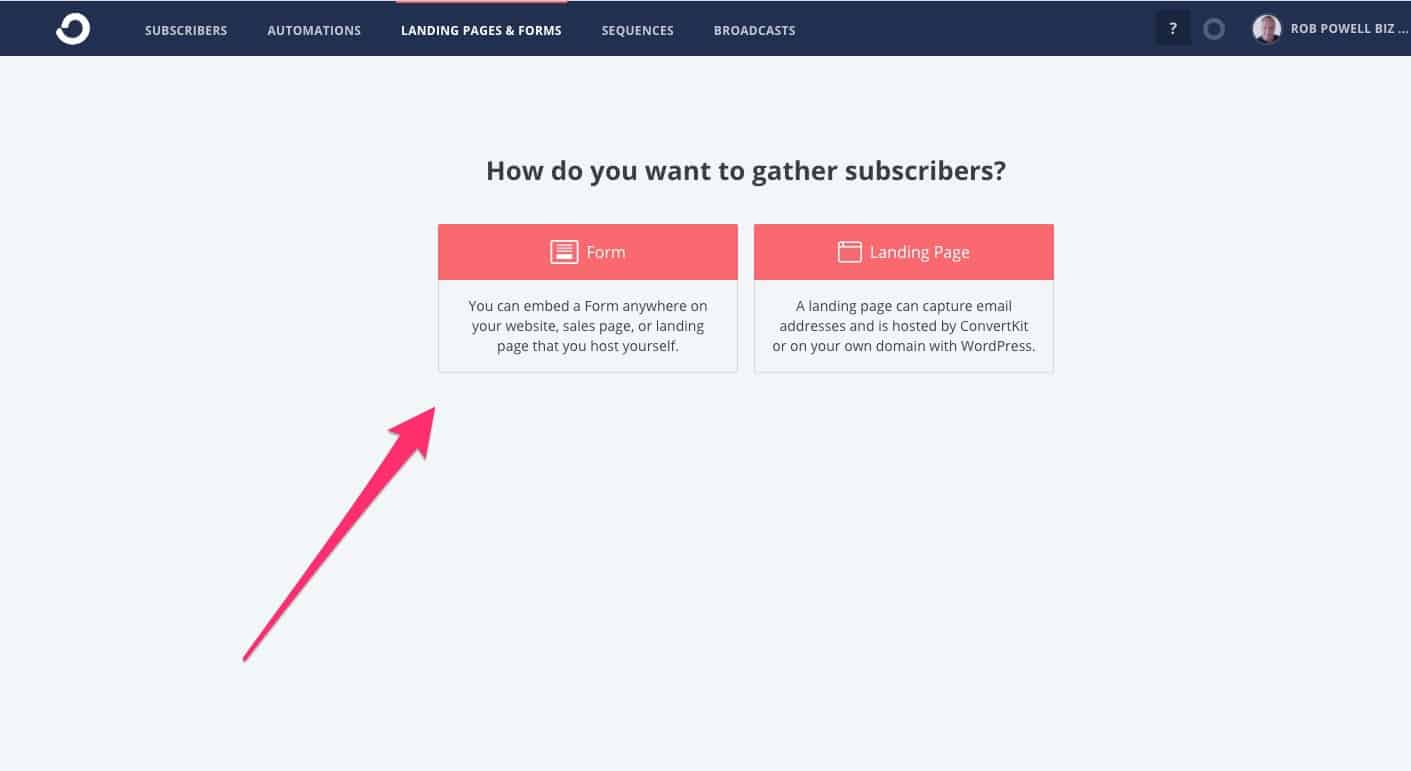
To create a form, click on ‘Landing Pages & Forms’:
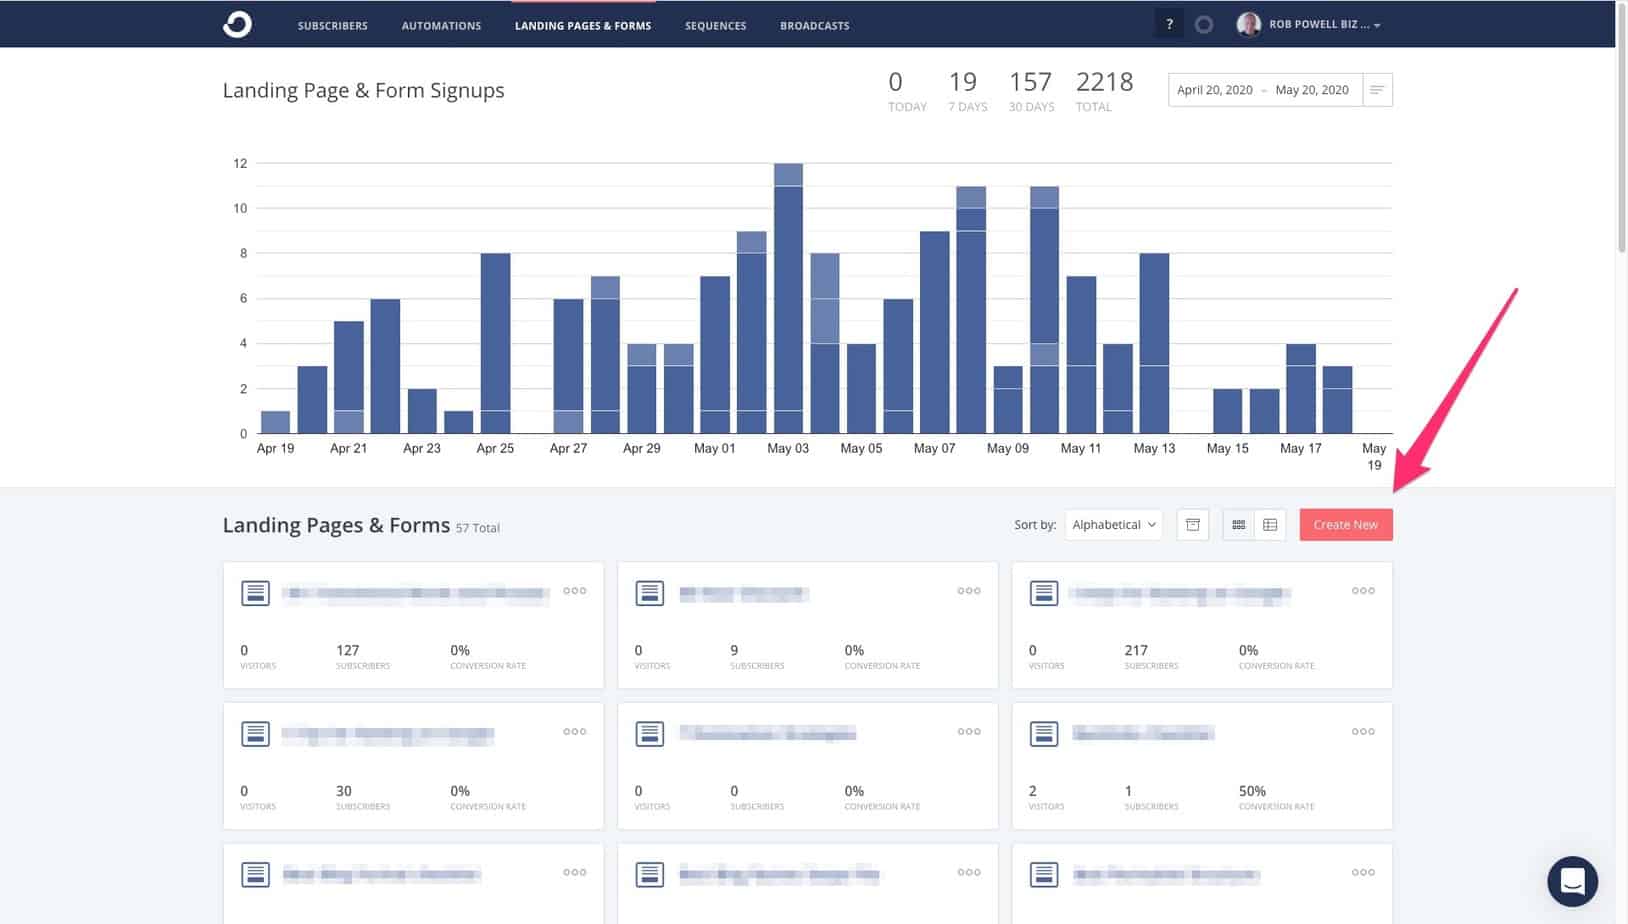
On the next screen, click ‘Create New’:
Four Different Kinds of Forms
You’ll then have to choose one of four options:
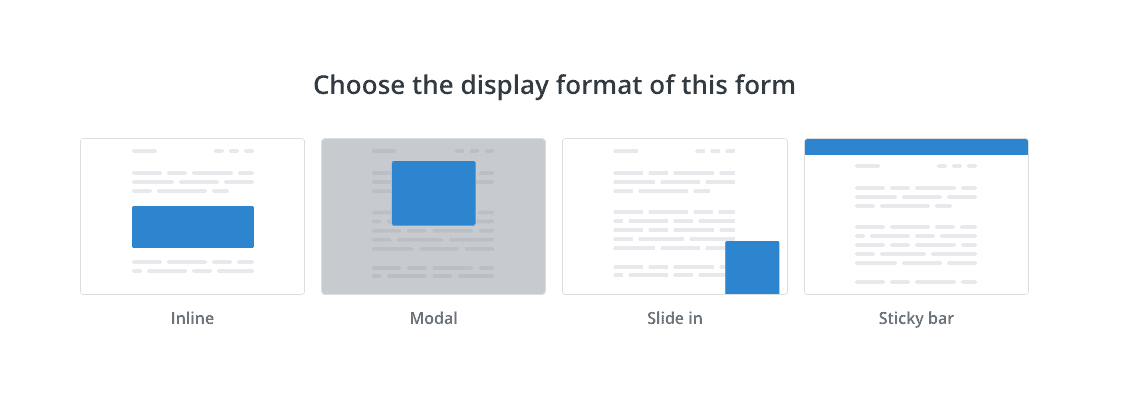
So what are these different types of forms?
- an inline form is an optin box that you embed within an article or blog post
- a modal form is a popup that triggers when your visitor arrive son your page or is about to exit your page.
- a Slide-In is a form that slides in, usually from the bottom right corner, when your visitor reaches a certain point in your page.
- a Sticky Bar is an optin form that sits at the top of your page.
Optin Forms and Third Party Lead Capture Tools
You can install these four different kinds of forms directly on your website. But most people (myself included) use third-party lead capture software, such as OptinMonster (a web-based tool) or Thrive Leads (a WordPress plugin).
If you’re using third-party lead capture software, you still need to create a ConvertKit form. You just won’t be installing that form on your website. But more about that later.
Let’s say, for the purpose of this tutorial, that you’re going to install the ConvertKit form directly on your website.
In this example, I’m going to choose an Inline form. That’s the kind of optin form you would see in an article. Inline forms are often used for content upgrades.
Customizing Your Optin Form
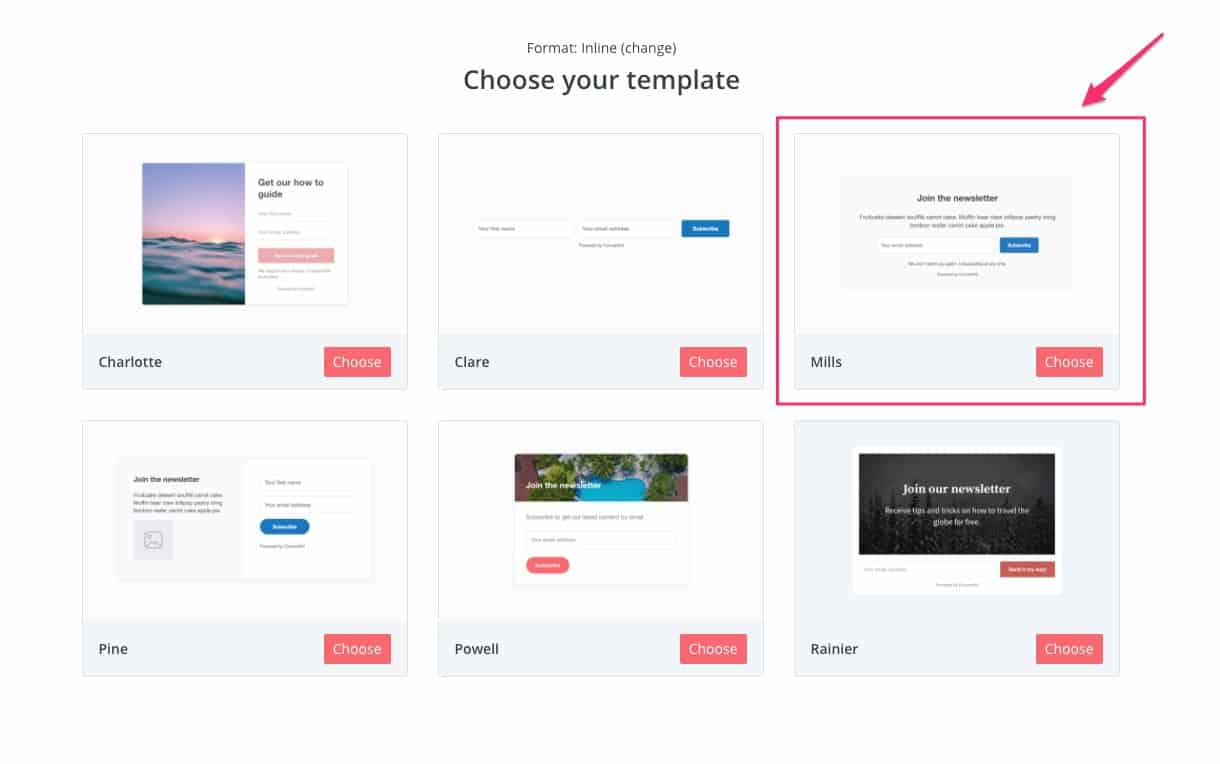
On the next screen, you’ll see six different form templates. Let’s go with the simplest, the one named ‘Mills’.
Click ‘Choose’:
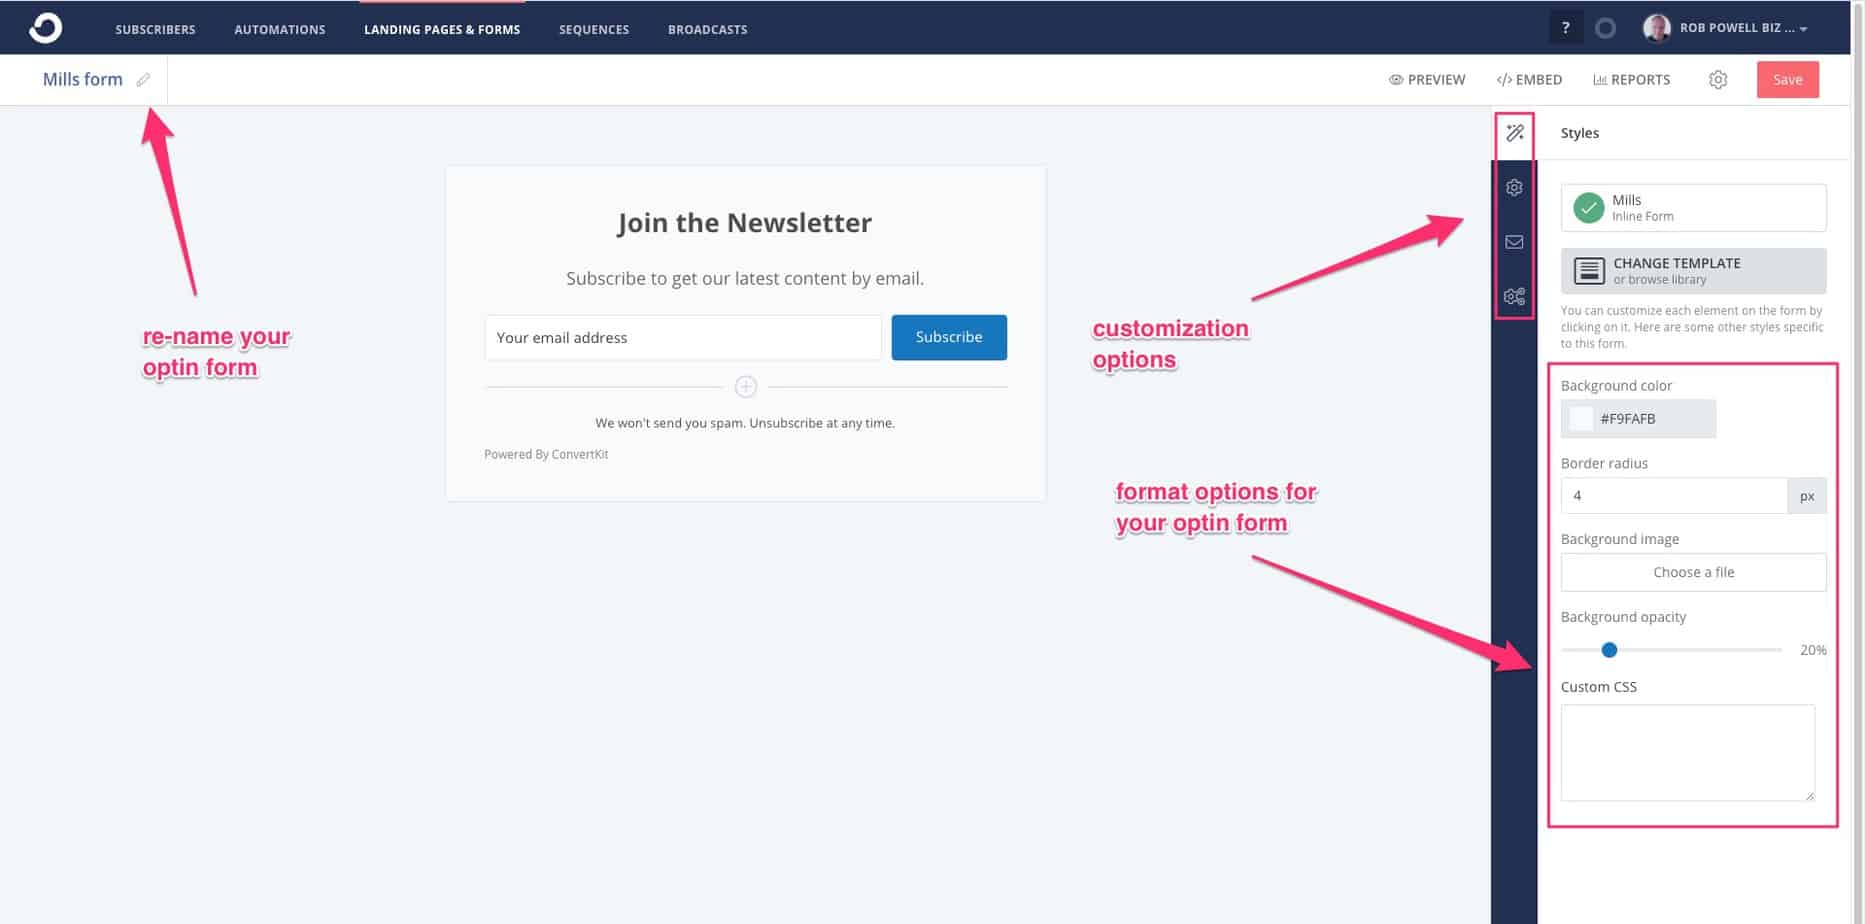
On the next screen, you’ll see four icons in the right-side panel. These are the main customization options for your optin form.
The first thing to do is to give your form a name that will help you remember where you placed the form on your website or what kind of content upgrade you are using with the form.
To do this, click on the pencil icon in the top left corner:
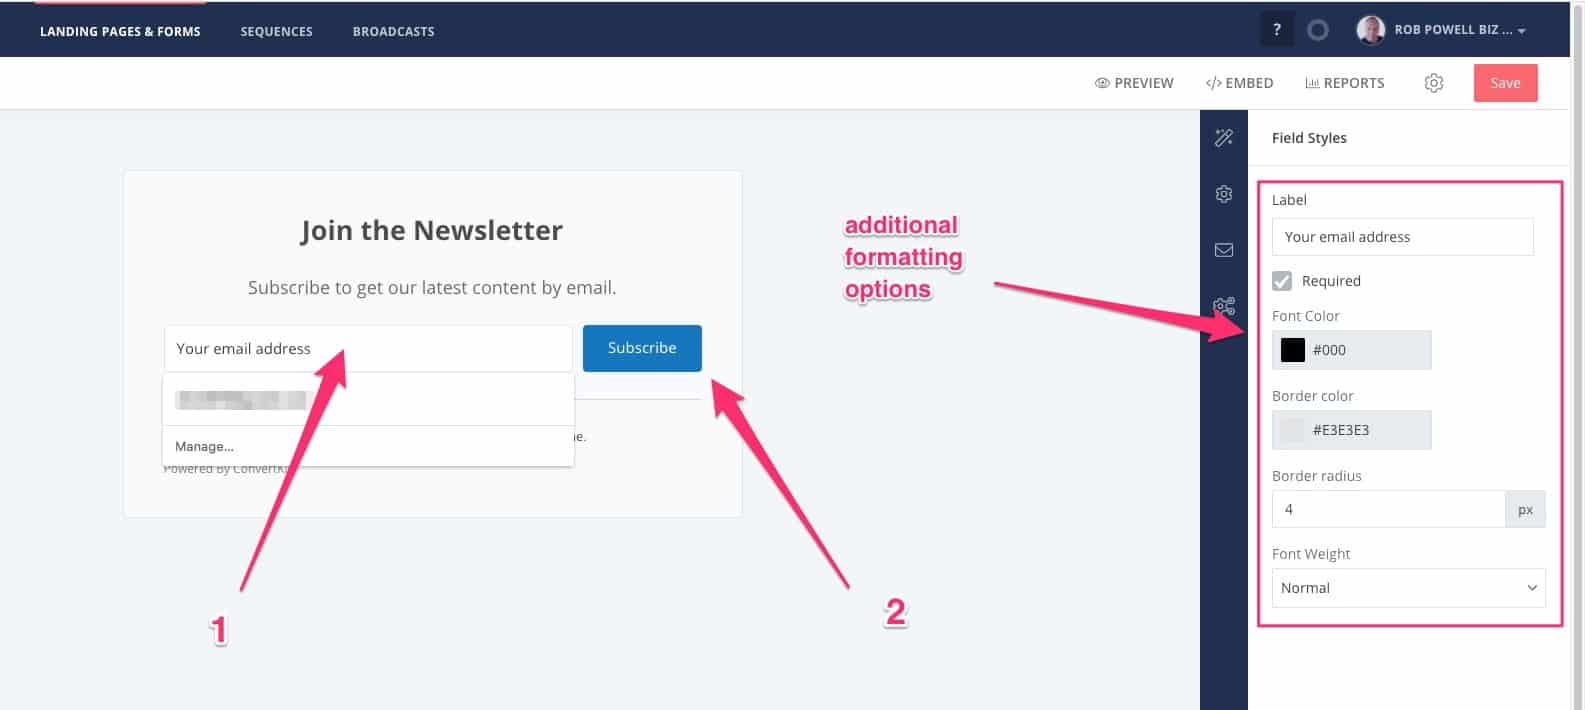
Next, click on the area of the form that says “your email address”, and you’ll see additional formatting options in the right-side panel:
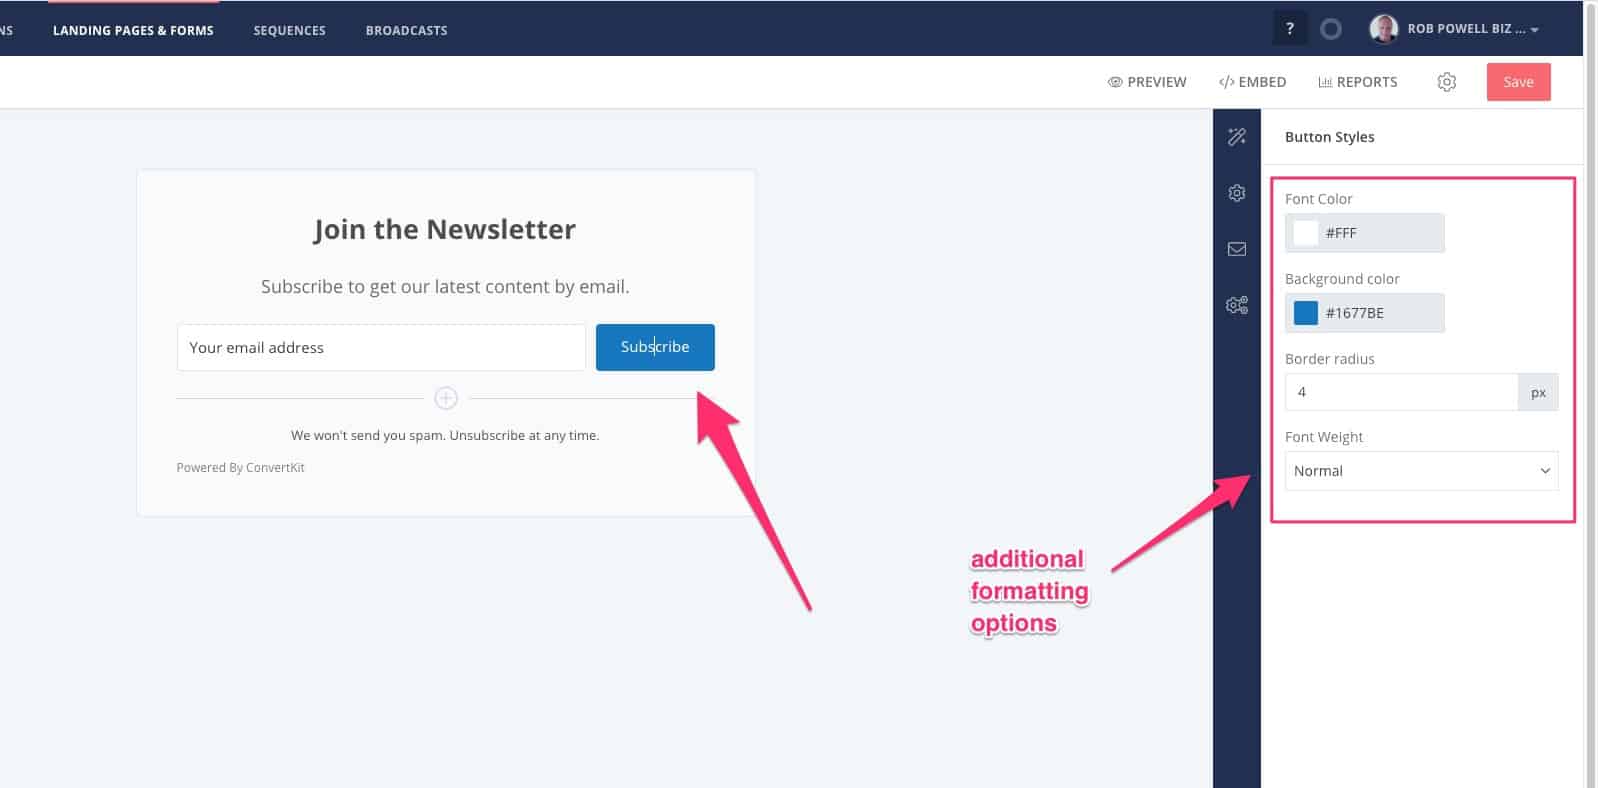
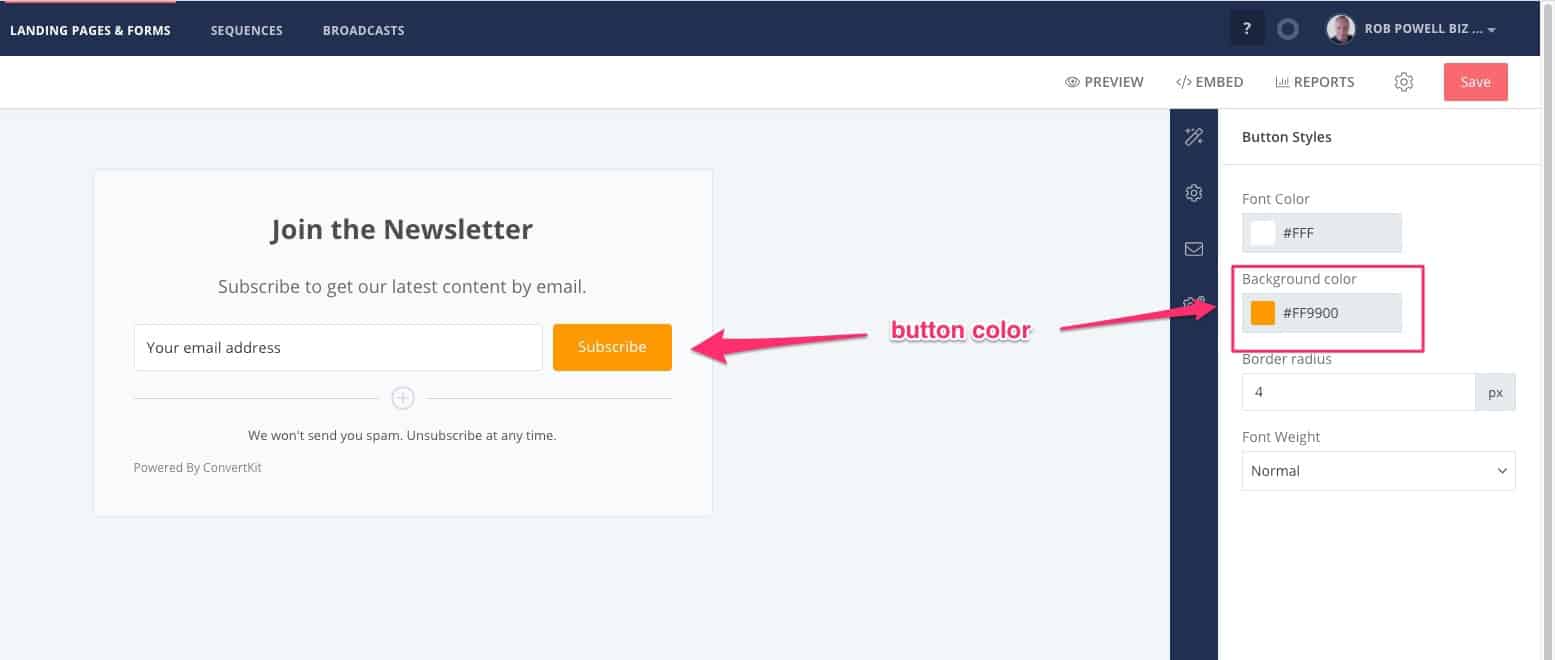
Then click on the ‘Subscribe’ button, and you’ll see some additional formatting options where you can change the color of the button:
Note that the color you choose for the button will determine the button color in the ‘Confirmation’ email.
Click on the second icon in the right-side panel and you’ll see some more customization options:
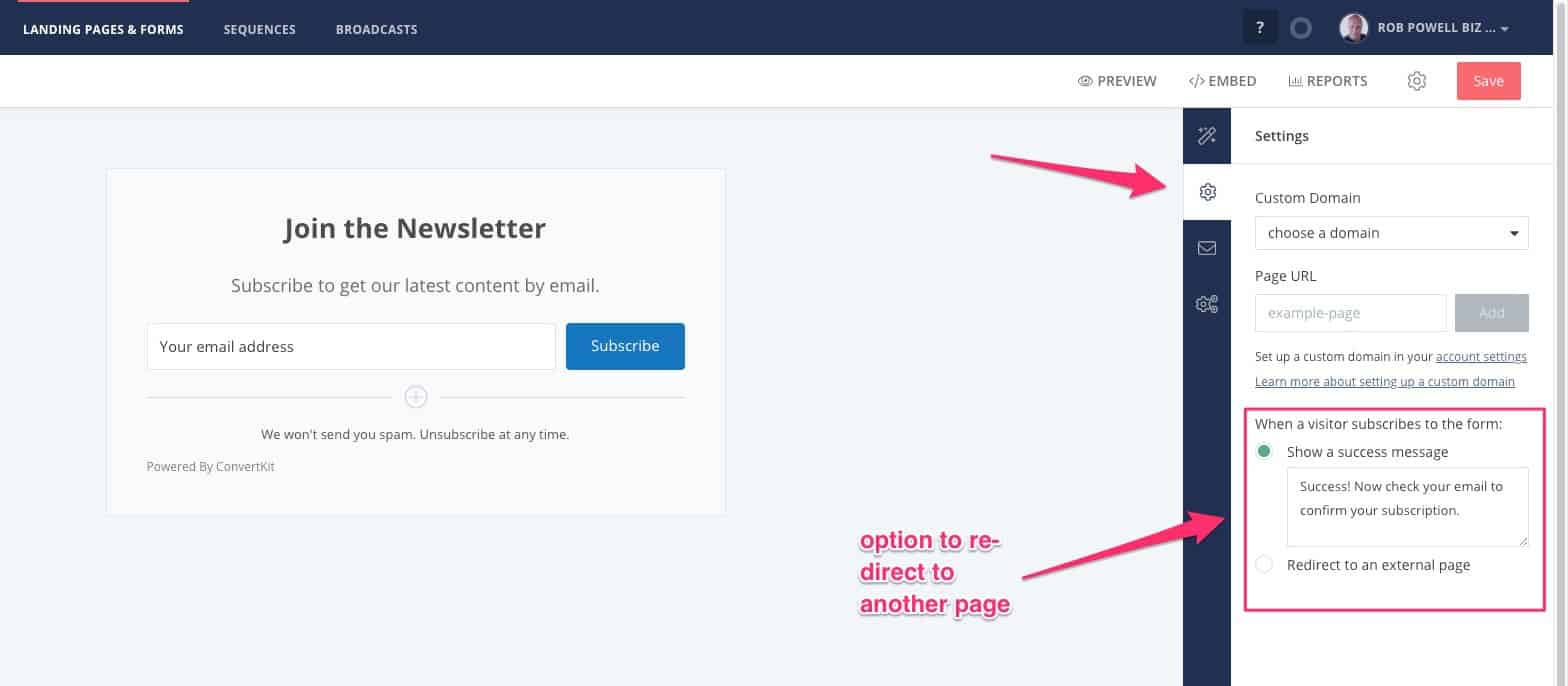
The most important options here are whether to show a success message or re-direct your subscriber to another page. Re-directing is a powerful feature if you want to present your subscriber with another free resource or even a premium offer.
ConvertKit’s Incentive Email
The third icon in the right-side panel is where you choose double-optin or single-optin.
By default, it’s set to double-optin and ConvertKit strongly recommends that you choose this option.
Double-optin protects you from complaints and it also ensures a higher deliverability rate and higher click-through rate. The reason for this is that if people have taken the extra step of clicking on a button in the initial email, it’s more likely that they are engaged subscribers who want your information.
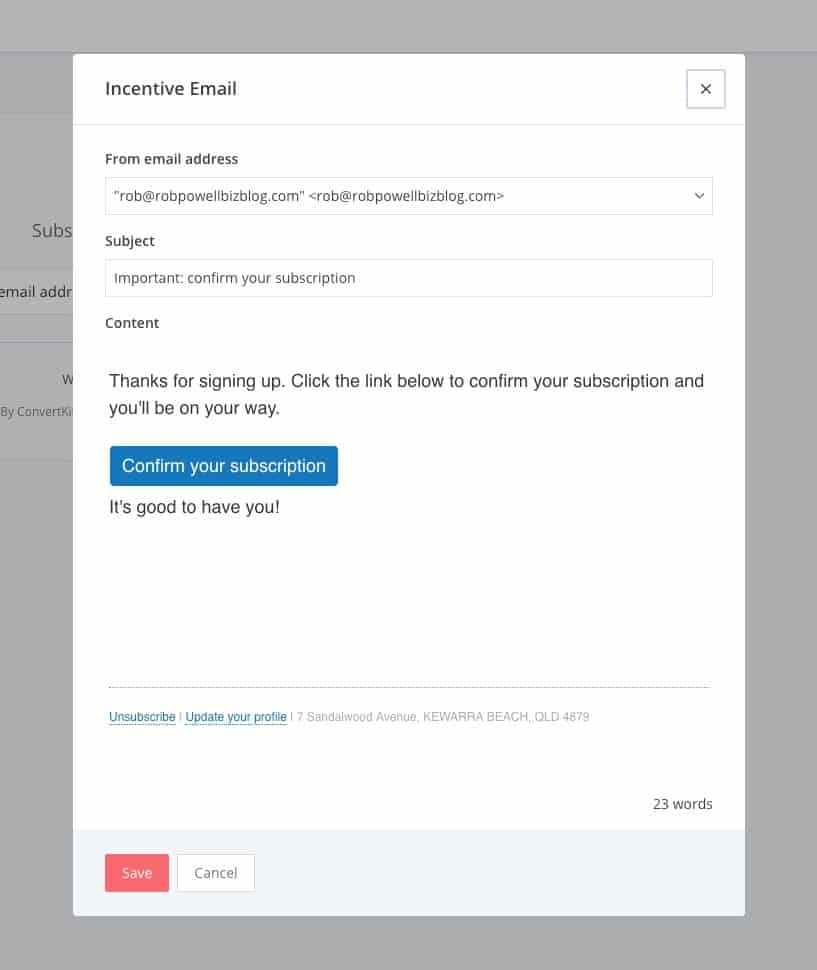
It’s important to realize here that ‘incentive email’ is ConvertKit lingo for ‘confirmation email’. When you have the ‘incentive email’ box checked, your subscribers will receive a confirmation email. And that means they won’t be added to your list until they click on the confirmation button in that initial email.
You can customize the content of your confirmation email by clicking on ‘Edit Email Contents’:
Just beneath the double optin / single optin option is a powerful feature that explains why so many bloggers **** ConvertKit.
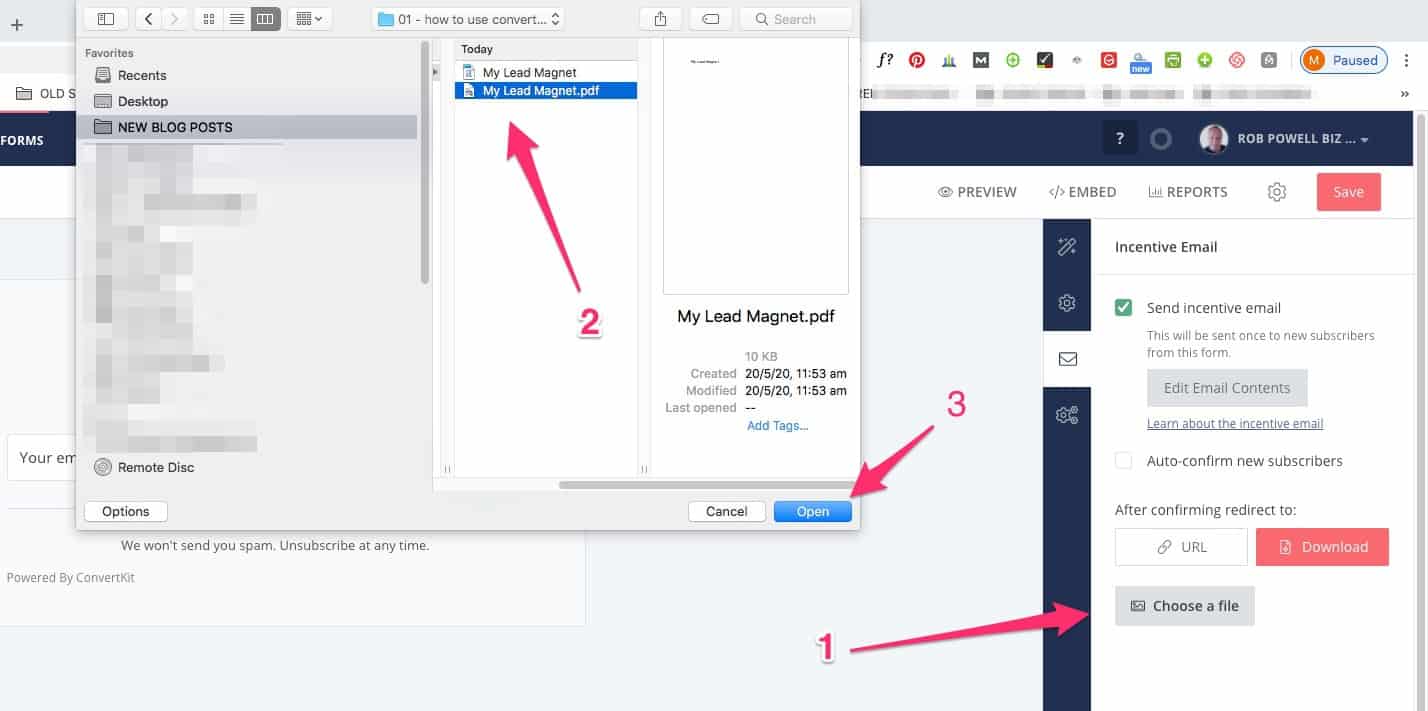
If you click on the ‘Download’ button, you’ll then be asked to choose a file:
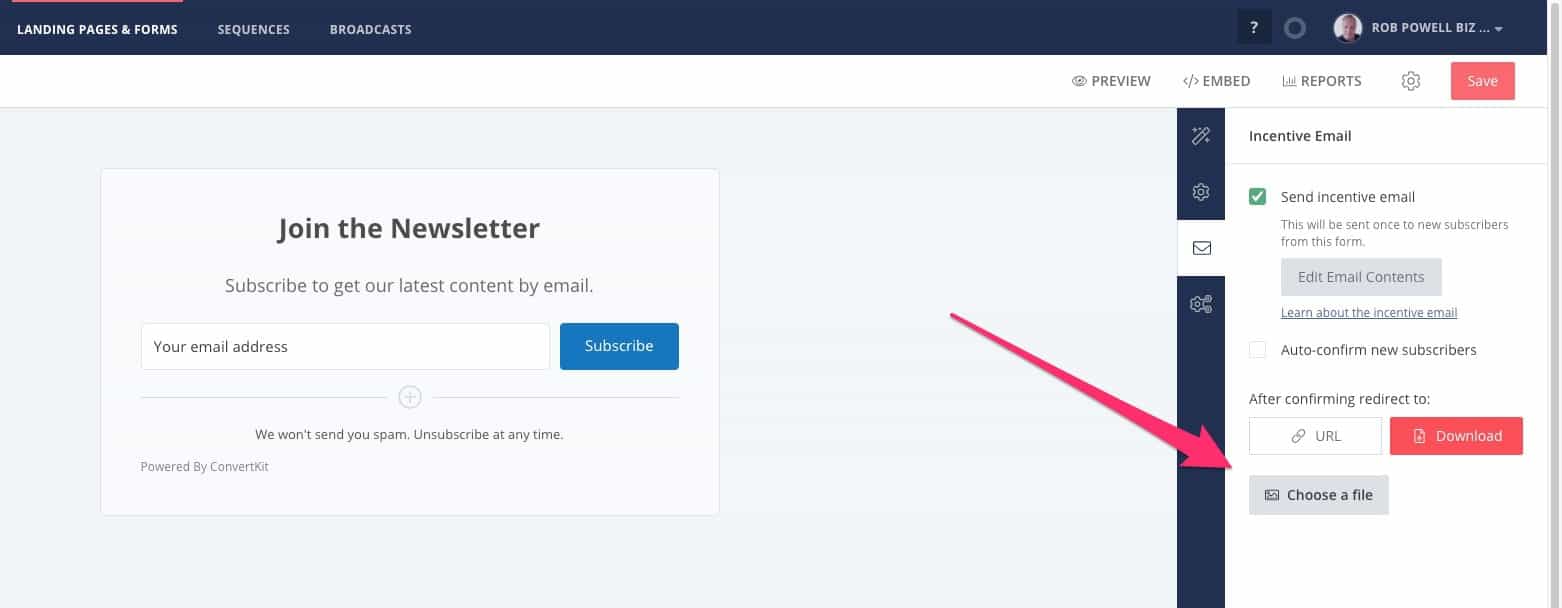
Find the content upgrade or lead magnet on your hard drive and upload it to ConvertKit:
Now, your subscriber can download their freebie from the welcome email. ConvertKit has combined email conformation and lead magnet delivery in one easy step:
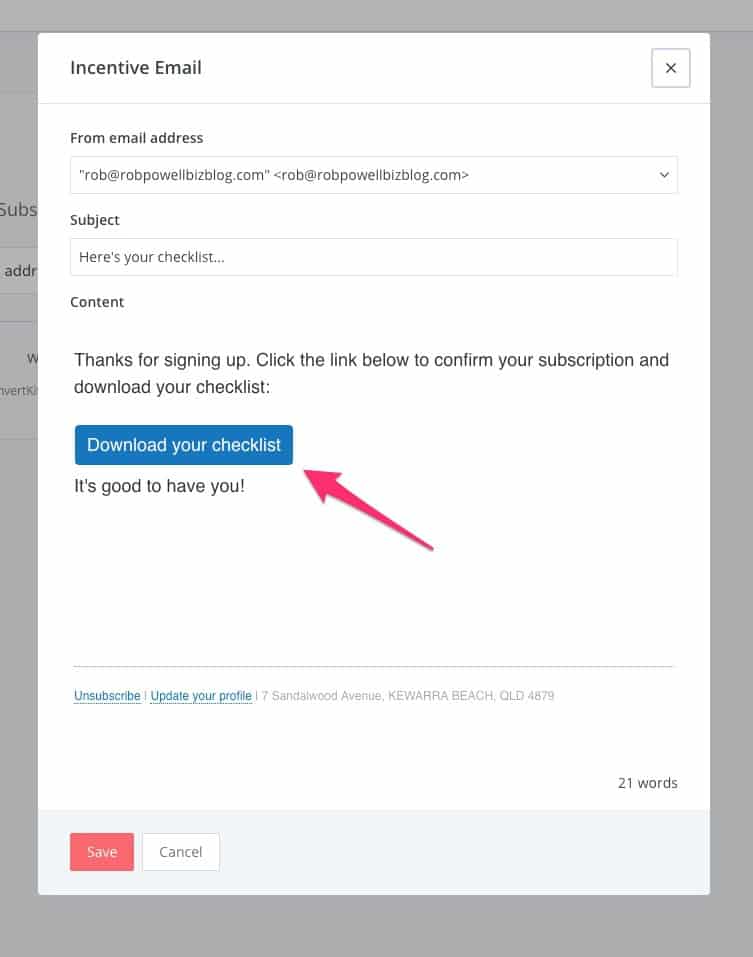
As far as I know, no other email service provider makes lead magnet delivery so simple.
#3 – Creating Your First Email Sequence
There are two kinds of email you can send in ConvertKit:
- email sequences
- one-off email broadcasts
In this section on how to use ConvertKit I’m going to show you what an email sequence is and how to set it up.
This is another feature, where ConvertKit excels. As far as I know, there is no other email service provider that makes email sequences so simple to set up and customize.
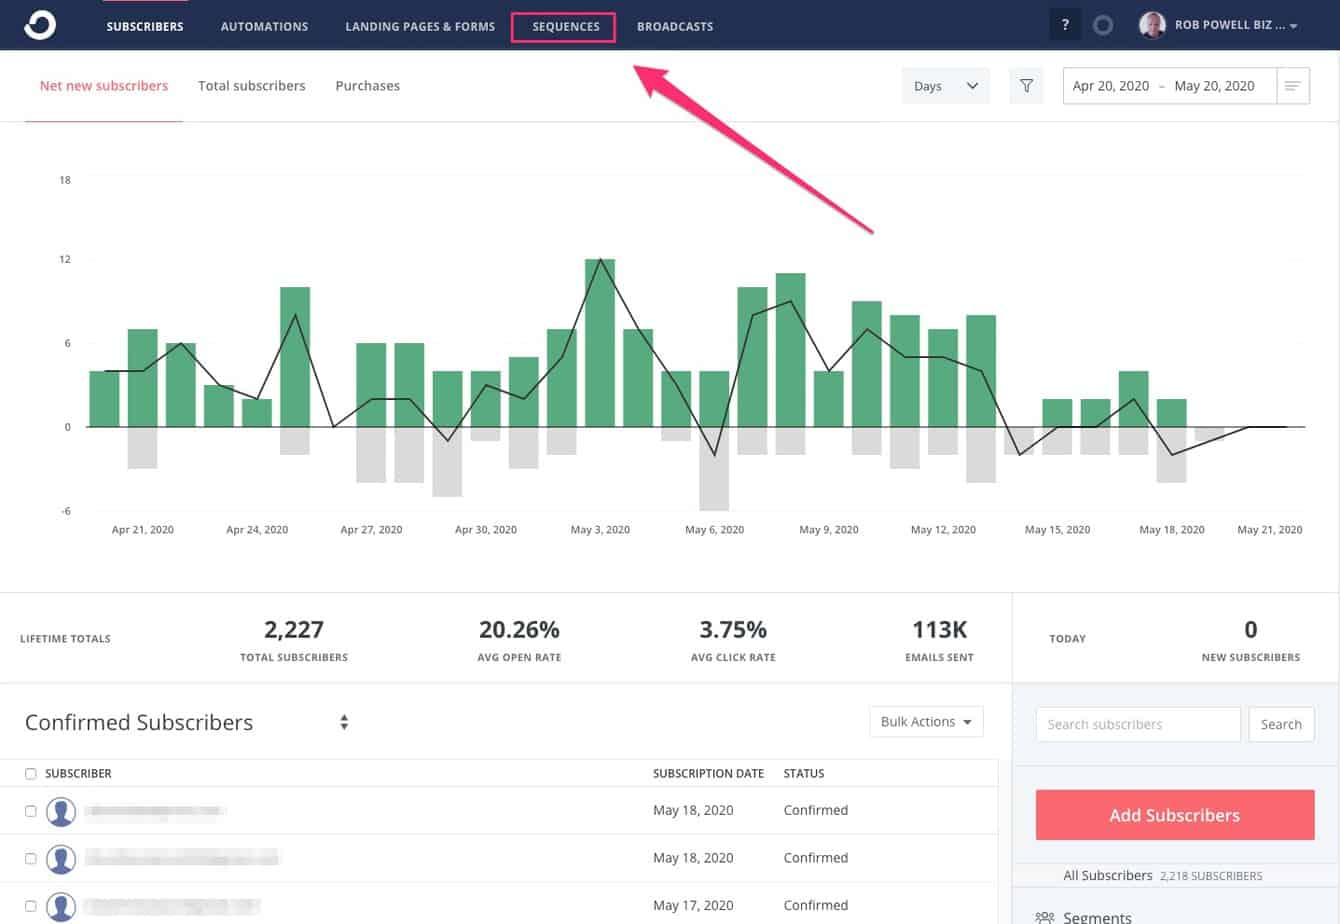
To begin with, click on ‘Sequences’ in the top menu:
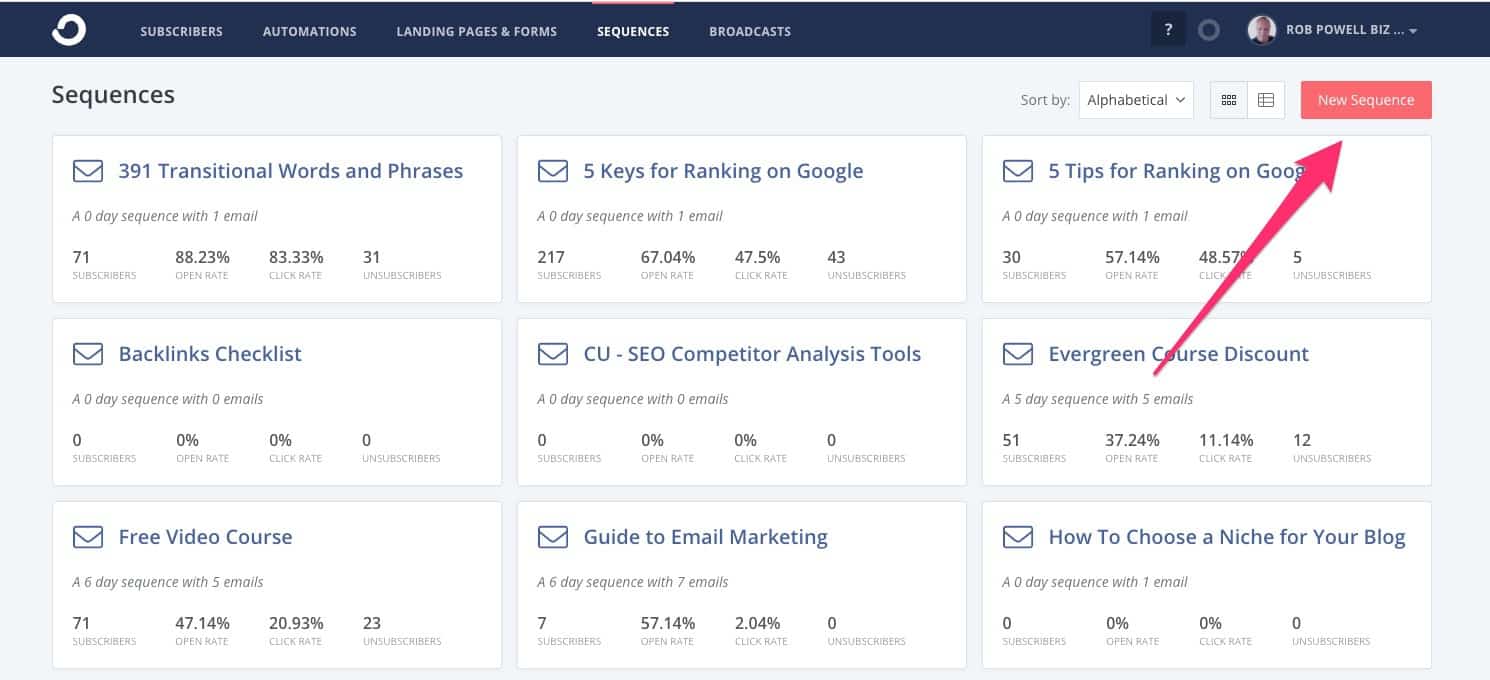
Then choose ‘New Sequence’:
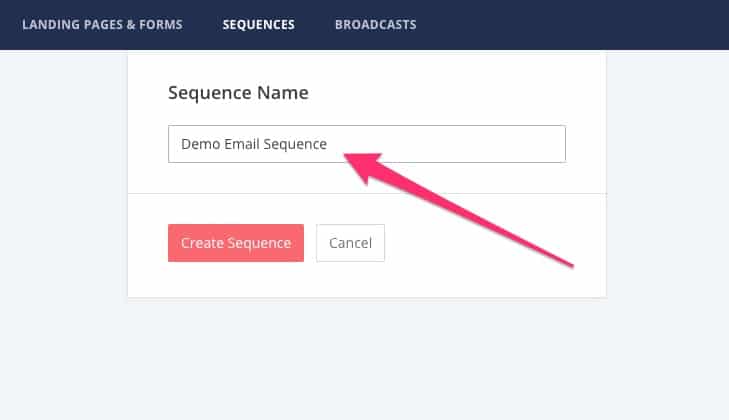
Next, give your sequence a name and click ‘Create Sequence’:
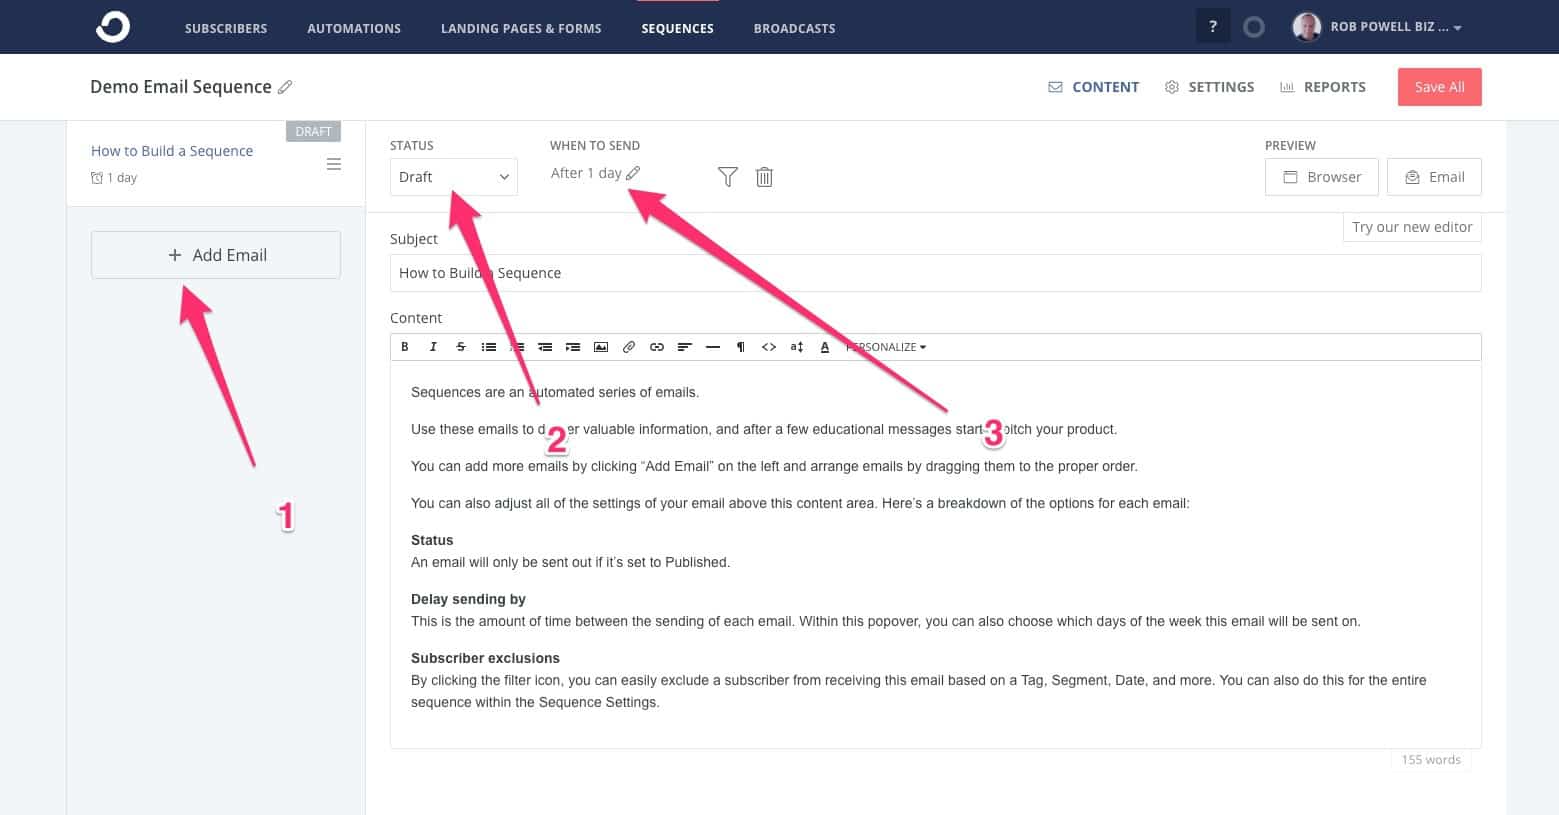
On the next screen you’ll be able to:
1. Add emails to your sequence
2. Turn each email to ‘active’ or ‘draft’
3. Set the interval between emails
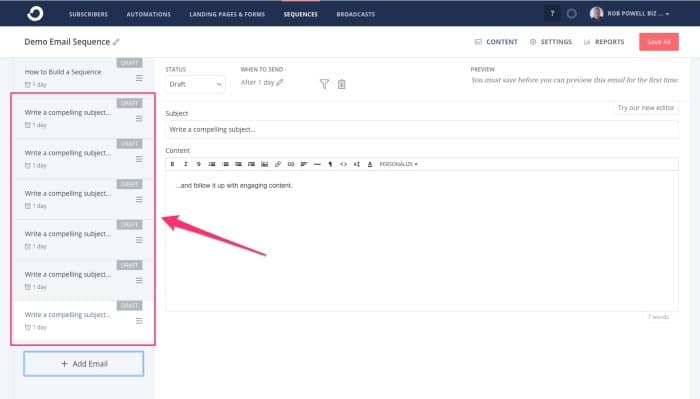
In this screenshot, I’ve added six additional emails, to create a 7-day email sequence:
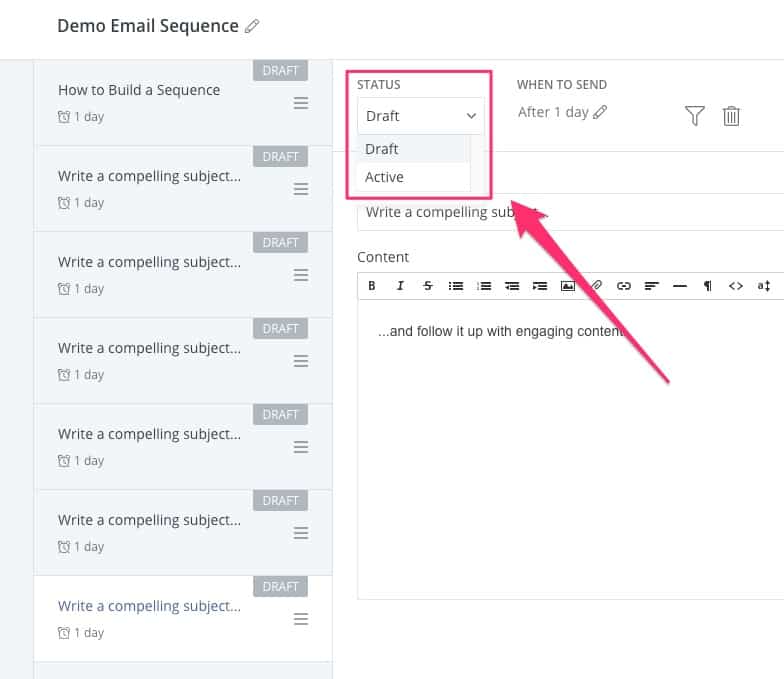
For each email in the sequence, you need to toggle the ‘status’ from ‘draft’ to ‘active’ once it’s ready to go:
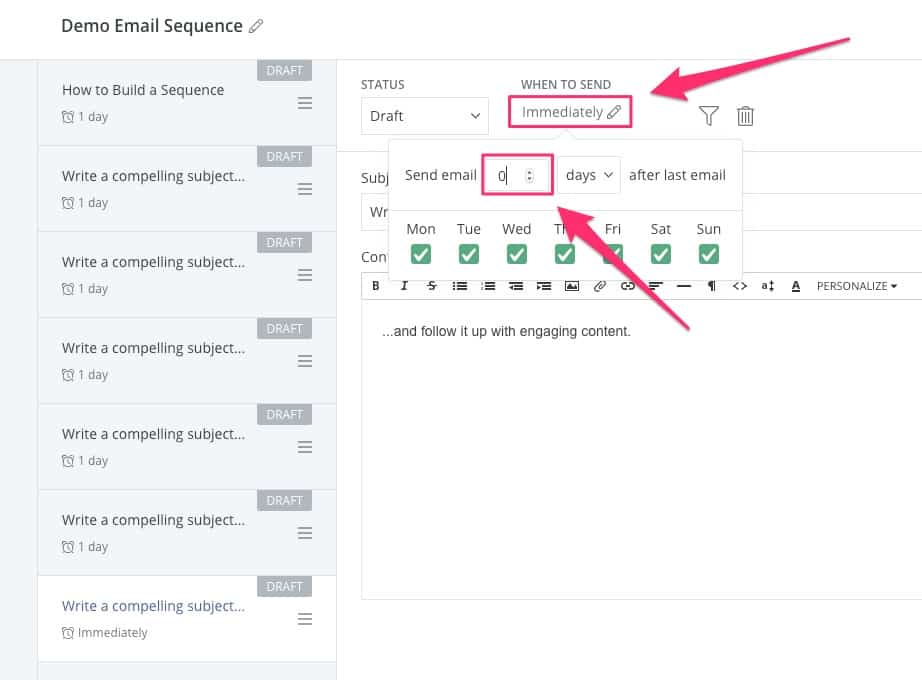
You’ll probably want the first email to go out immediately. In that case, set the value in the interval box to ‘0’:
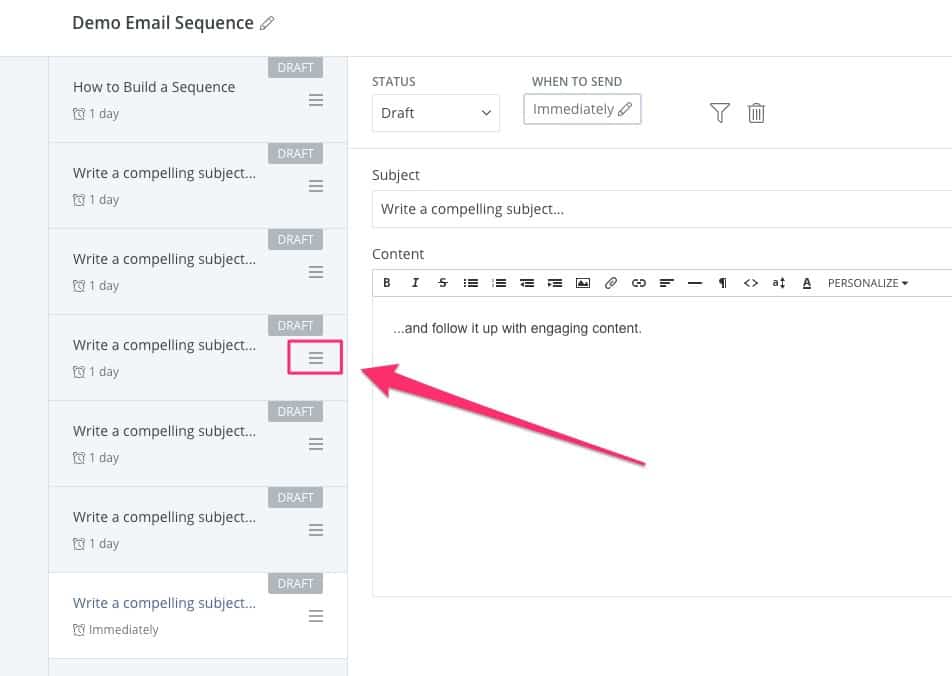
As I said, this is the most user-friendly UI I’ve seen for creating email sequences. One feature that’s super useful is the hamburger button that allows you to drag the emails up and down and change their order:
If you want to get really granular, you can use filters to decide who gets individual emails in your sequence.
Here’s an example.
Let’s say your email sequence is designed as a funnel to sell blue widgets. If a subscriber purchases a blue widget on Day 2 of your email sequence, you don’t need to send them Days 3 through 7 – that would be annoying for your subscriber.
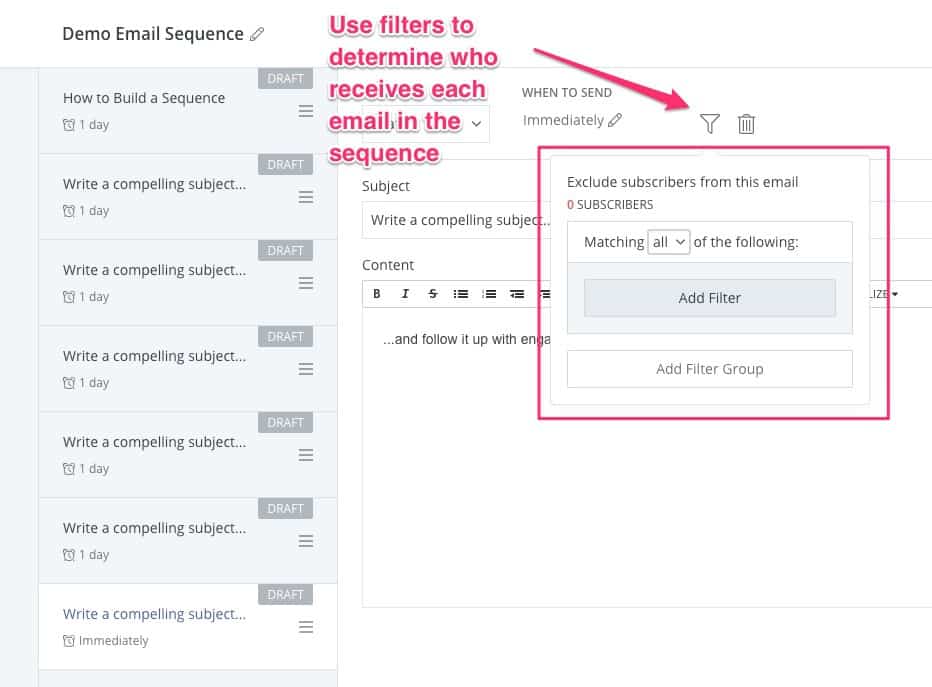
If you tag subscribers who make a purchase (more about how to do that later), you can use that tag to remove those subscribers (i.e. people who made a purchase) from your sequence. Pretty cool, hey?
When your email sequence is ready, there’s one last step you need to take: connect your sequence to a form.
#4 – Connect Your Email Sequence to a Form
This is another key aspect of how to use ConvertKit: connecting your email sequence to an opt-in form.
There are two ways of connecting your email sequence to a form: using a visual automation or creating a rule.
Let’s take the visual automation first:
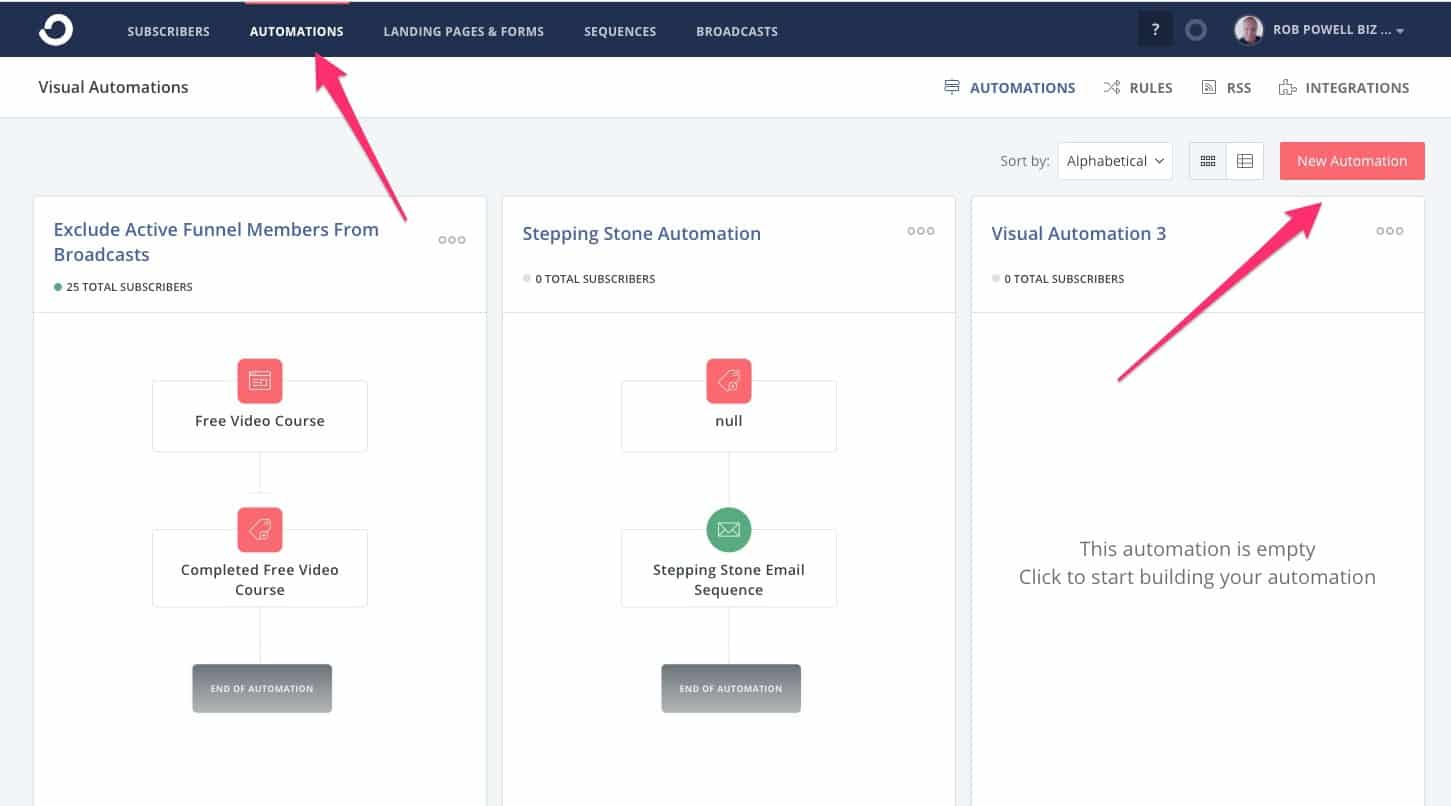
Click on Automation in the top menu and then ‘New Automation’:
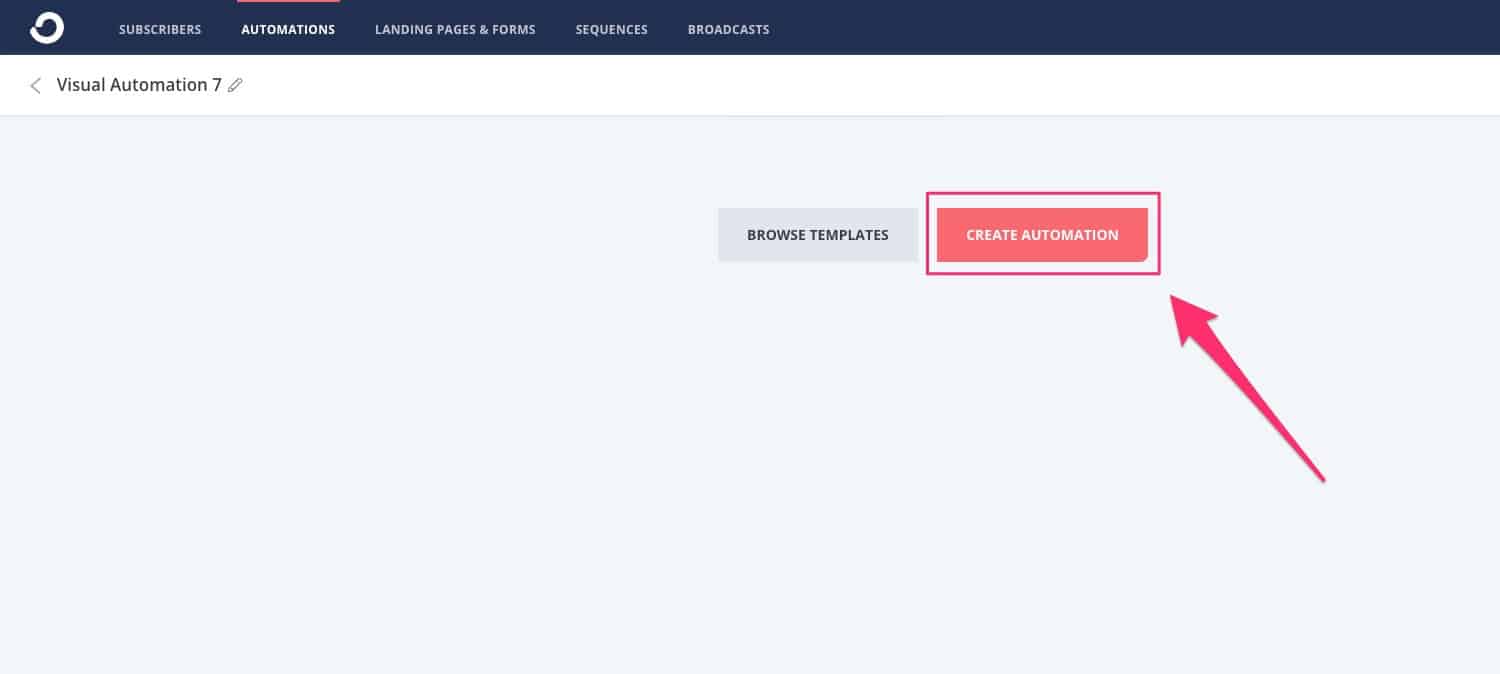
Next, click ‘Create Automation’:
On the next screen, make sure that ‘Joins a Form’ is selected:
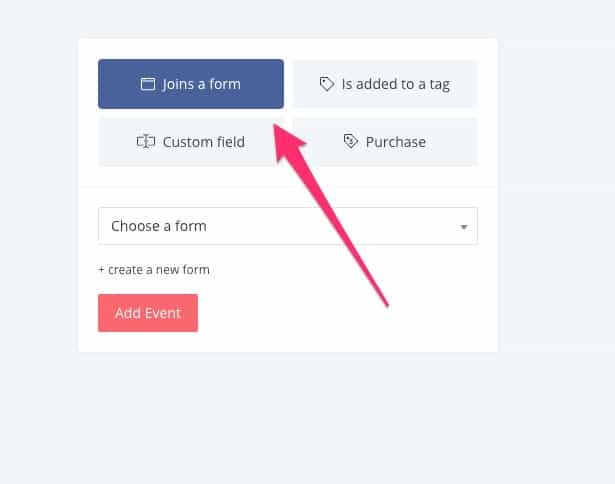
Then, from the dropdown menu, select the form you just created:
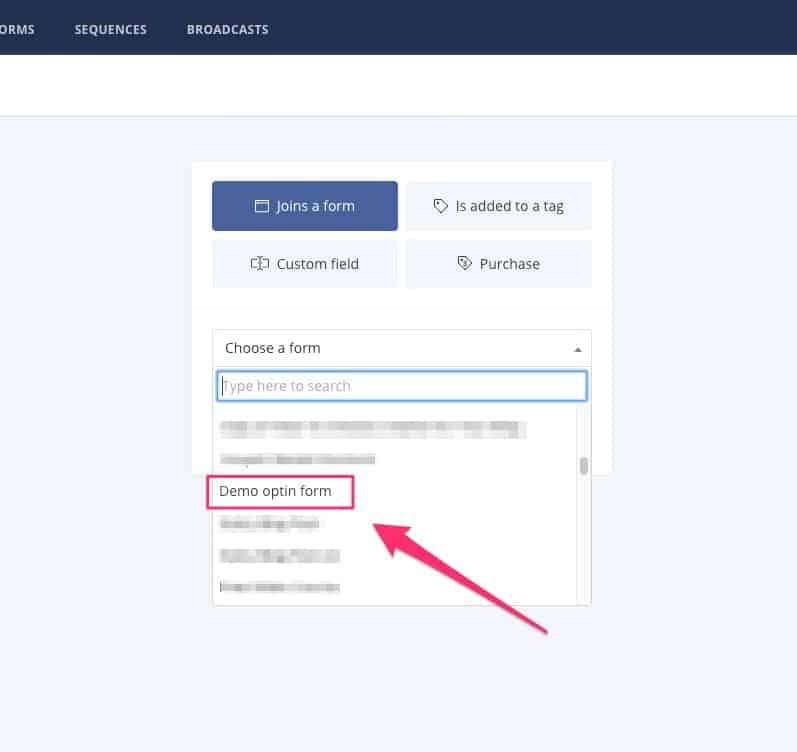
And then click ‘Add Event’:

A visual automation will now appear:
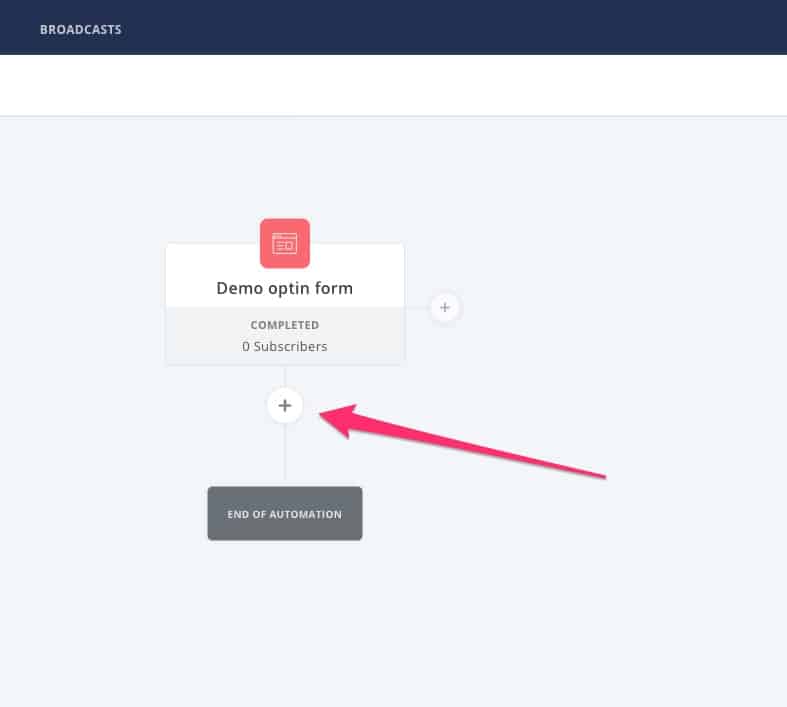
Click on the plus sign.
Next, make sure ‘Action’ is selected, and then click on ‘Email sequence’:

Then, from the dropdown, select the email sequence you just created:
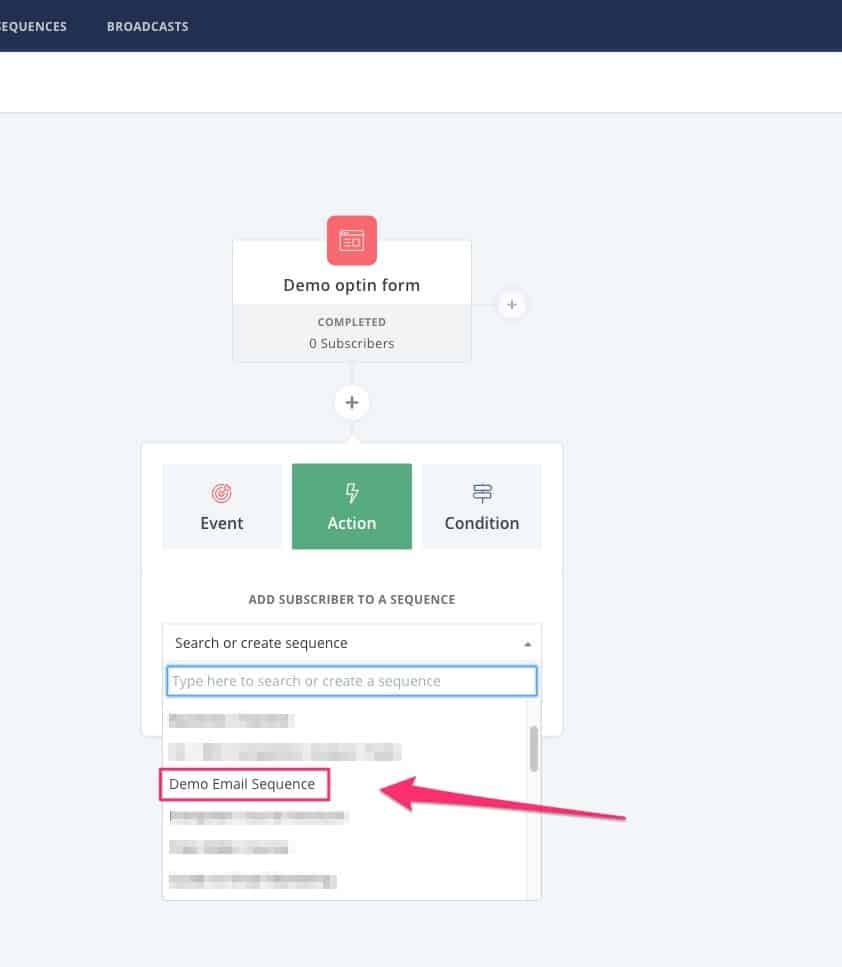
Then click ‘Add Action’:
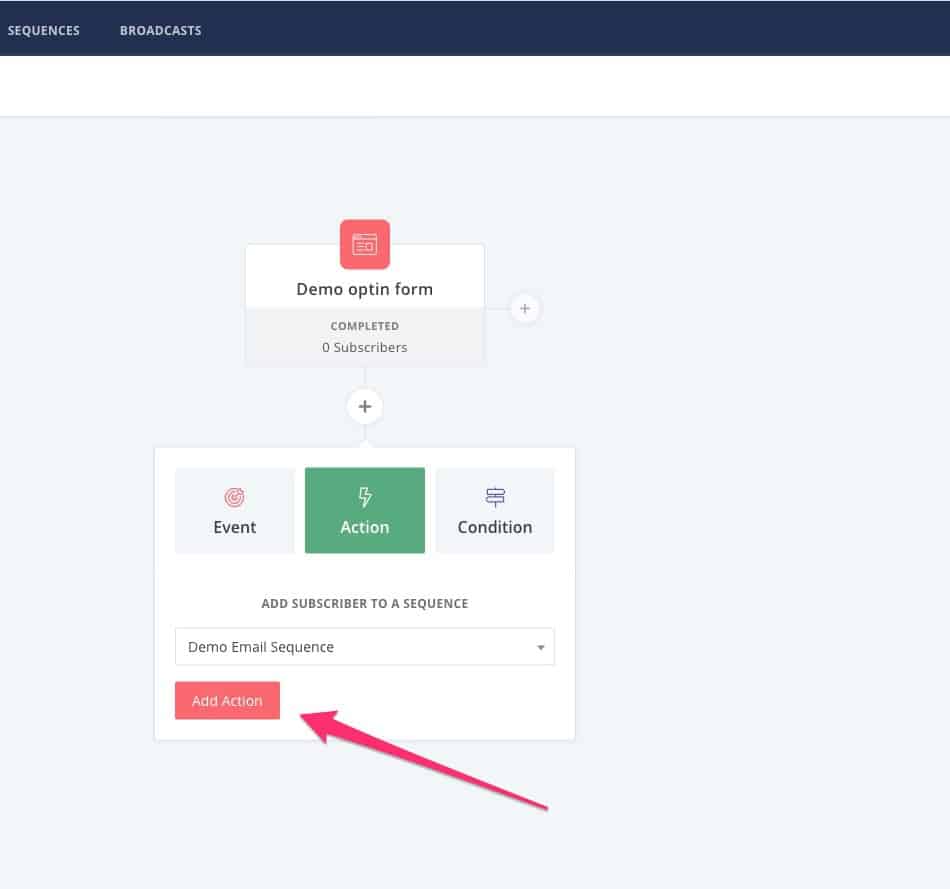
And that’s it – you now have a simple automation that adds new subscribers to an email sequence:
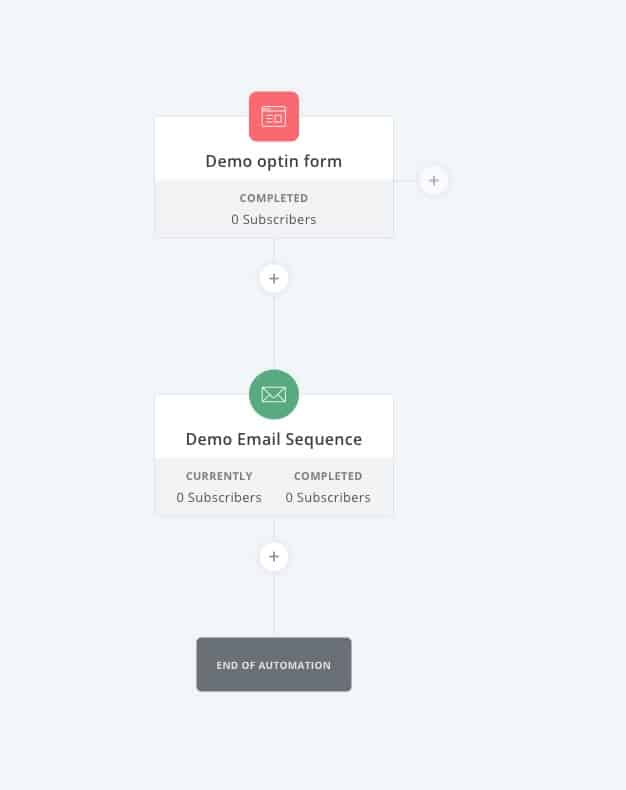
Now let’s do the same thing using a ‘Rule’ instead of a visual automation.
On the ‘Automations’ screen, click on ‘Rules’:
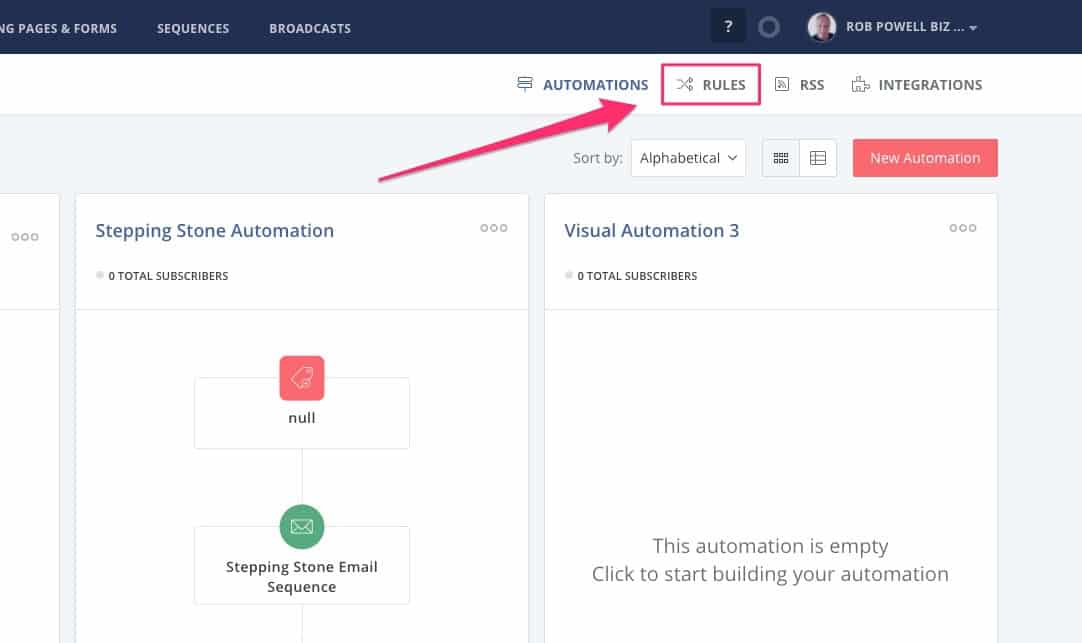
On the next screen, click ‘Add Rule’ and then choose ‘Subscribes to a Form’:
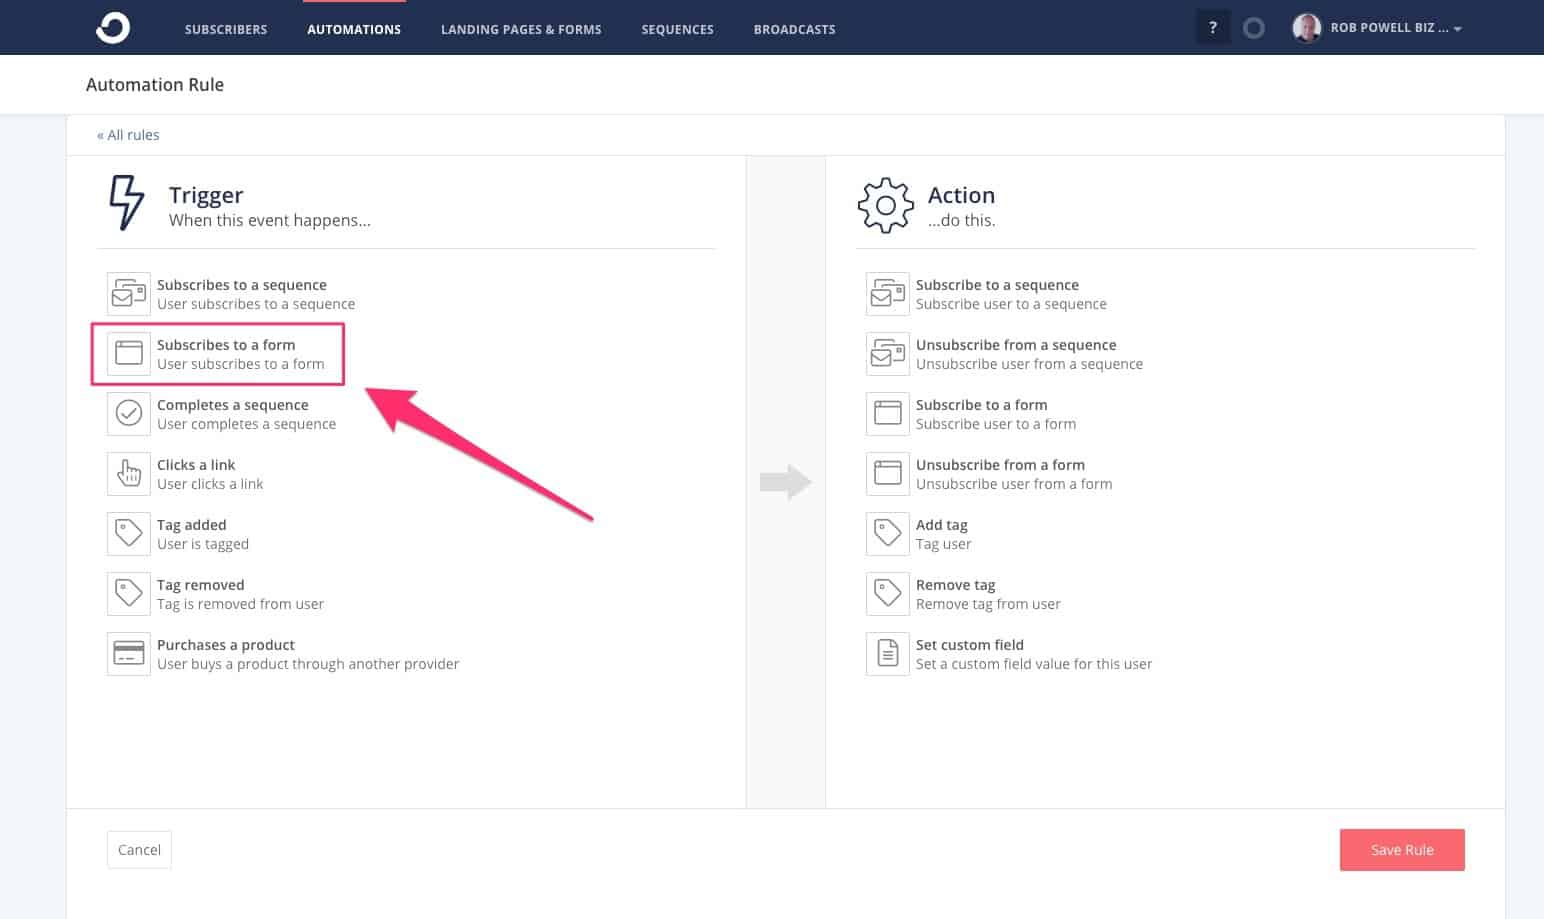
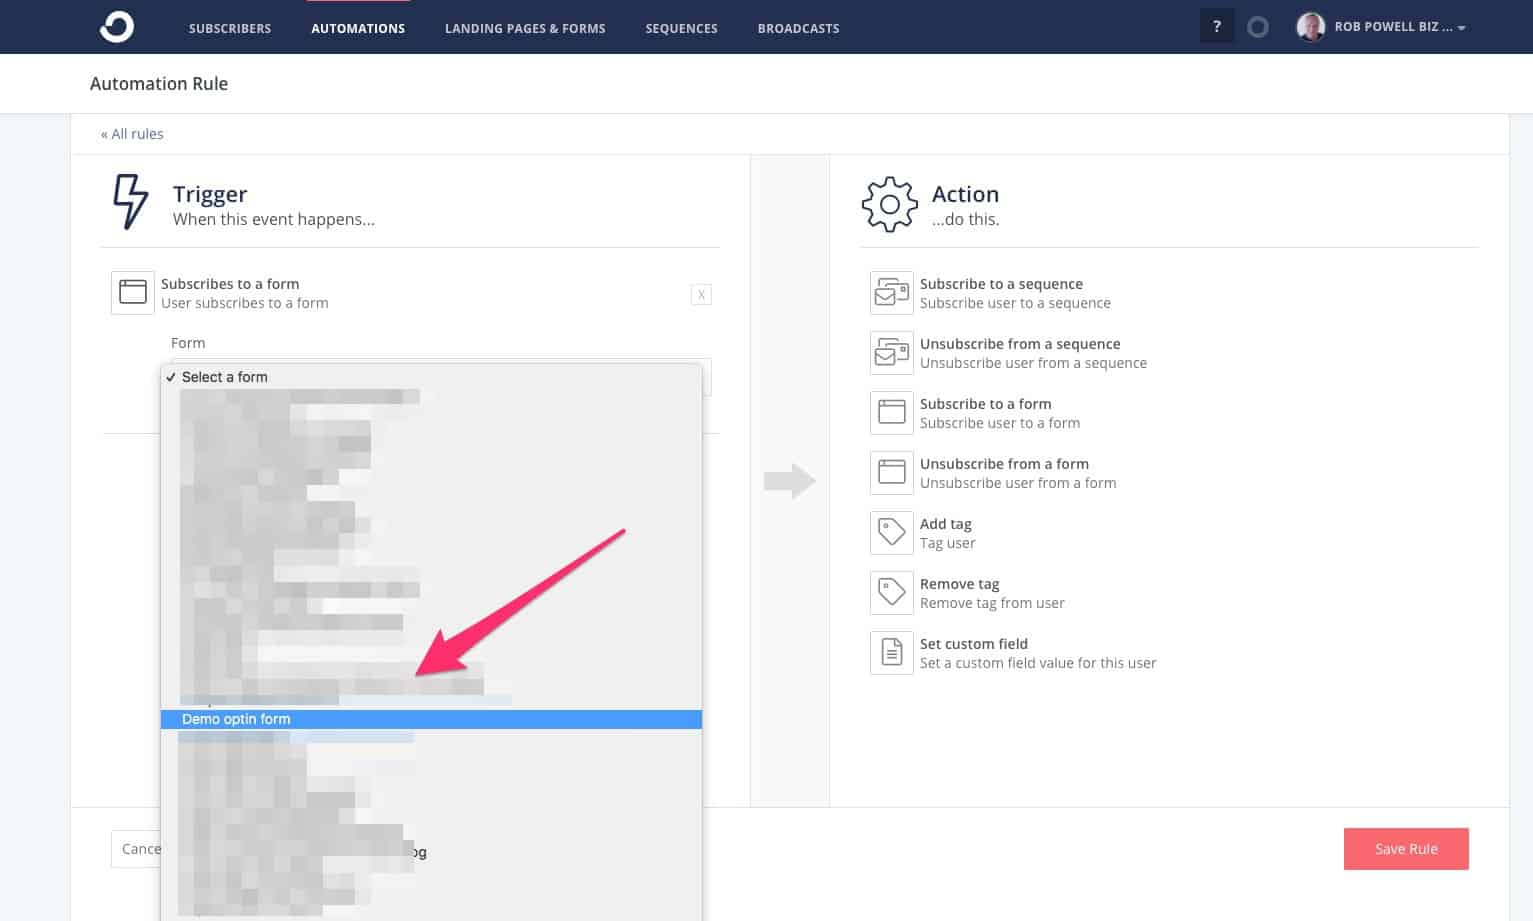
From the dropdown menu, select the form you created:
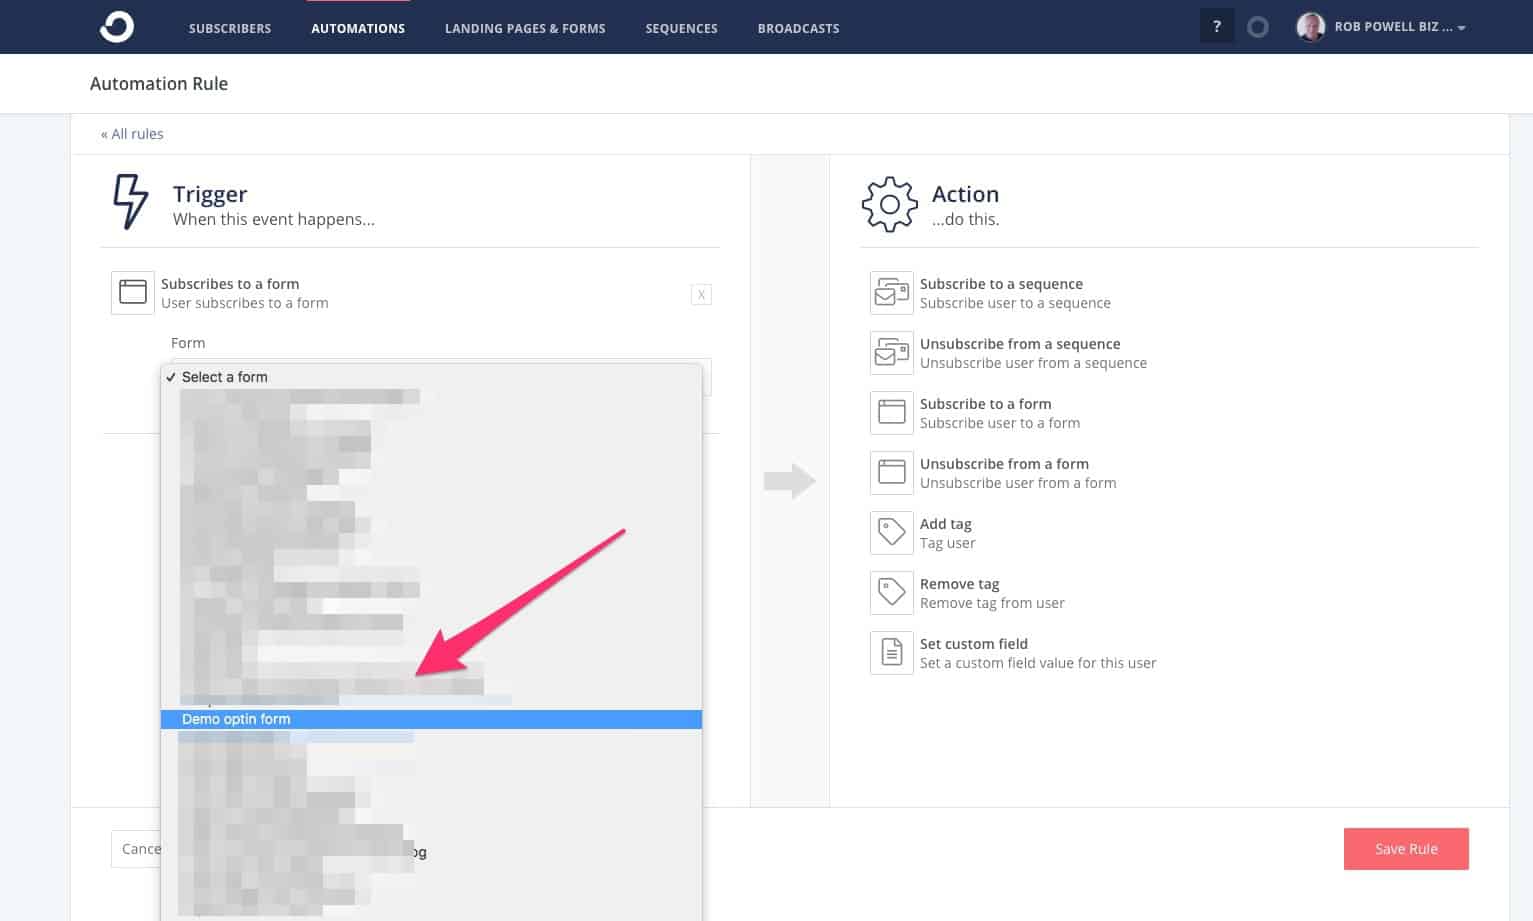
In the right-side panel, you now need to click on ‘Subscribe to a sequence’:
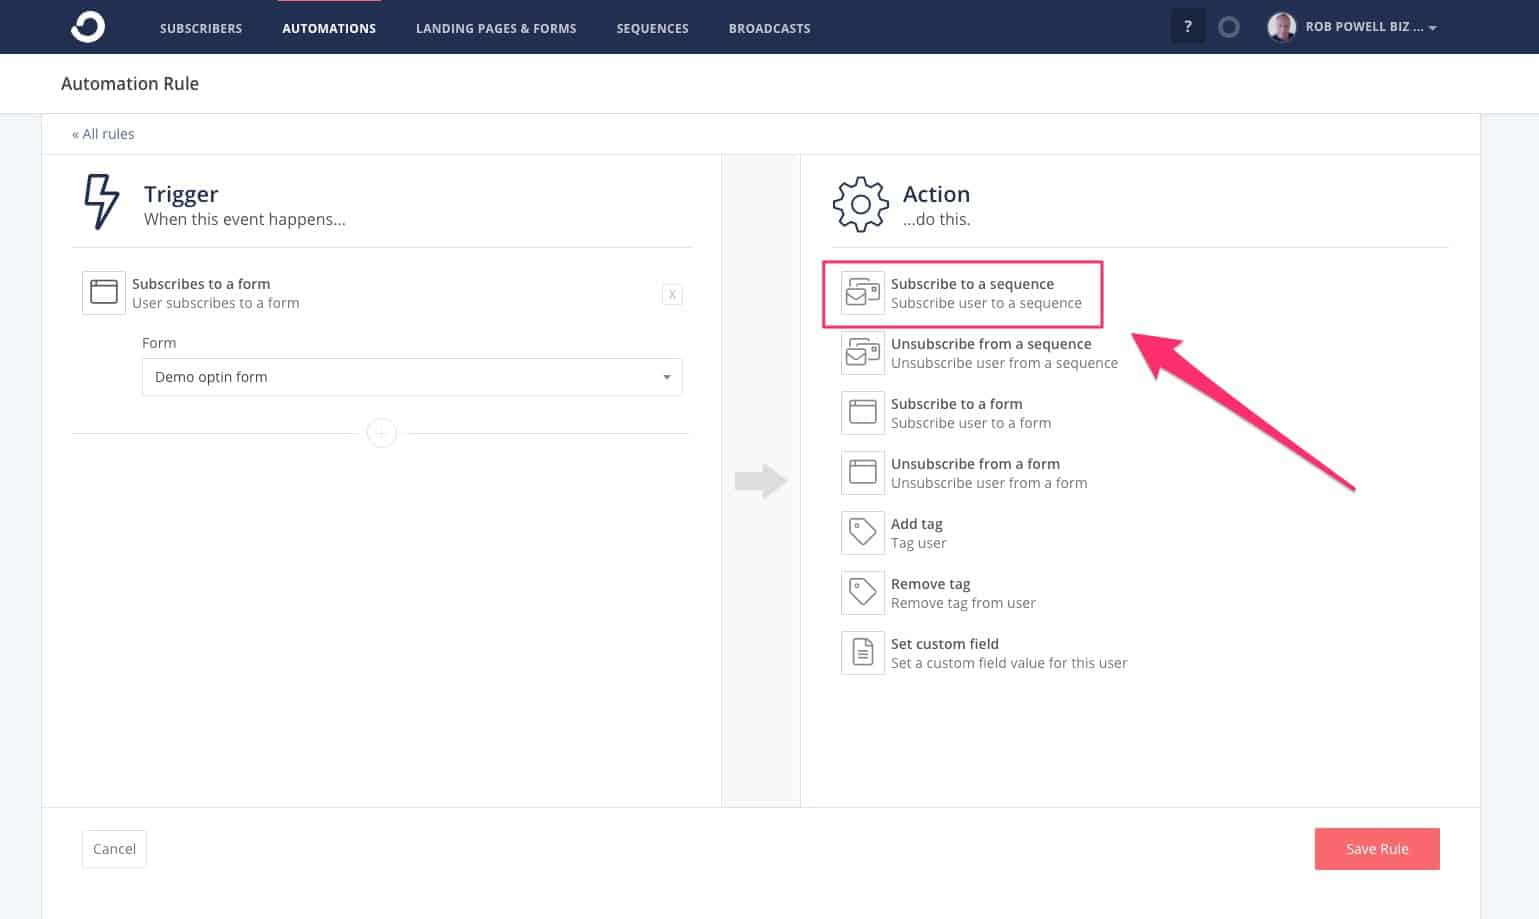
Now choose the email sequence you just created:
And then click ‘Save Rule’:
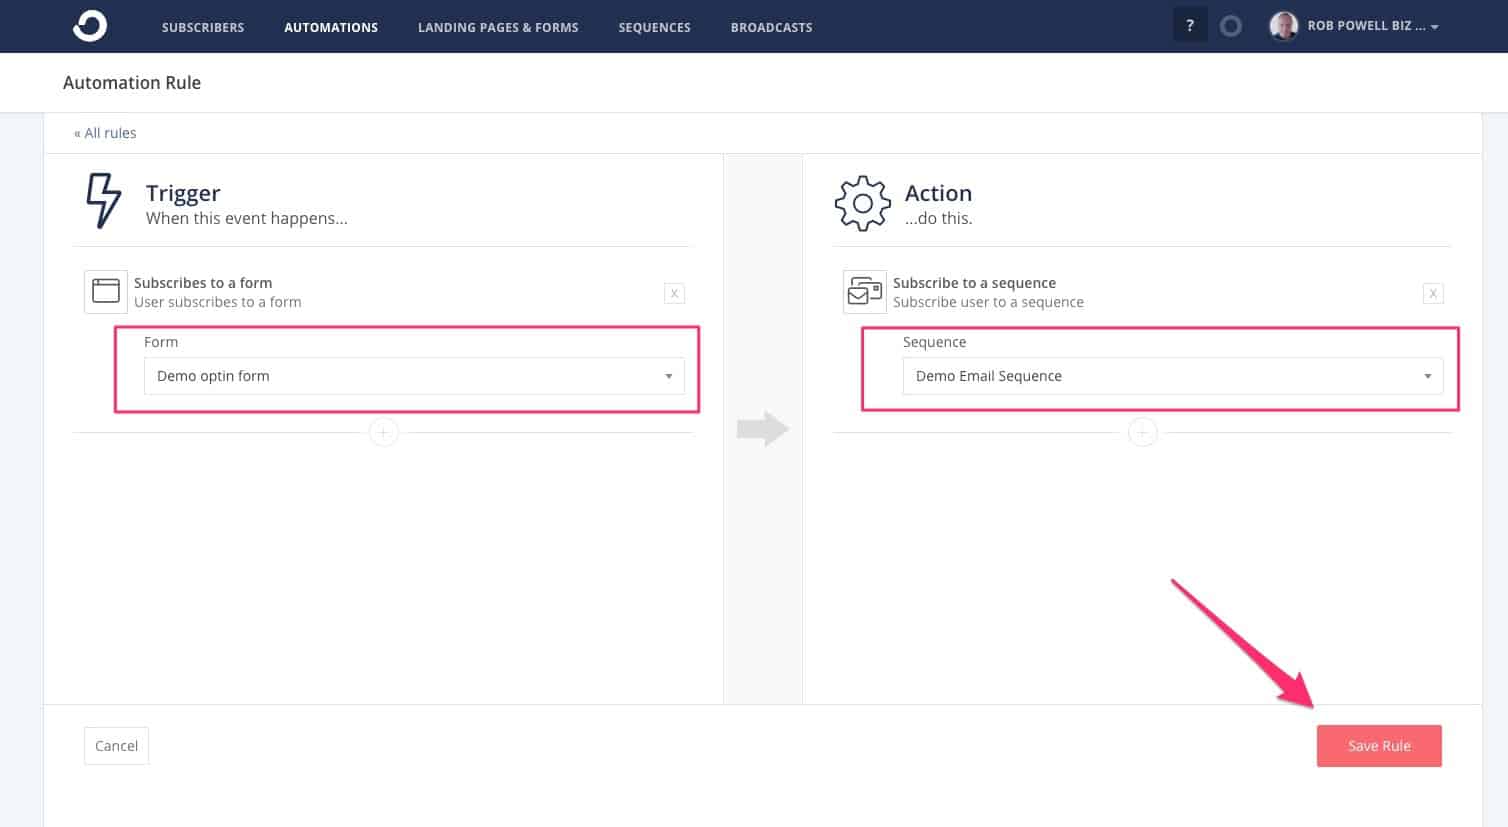
You now have a rule that says when somebody subscribes to the ‘demo optin form’ they will also be subscribed to the ‘demo email sequence’.
So, that’s how you join an email sequence to a form.
#5 – Connect Your Form to a Lead Capture Tool
ConvertKit provides optin forms that you can install on your website. But as I said earlier, a lot of bloggers use third party software for capturing leads. The reason is quite simple: email service providers like ConvertKit specialize in email delivery, not in lead capture.
And so if you want state-of-art tools for collecting email addresses, its best to use dedicated lead capture software. This can be web-based software, such as OptinMonster, or a WordPress plugin, such as Thrive Leads.
I use Thrive Leads, and in this section I’m going to show you how to connect ConvertKit to a Thrive Leads optin form.
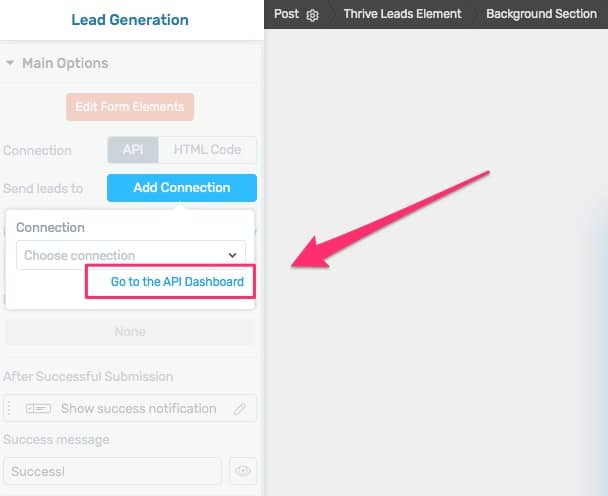
In Thrive Leads, click on the lead generation block, and then in the control panel, click ‘Add Connection’:
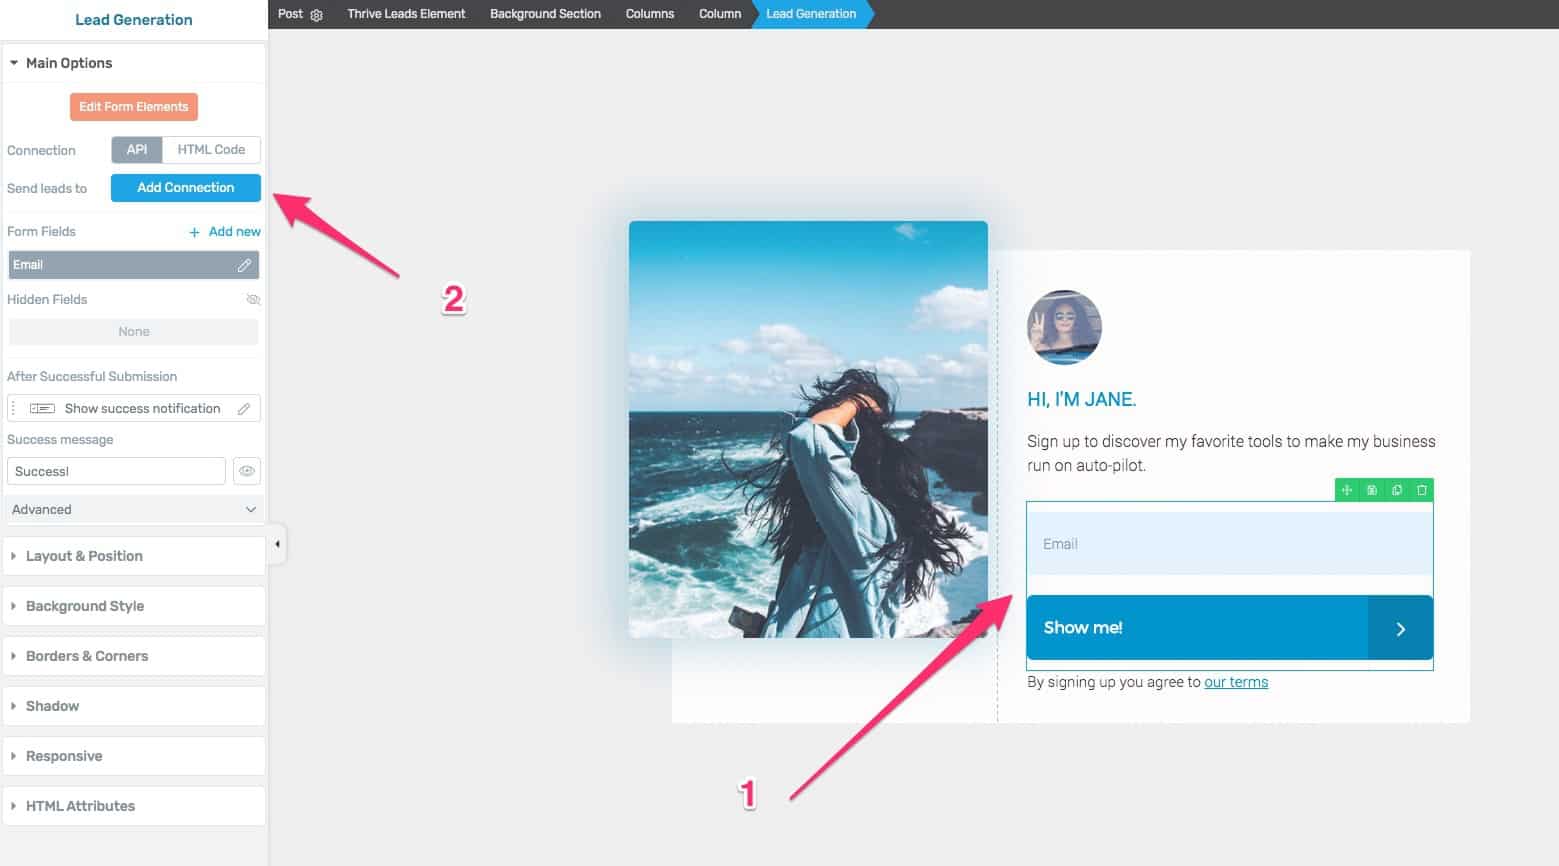
Click on ‘Go to the API Dashboard’:
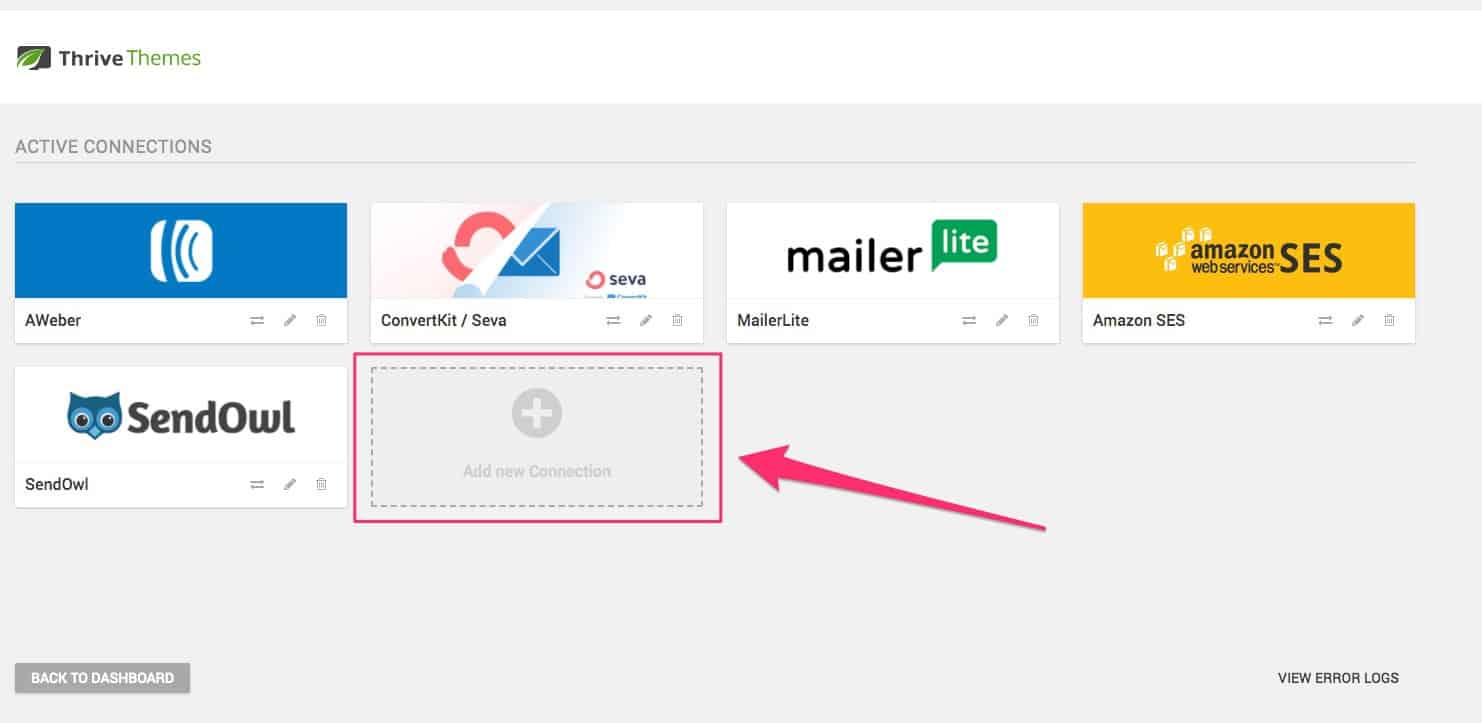
Then click on ‘Add new Connection’ and follow the instructions:
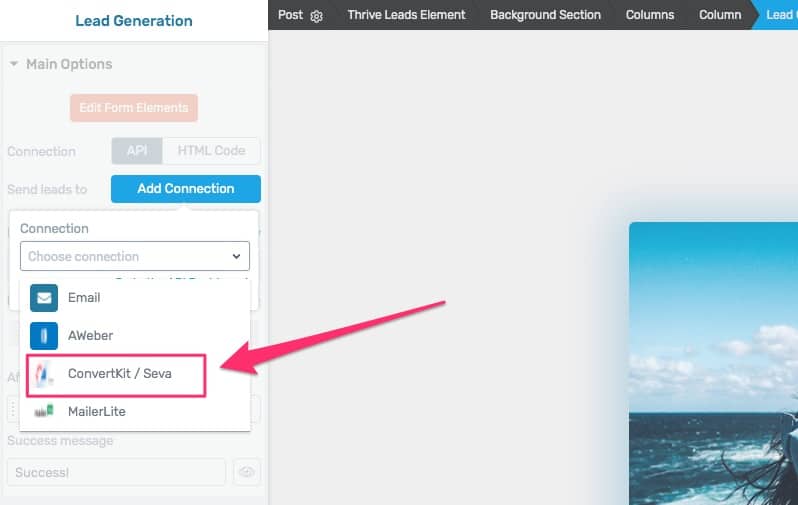
Once you’ve connected ConvertKit to Thrive Leads, you’ll be able to choose it from the dropdown menu:
Next, select the form you created in ConvertKit:
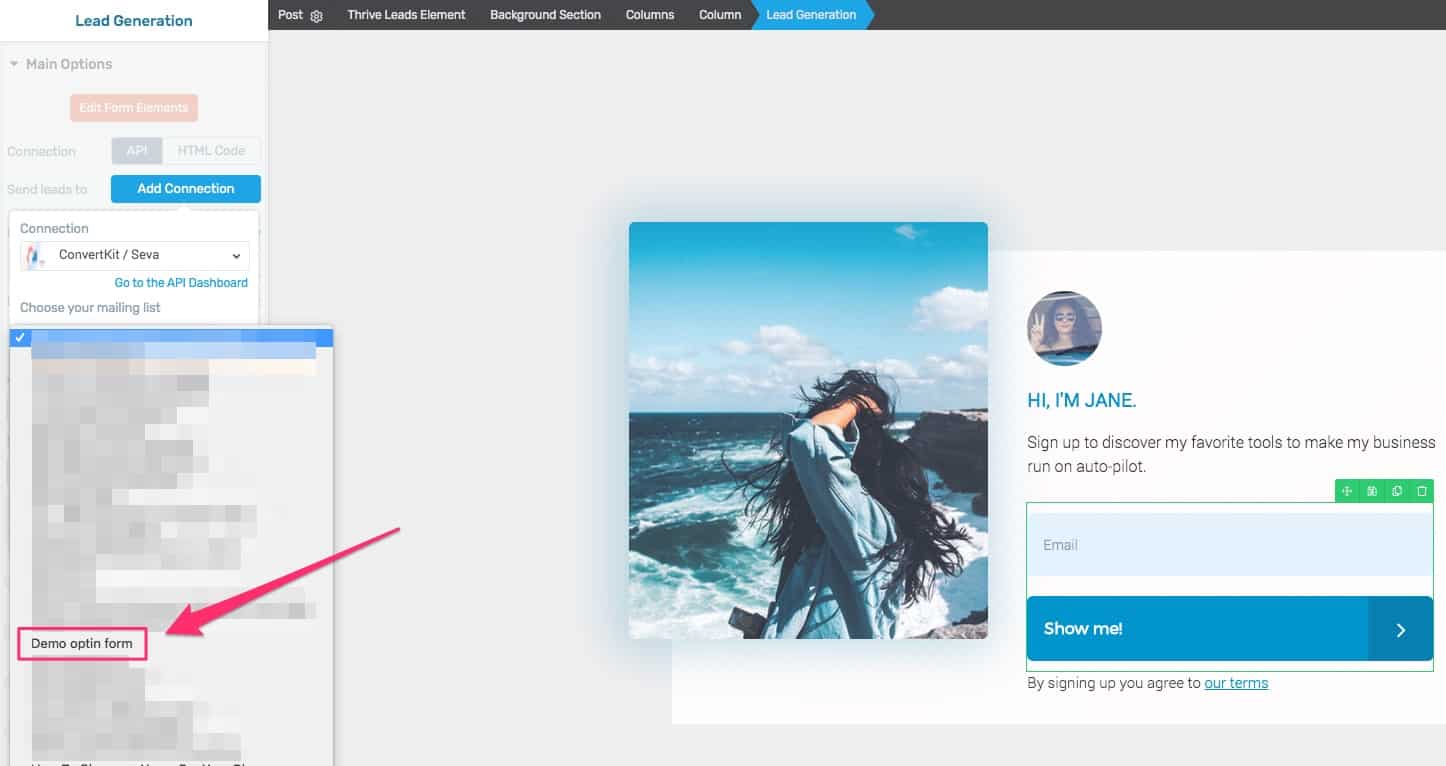
And then click ‘Apply’:
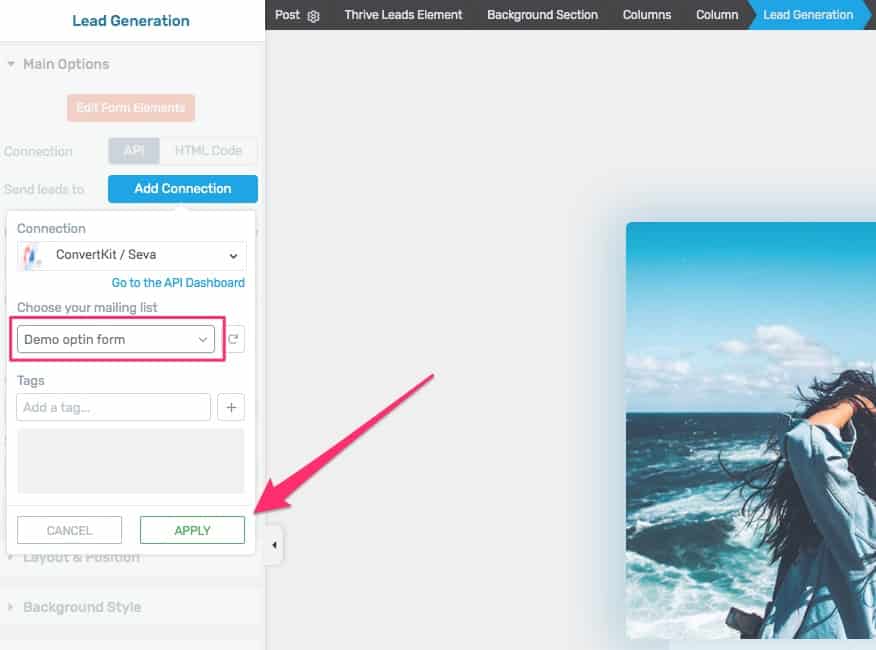
And that’s it: your Thrive Leads optin form is now connected to your ConvertKit account.
#6 – Sending an Email Broadcast
Sending emails to your list is a key part of how to use ConvertKit. As I said earlier, there are two kinds of email you can send in ConvertKit.
The first is an email sequence and the second is a one-off email broadcast.
In ConvertKit, a broadcast is what you use to send out your regular email update to subscribers.
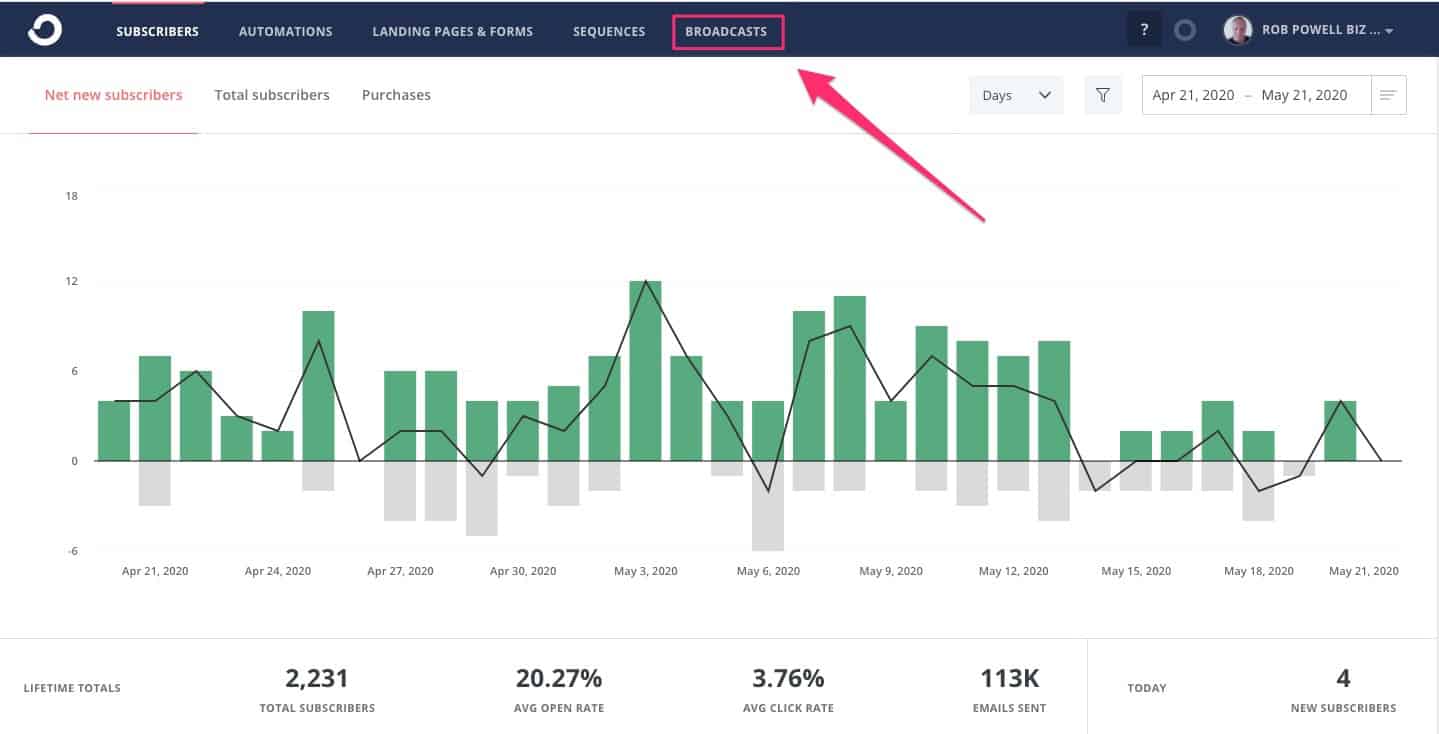
To create a broadcast, click on ‘Broadcasts’ in the top menu:
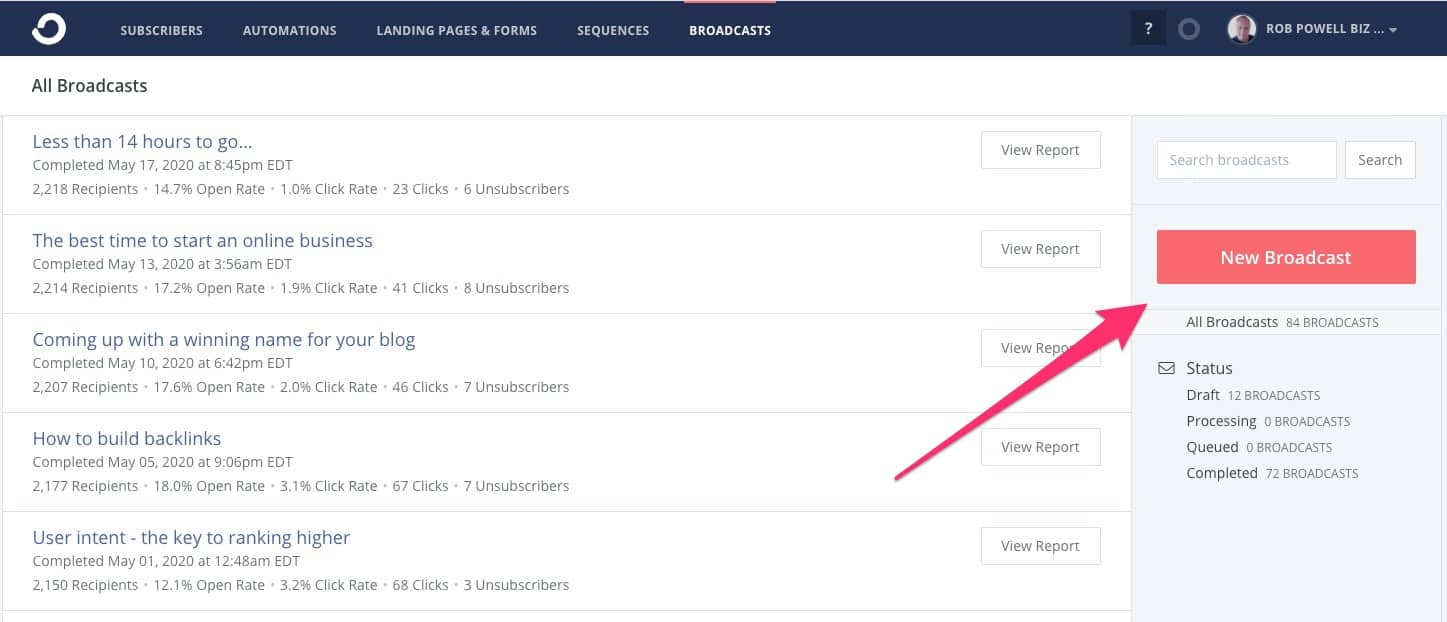
Next, click ‘New Broadcast’:
On the next screen, you have two options:
- Send the broadcast to your entire list
- Send the broadcast to a subset of your list
The number of people who will receive your broadcast is shown at the top right of the broadcast:
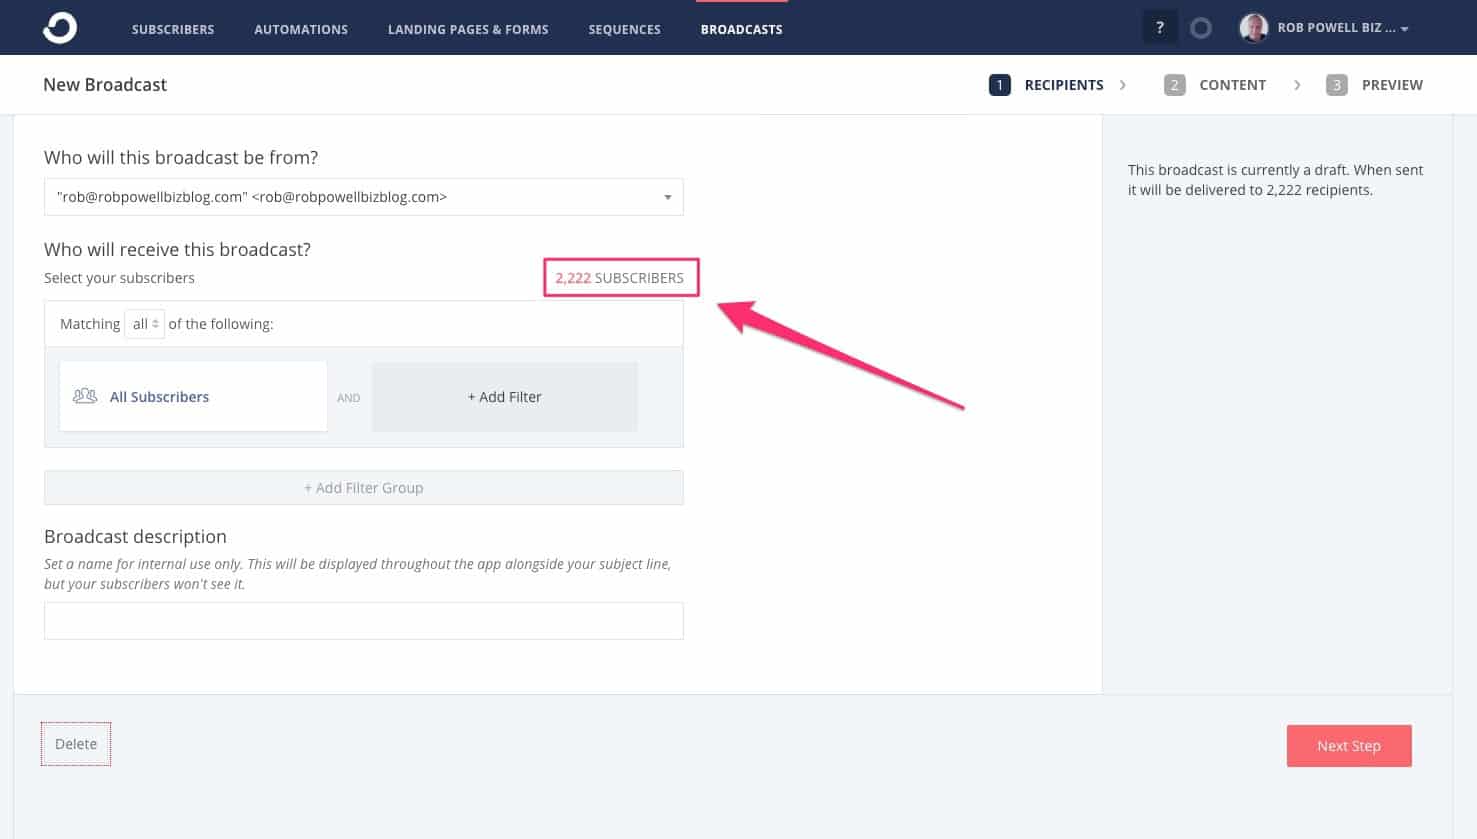
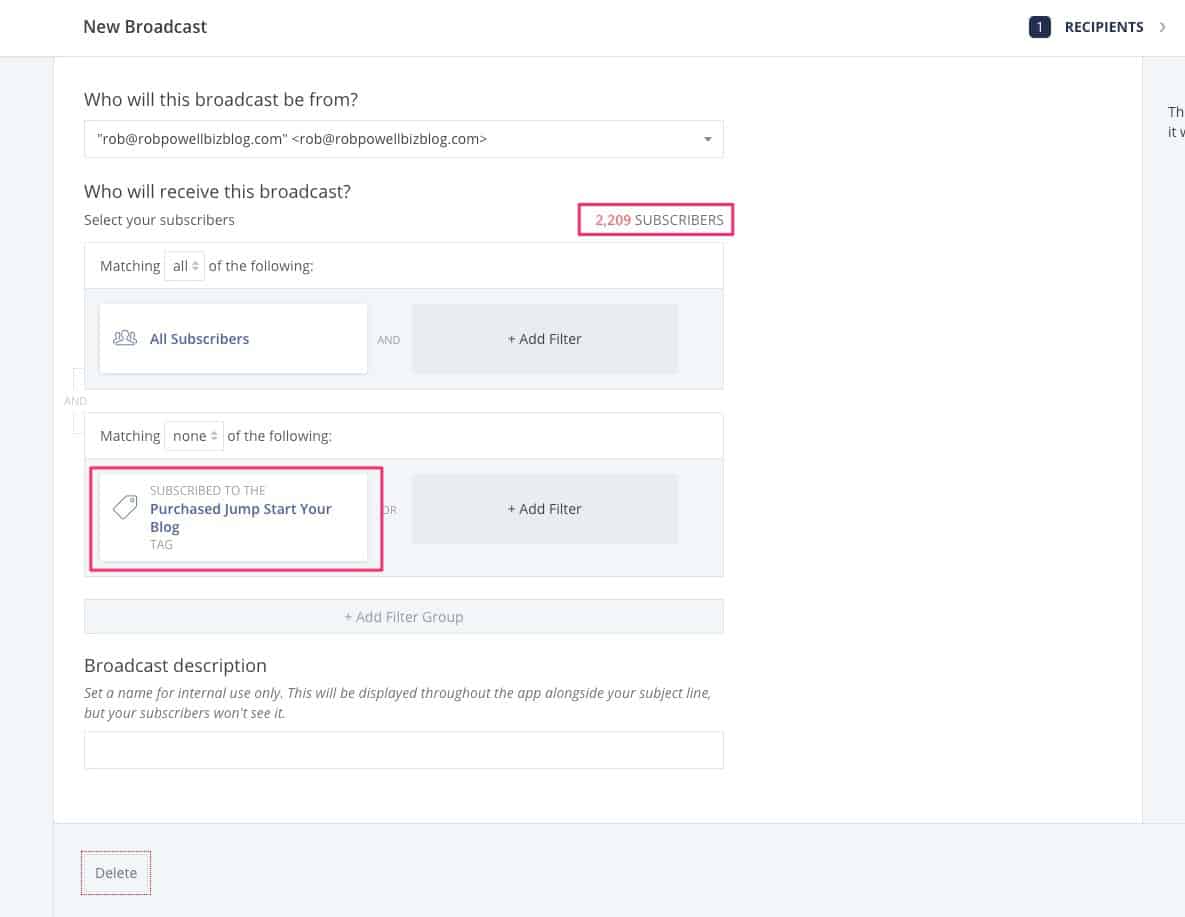
If you want to send the broadcast to a subset of your subscribers, you need to add a filter.
Let’s say I want to send my broadcast only to people who didn’t purchase my product ‘Jump Start Your Blog’.
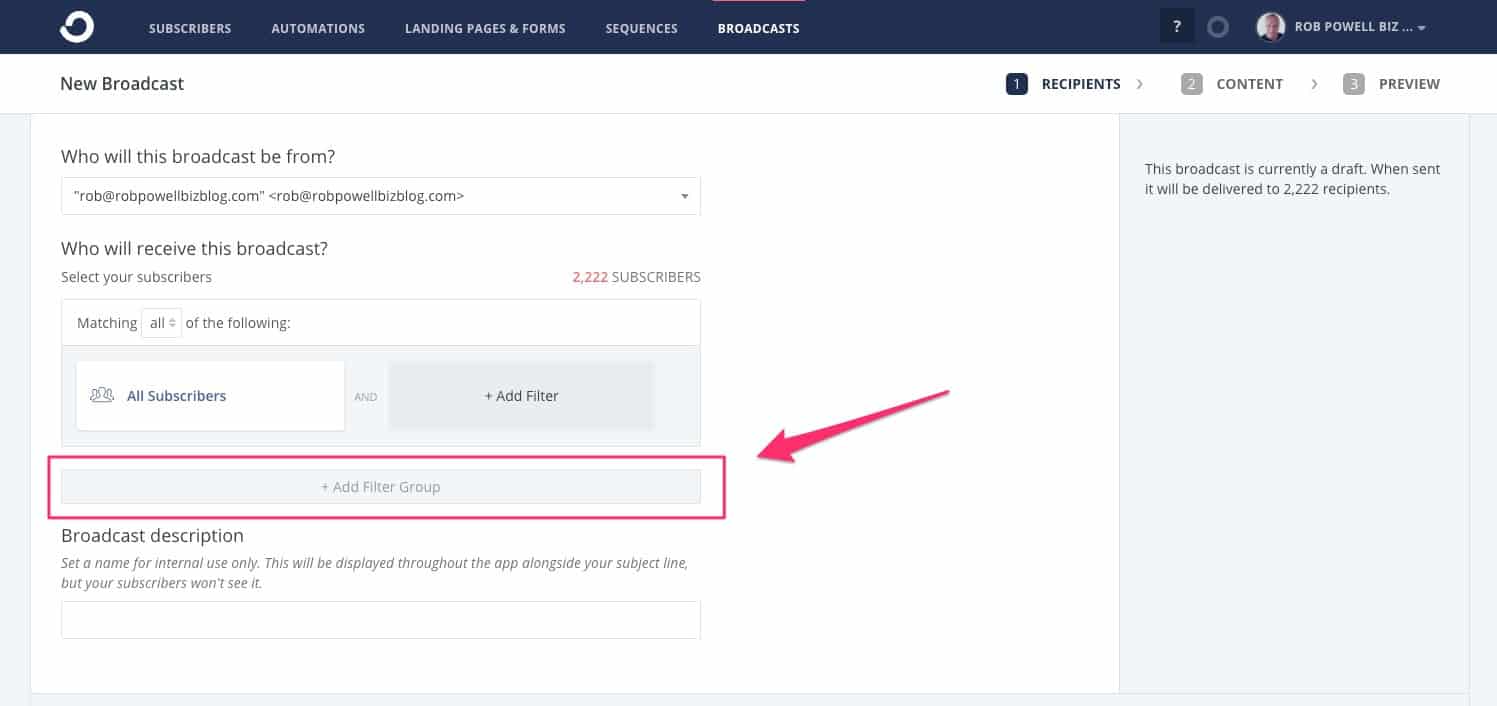
To do this, click ‘Add Filter Group’:
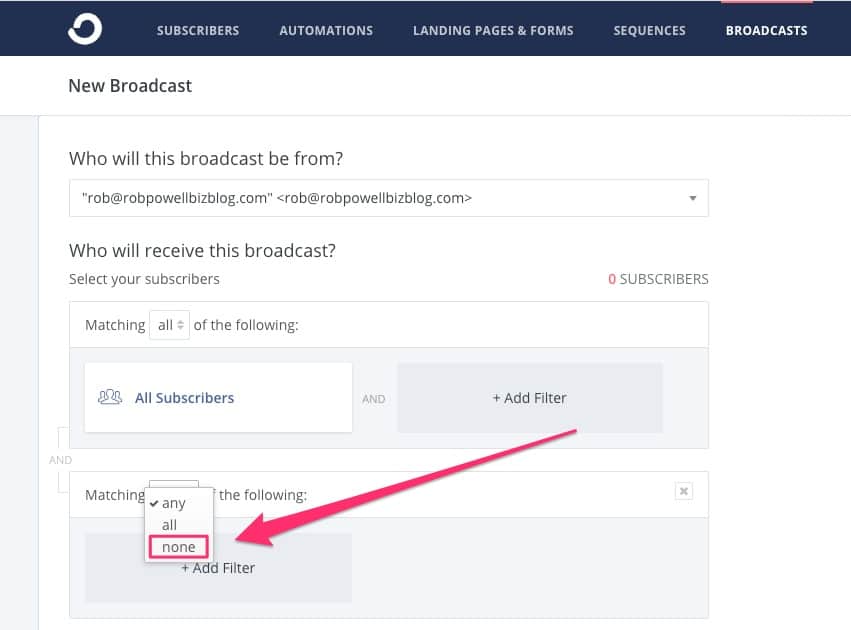
From the dropdown, choose ‘Matching none’:
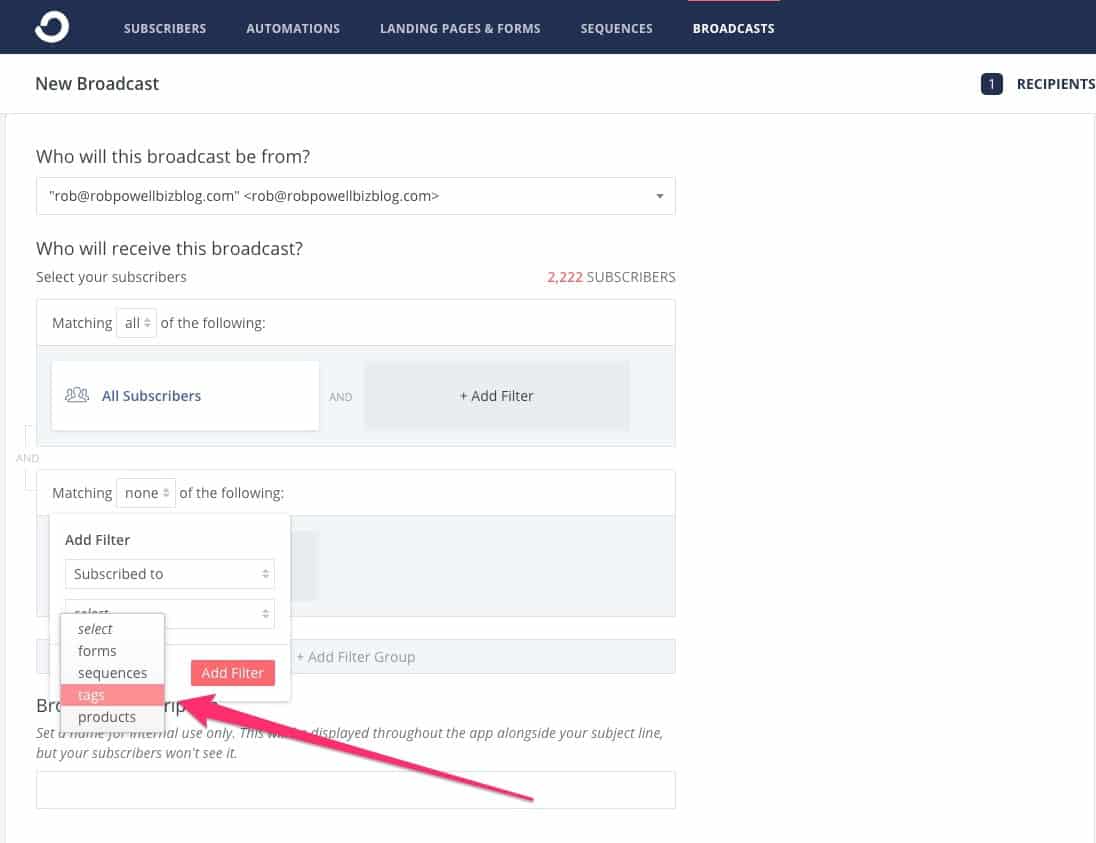
Then choose ‘Subscribed to tags’:
Next, choose the tag that you want to exclude:
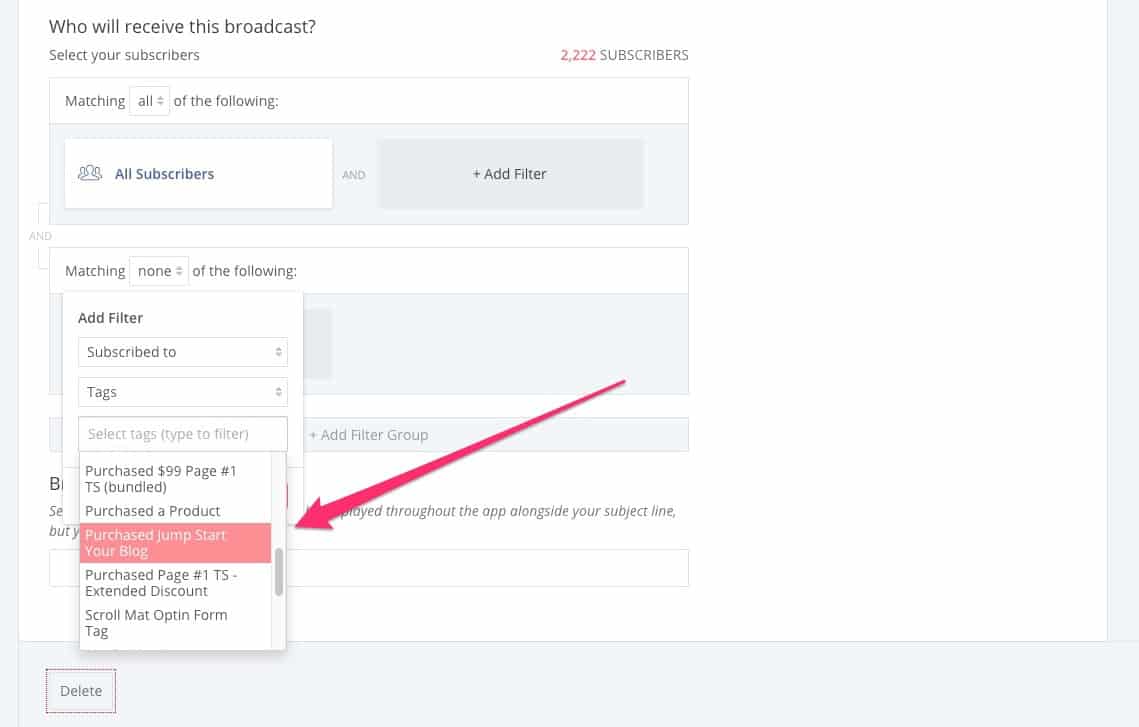
You’ll notice that with the filter applied, the number of subscribers who will receive this broadcast has reduced:
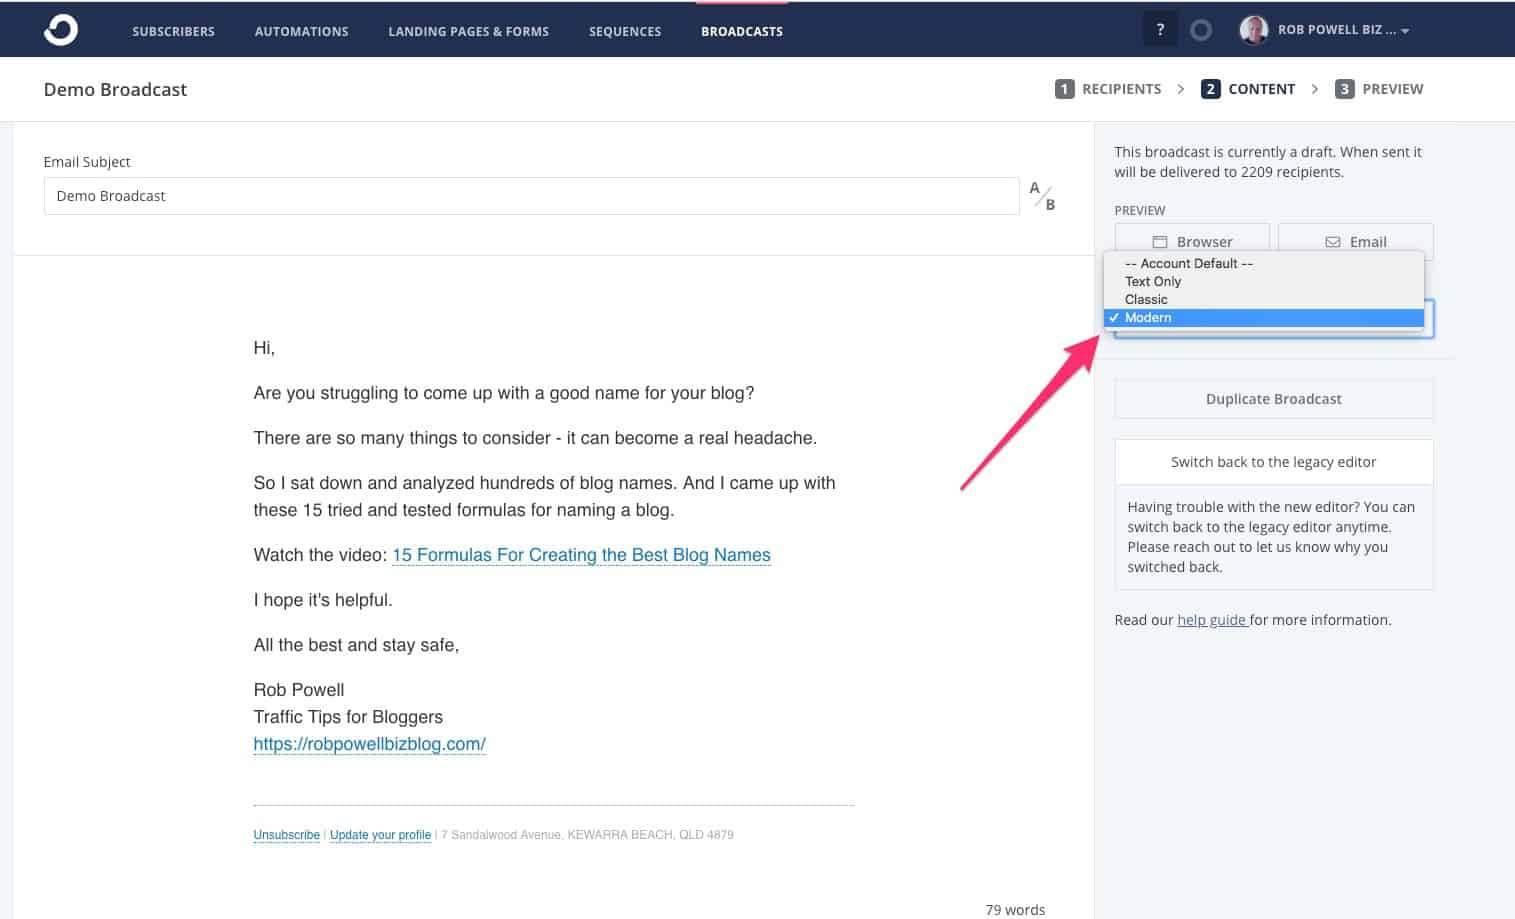
Now, compose your message and choose a style template:
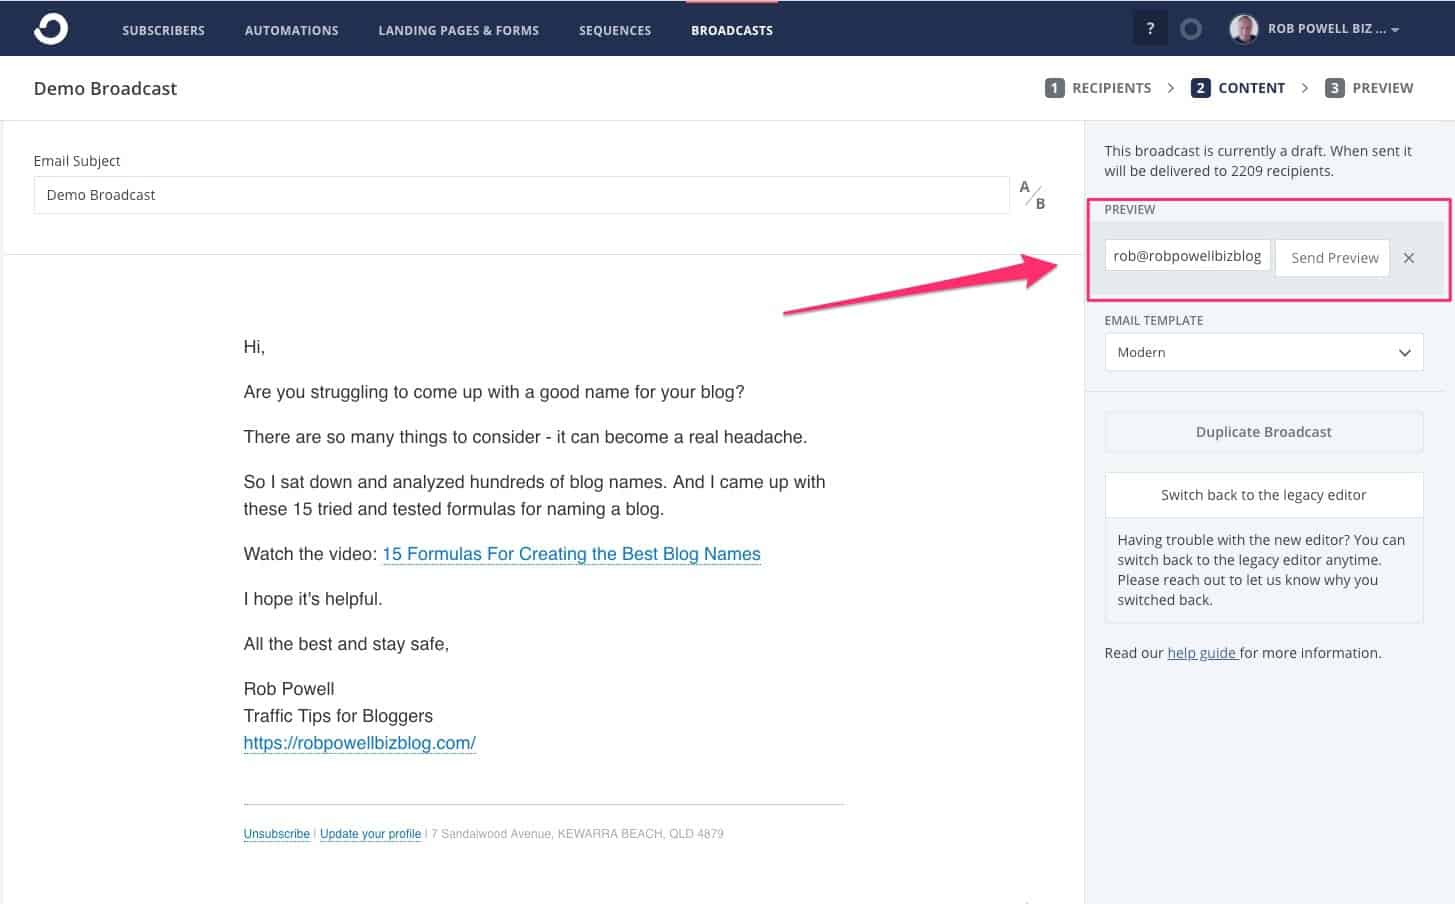
Then, send yourself a preview email:
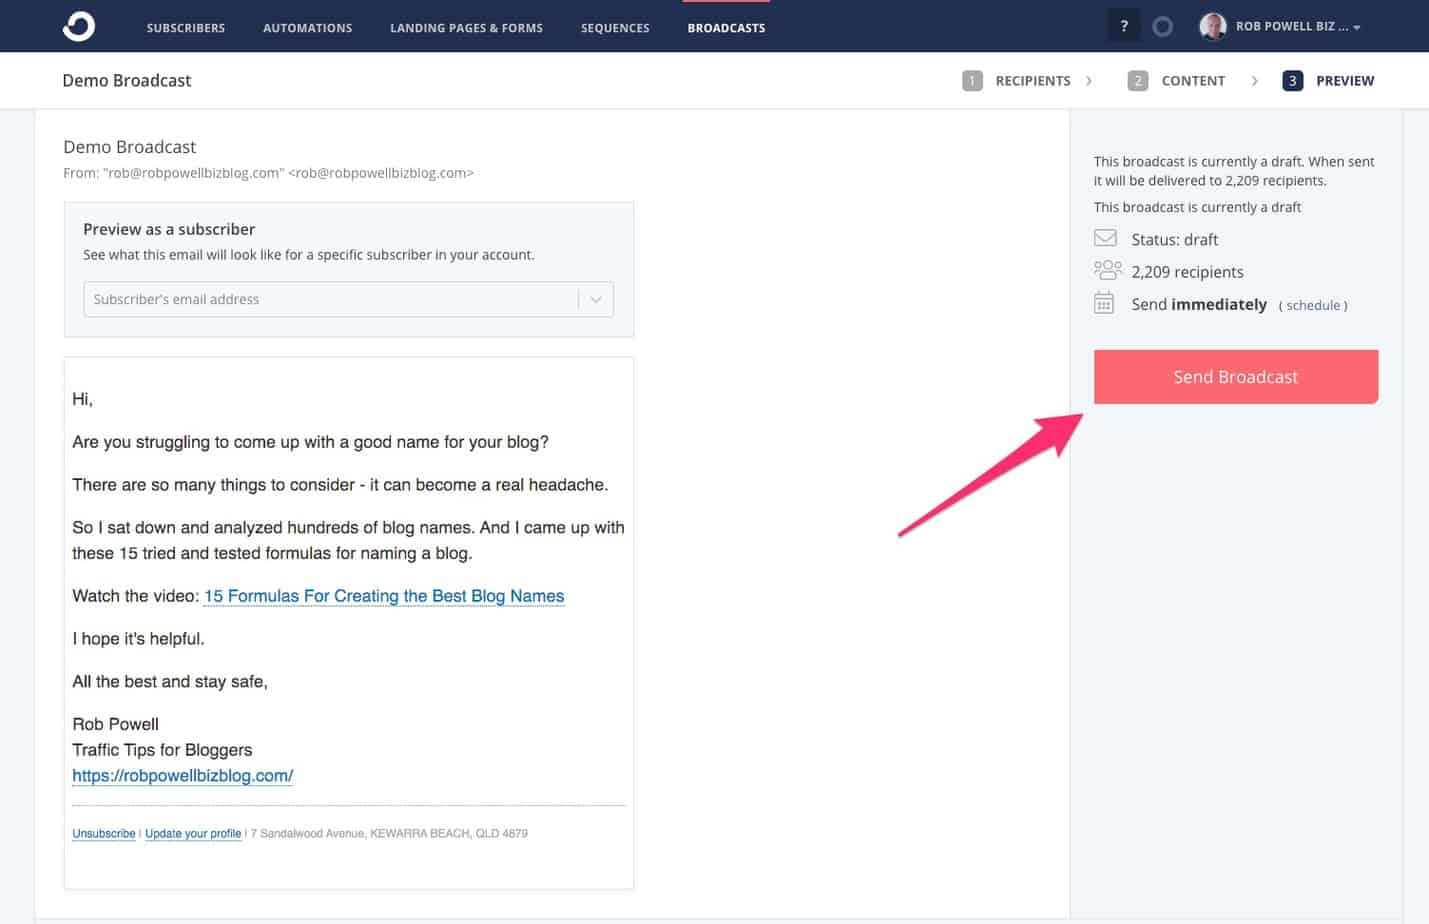
And then click ‘Send Broadcast’:
#7 – Using the Email Builder
One thing you’ll quickly notice about ConvertKit is that the email builder is text-based. It doesn’t allow you to create fancy emails containing graphics.
The reason for this is that ConvertKit believes that the highest-converting emails are simple text emails, not elaborate, image-laden, corporate-style emails.
The email builder in ConvertKit is the same, whether you’re composing an email sequence or a one-off broadcast.
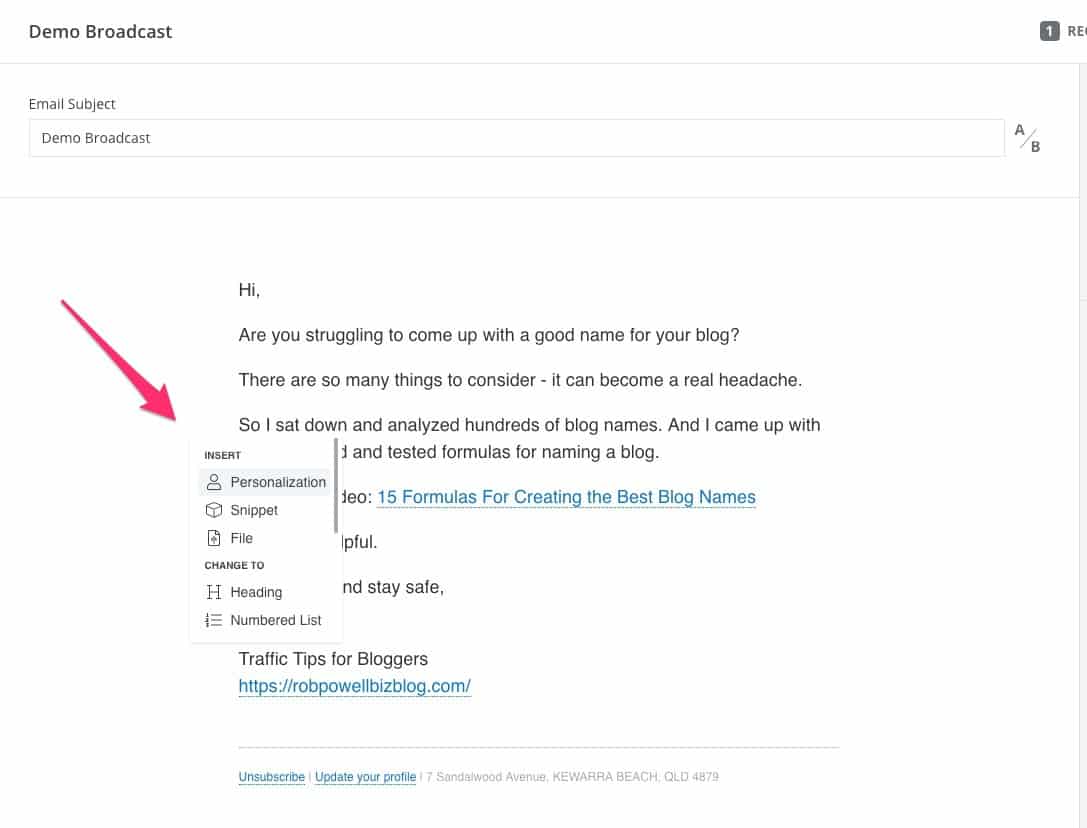
Place your cursor within a paragraph, and then click on the plus sign that appears to the left of the paragraph and you see a dropdown containing a list of formatting options you can apply to that paragraph.
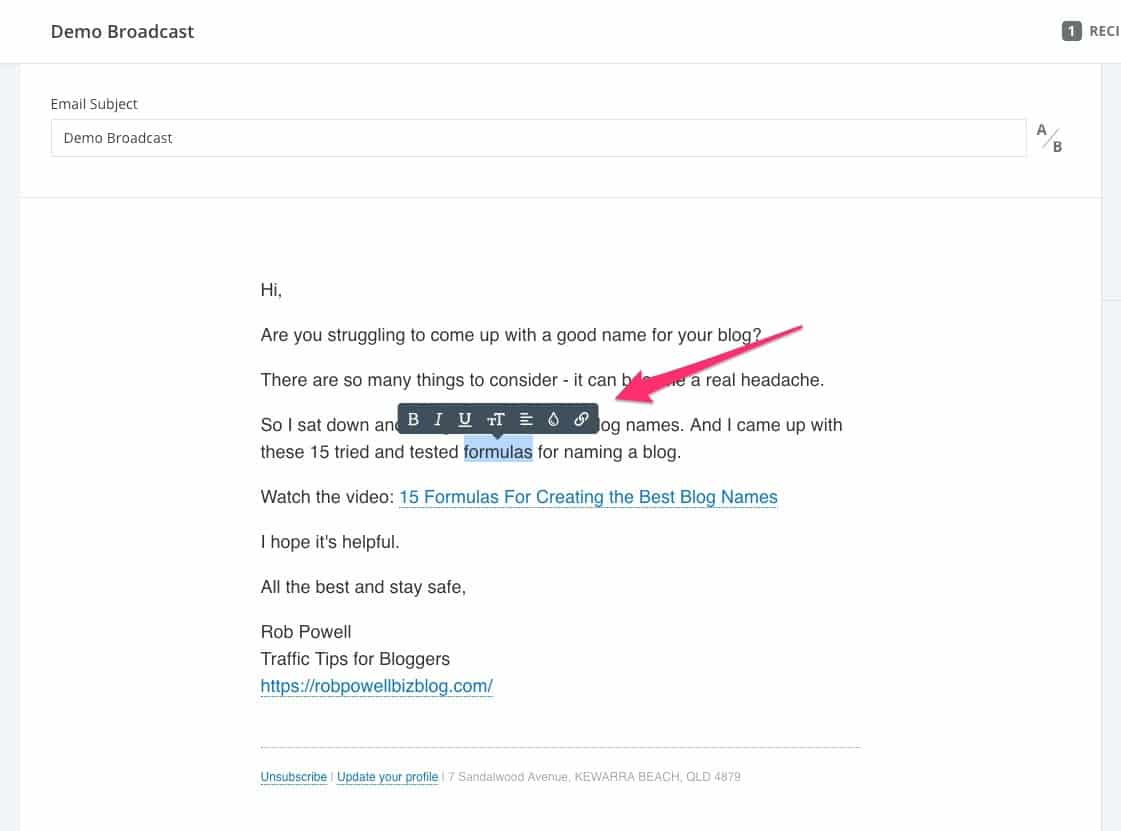
If you want to apply formatting a single word (or group of words) simply select the word, and some formatting options will appear above the selected word:
#8 – Creating and Adding Tags
Segmenting your audience is a important part of how to use ConvertKit and it’s a key to successful email marketing.
Having a segmented list leads to much higher open rates and click-through rates because you are sending information only to those subscribers who are interested in that information.
Most blog websites will have various different audiences. Take my blog for example. I write about the following topics:
- Analytics
- Blogging
- Email Marketing
- List Building
- SEO
- Social Media
- Statistics
- WordPress
- Writing
Someone who joins my list from an article about writing may not be interested in information about SEO.
And that’s where segmenting comes in.
In ConvertKit, you can segment your audience using ‘tags’.
Here’s how it works.
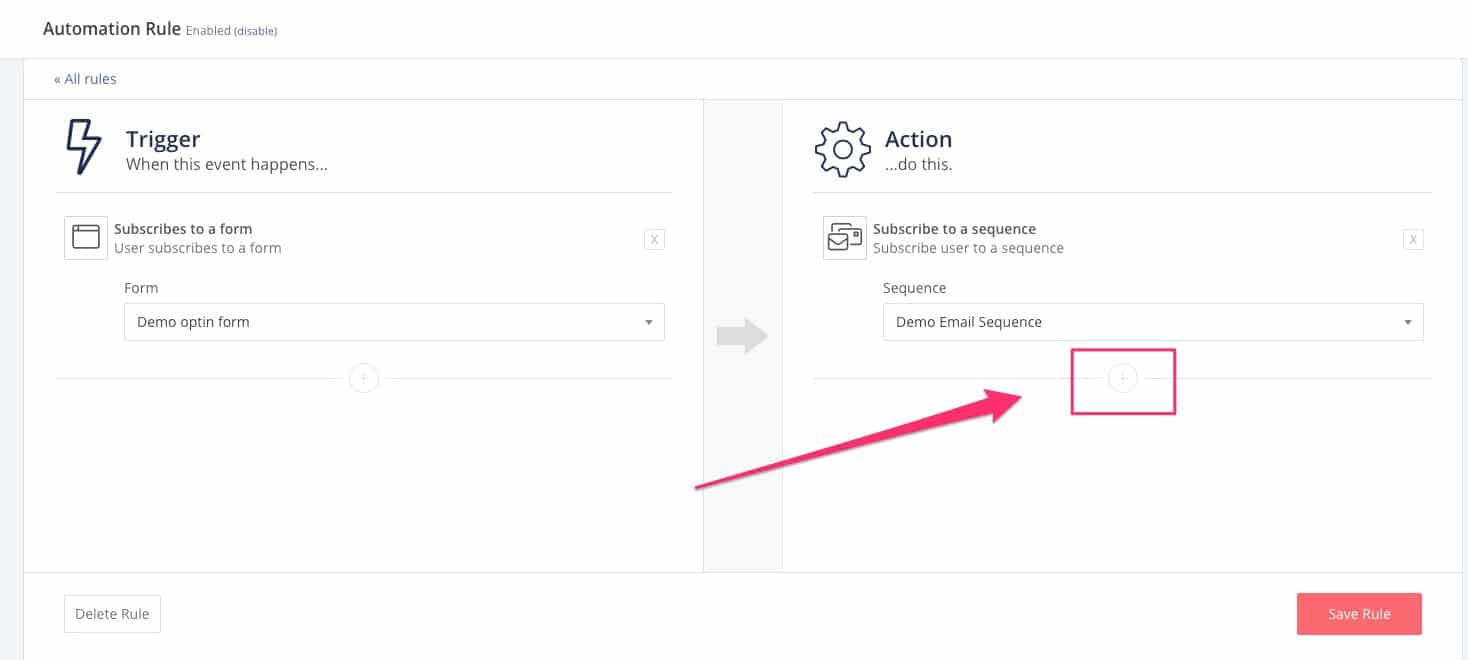
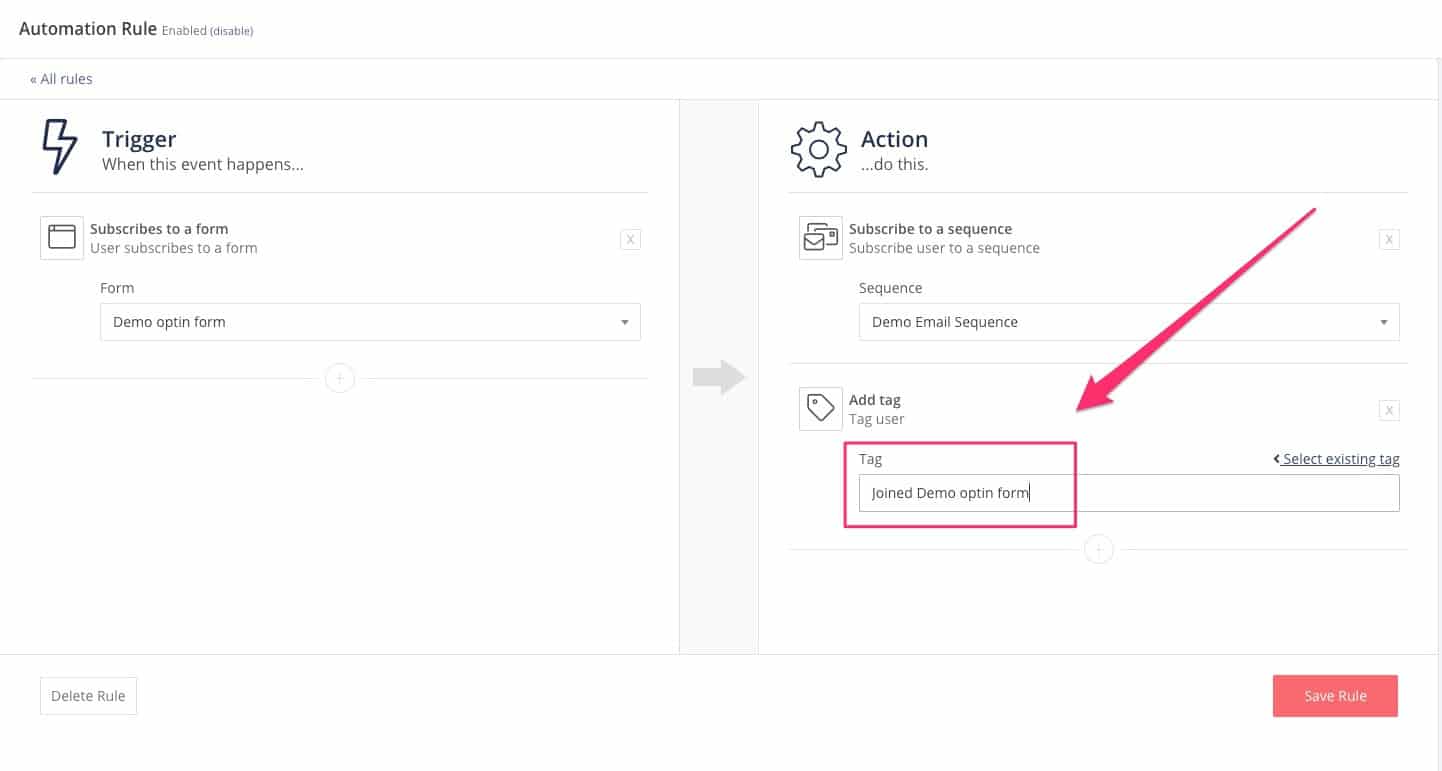
Let’s go back to the rule we created earlier:

Now click on the plus sign in the right-side panel, to add another action:
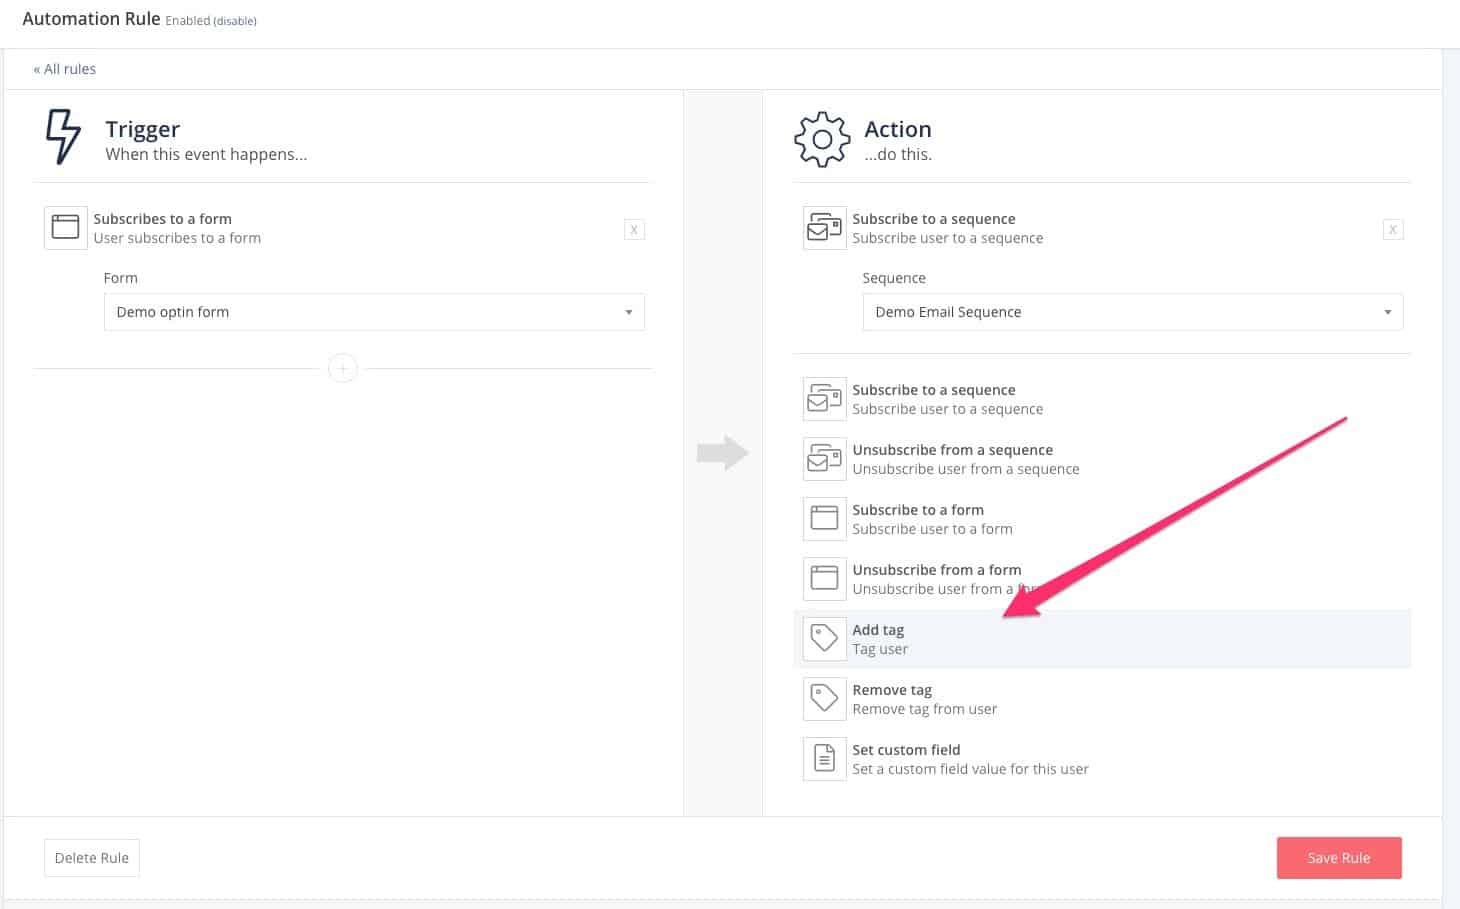
Now click on ‘Add a Tag’:
From the dropdown menu, select the tag you just created:
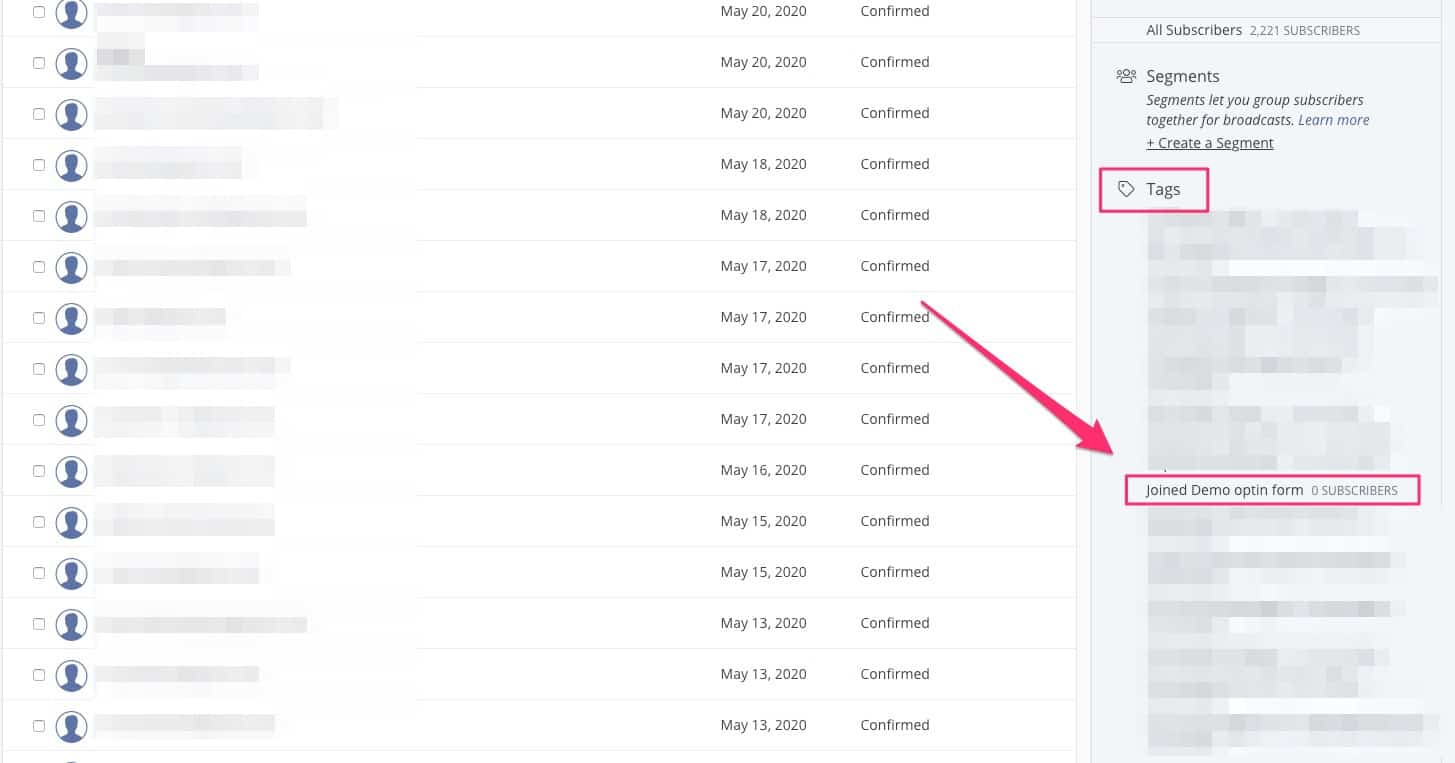
Now click on ‘Subscribers’ in the top menu, and you’ll see a list of your tags in the right sidebar:
#9 – How to Tag Purchases on Teachable
If you’re a course creator and you sell your courses on Teachable (or any other platform) you can link your CK account to Teachable and tag people who purchase specific courses.
Why is this useful?
Firstly, you don’t want to be promoting your course to people who already purchased it – they would probably find that annoying.
When you tag people who purchased a specific course, you can use that tag to create a segment. You can then use that segment to exclude people who purchased that course from any future promotional emails regarding that course.
Secondly, people who already purchased one of your courses are highly likely to purchase any future course you create. So it’s useful to have a segment for people who previously purchased a course. That way you can market your new course to existing ‘converts’.
So how do you connect Teachable to ConvertKit?
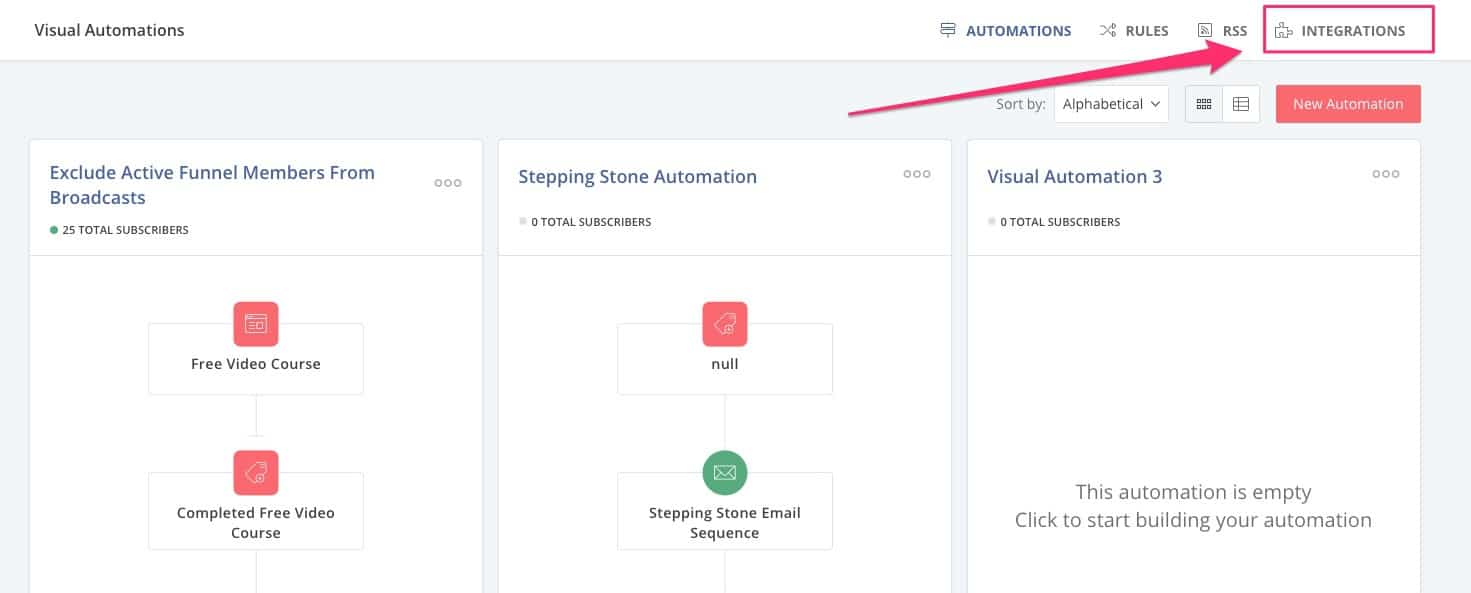
In your ConvertKit account, go into ‘Automations’ and then ‘Integrations’:
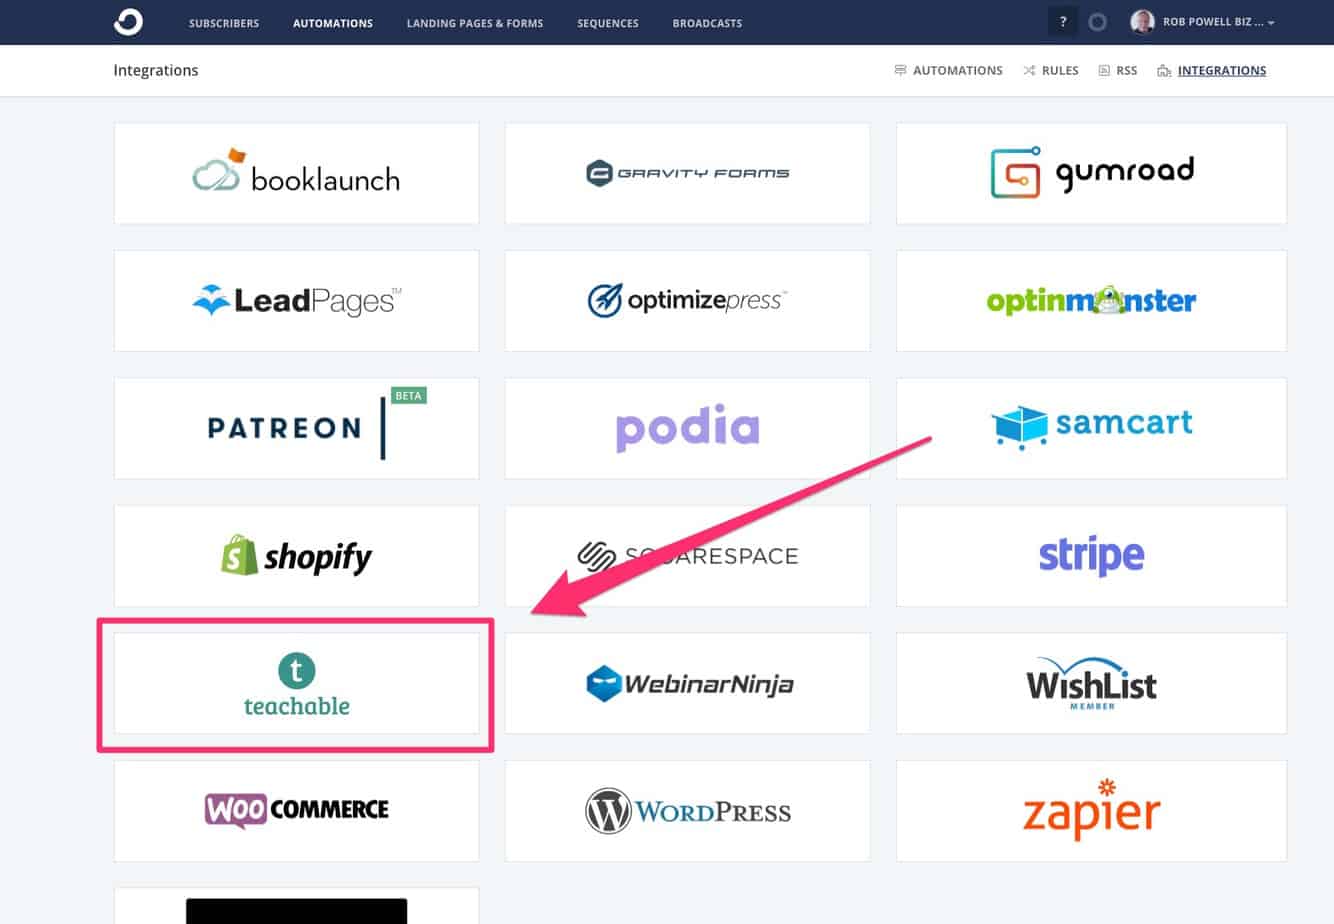
Next, click on the Teachable card:
Because I’ve already connected my Teachable account to ConvertKit, I can’t give you step-by-step screenshots of what to do.
Here, however, is a summary of what you need to do:
- Input your Teachable school’s URL into the relevant field in ConvertKit
- Get your ConvertKit API Secret
- Log in to your Teachable school and go to Settings
- Click Integrations from the submenu
- Toggle on the ConvertKit integration
- In the ConvertKit API Key field, enter the API Secret you copied from ConvertKit
For detailed instructions on connecting Teachable to ConvertKit, see this article.
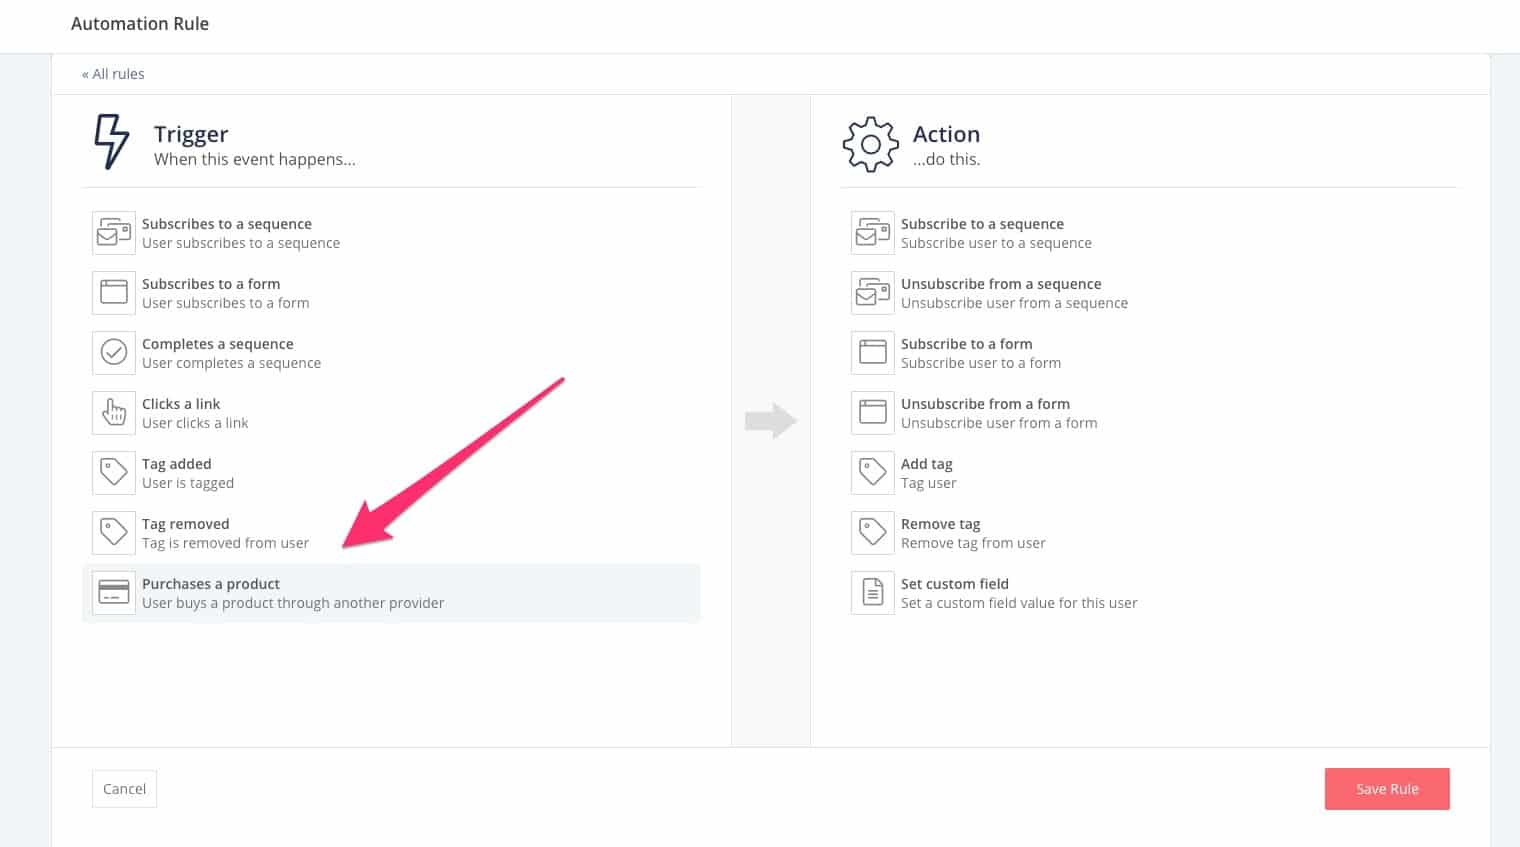
Once your Teachable account is connected to ConvertKit, go to ‘Automations’ in CK and then ‘Rules’ and click ‘New Rule’.
For the trigger, choose ‘Purchases a Product’:
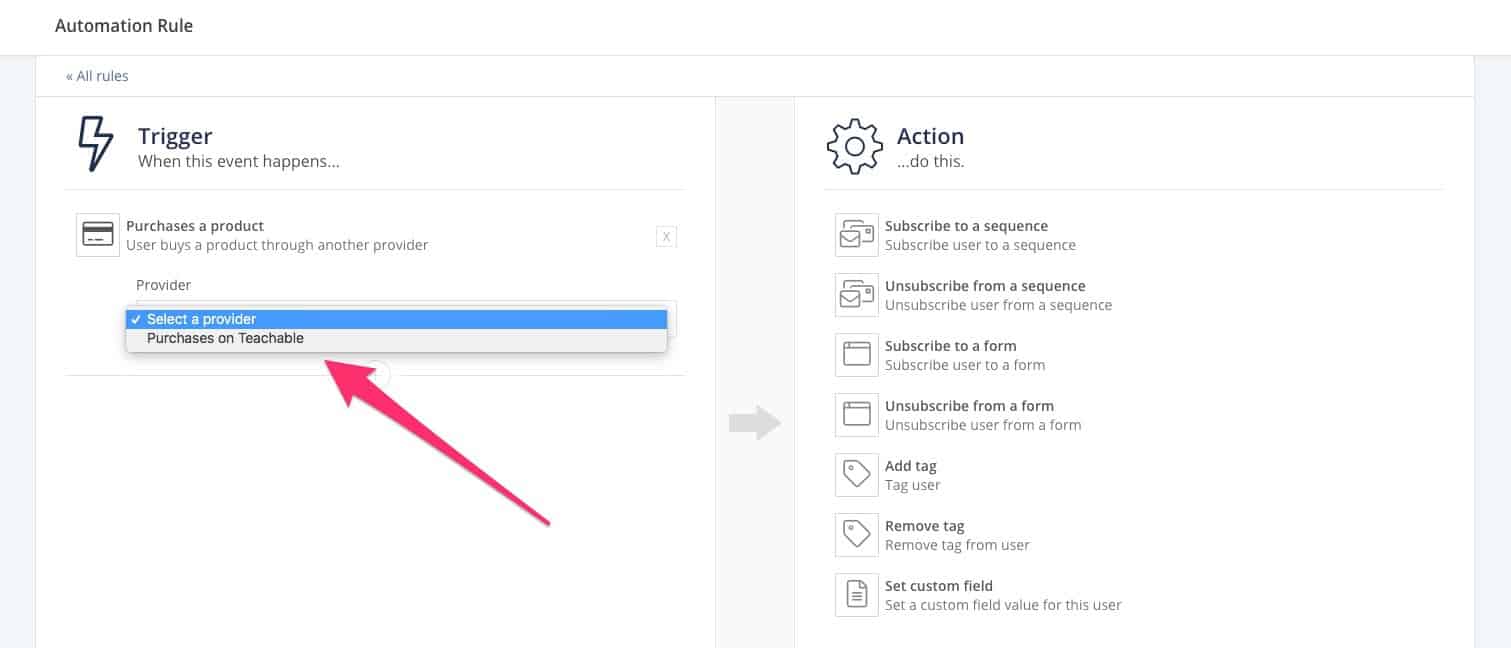
From the dropdown, choose ‘Purchases on Teachable’:
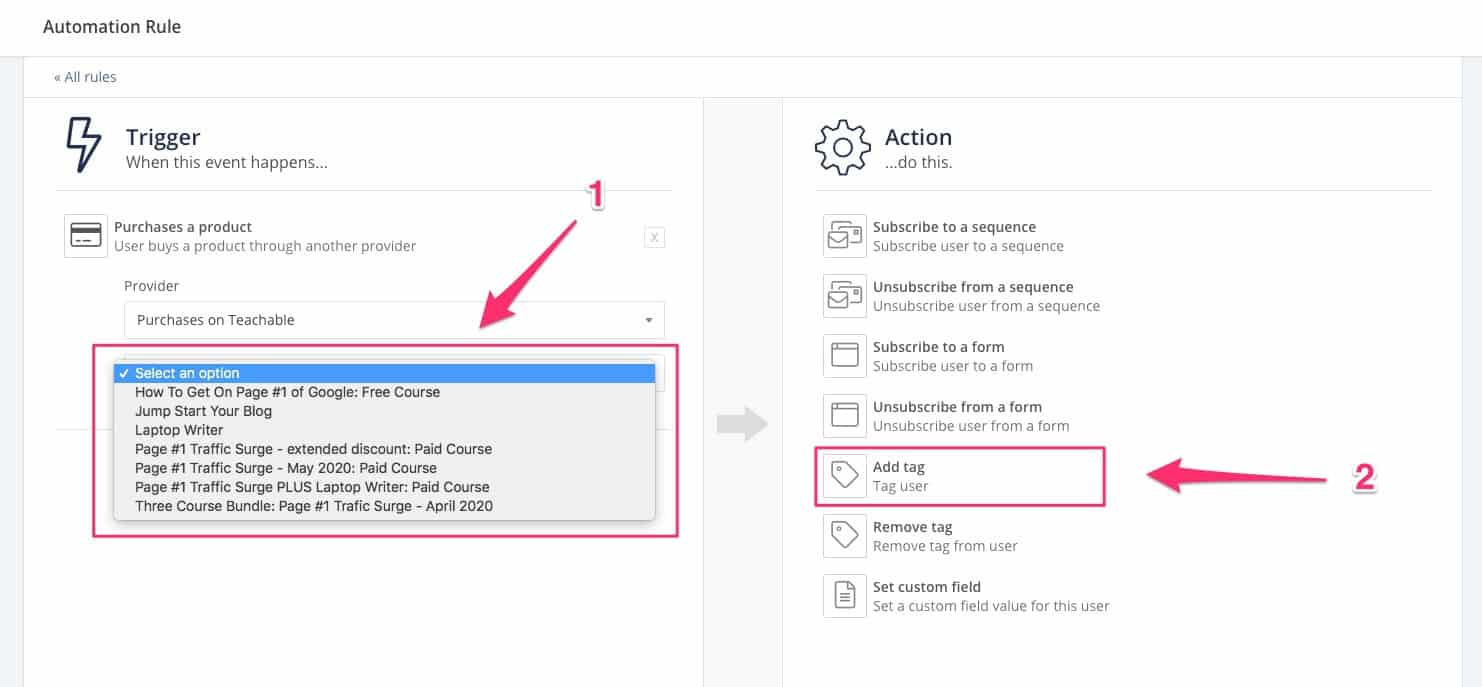
Choose the specific course that you want to tag and then click ‘Add tag’:
Then, simply follow the procedure I outlined above for creating a tag to be added to that trigger.
#10 – Creating a Segment
A segment is a portion of your list that has a particular interest that sets them apart from the rest of your list. In ConvertKit, you create a segment by first creating a tag and applying the tag to individual subscribers.
To create a segment:
- Click on ‘Create a segment’
- Give your segment a name
- Select ‘all’ from the dropdown
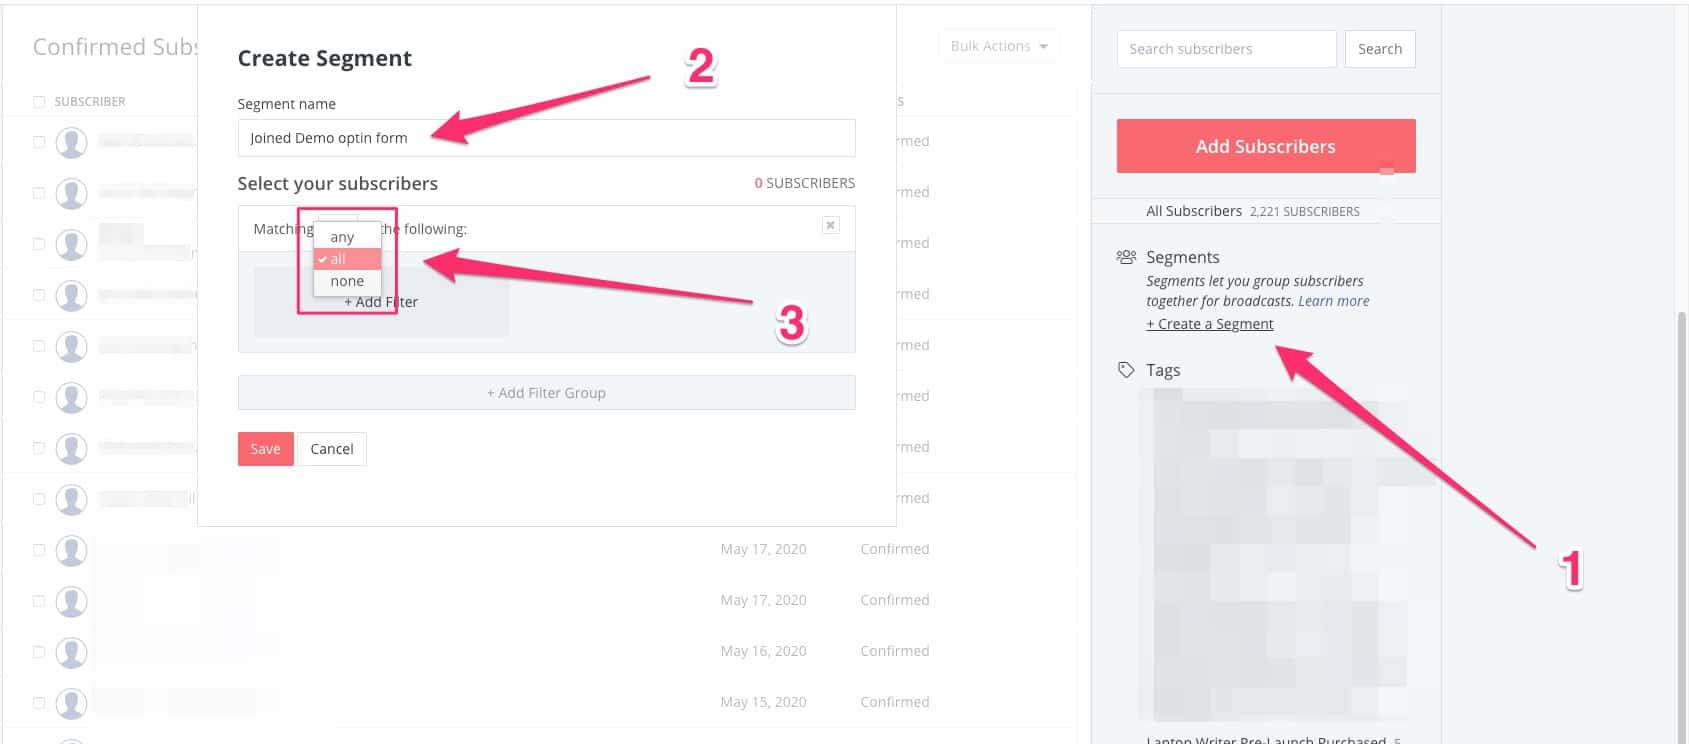
In the next dialog box, select ‘subscribed to tags’:
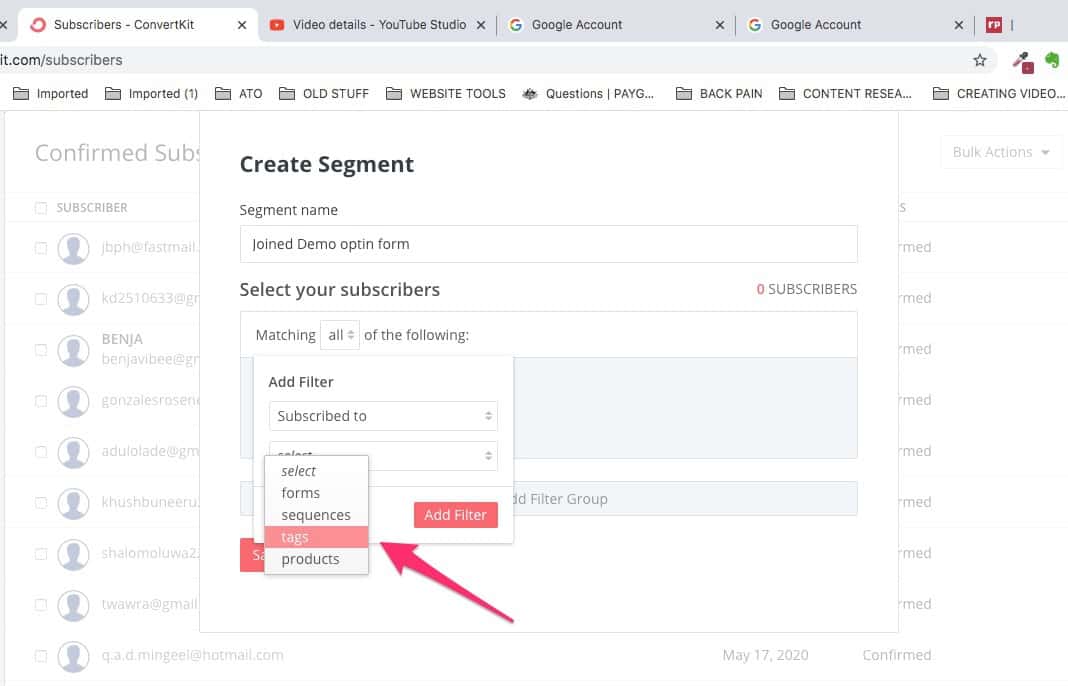
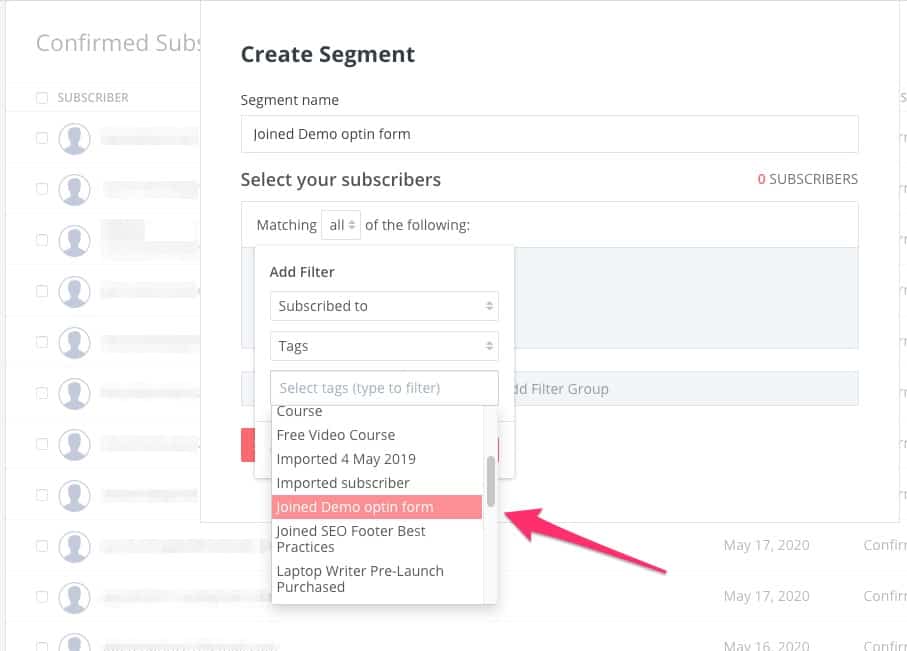
Then choose the tag from the dropdown:
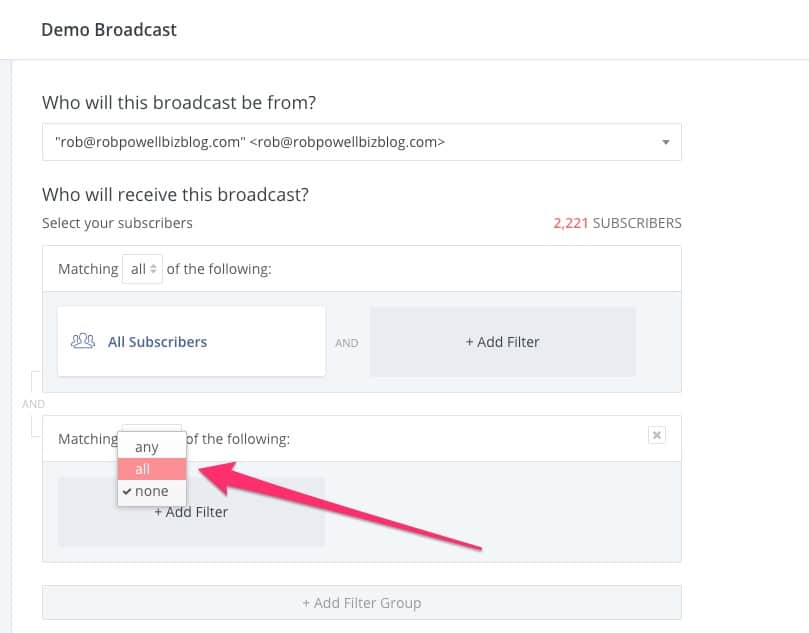
If we only want to email people in that segment, we now need to apply that segment as a filter to our broadcast. Go back to the demo broadcast we created before, and add a filter with the setting ‘all’:
Next, select ‘within segment’:
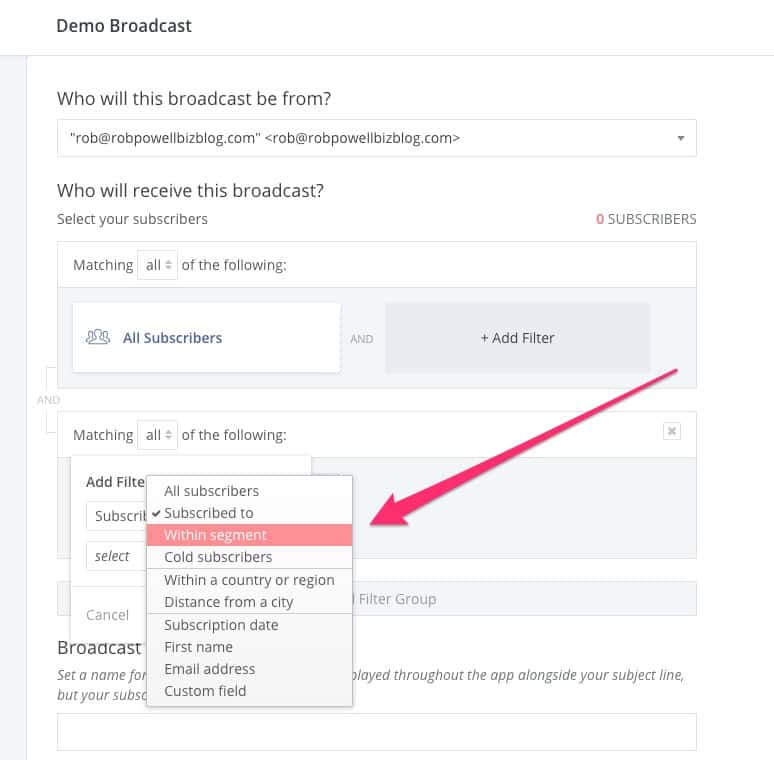
From the dropdown, choose the segment you want your email to go to:
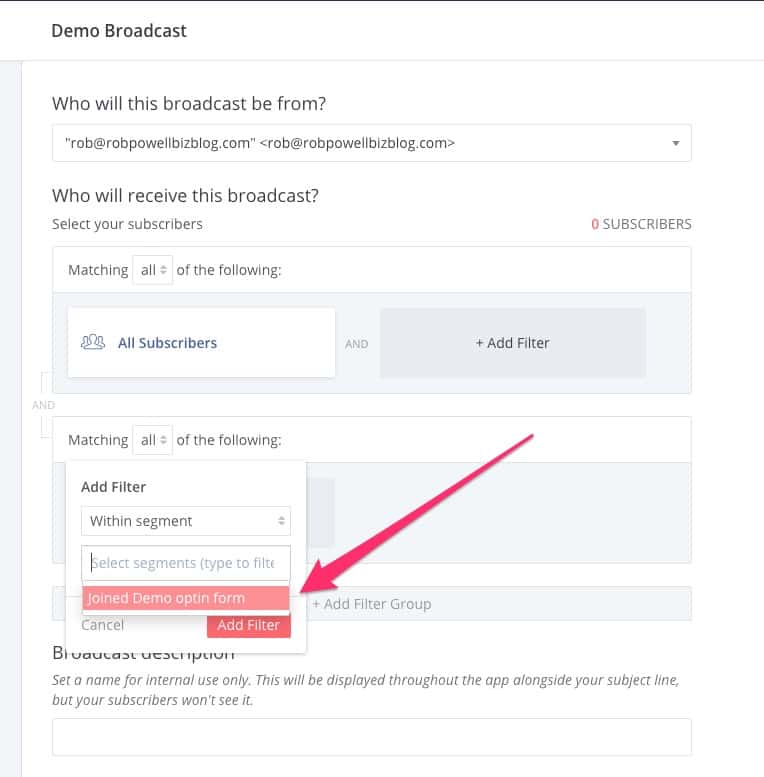
You can see that with the segment selected, the number of recipients for this broadcast has dropped down to zero (because the segment is empty).
#11 – Using Link Triggers
Link triggers are links that you place in an email. When someone clicks on a link trigger, it triggers an action, such as adding a tag to that subscriber.
This can be useful when you want to know which of your subscribers are interested in a particular product.
Let’s say you are thinking of designing a course on ‘How to use Instagram to get more traffic to your website’ and you want to know how many of your subscribers are interested in that. You could send interested subscribers to an optin form – that would be one way to gauge the level of demand for such a course.
But getting people to fill out yet another optin form is cumbersome. Especially when there’s a much simpler way of doing it.
Just include in your email a link trigger that links to a page where you describe in more detail what the new course would cover.
Then, you can tag the subscribers who clicked on that link trigger and you’ll get a good estimate of how popular such a course would be amongst your subscribers.
Here’s how to use link triggers.
Go to Automations and then Rules, and click ‘Add Rule’:
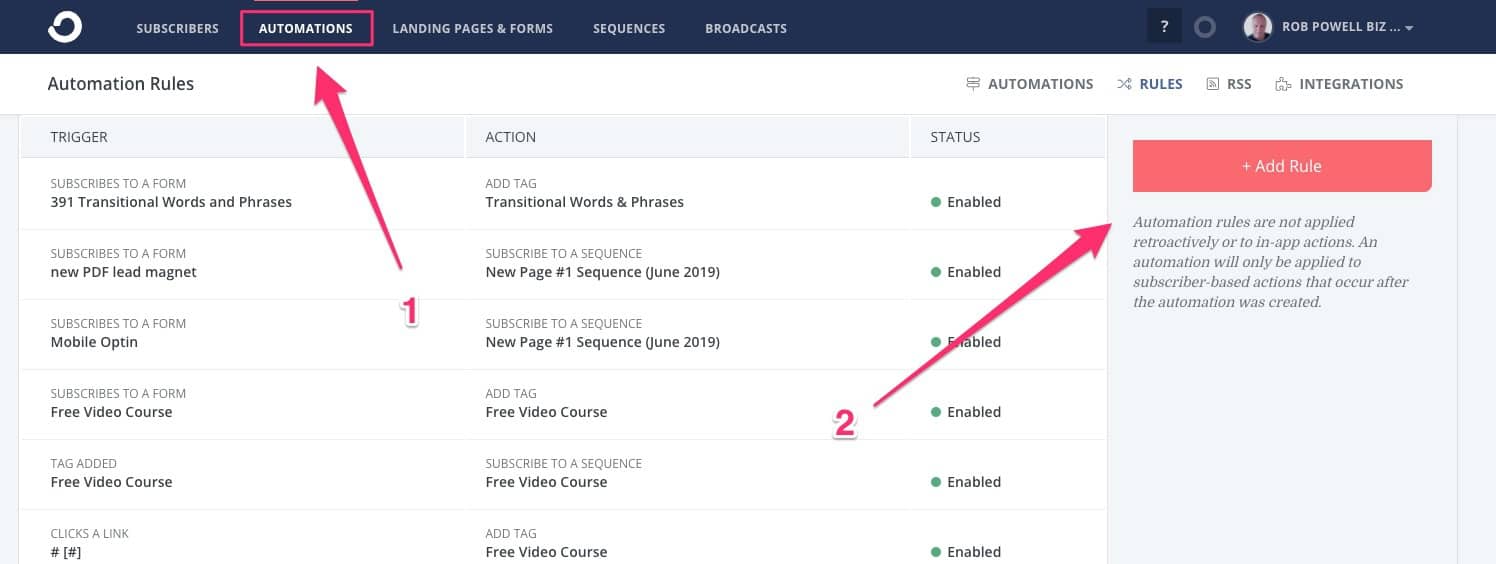
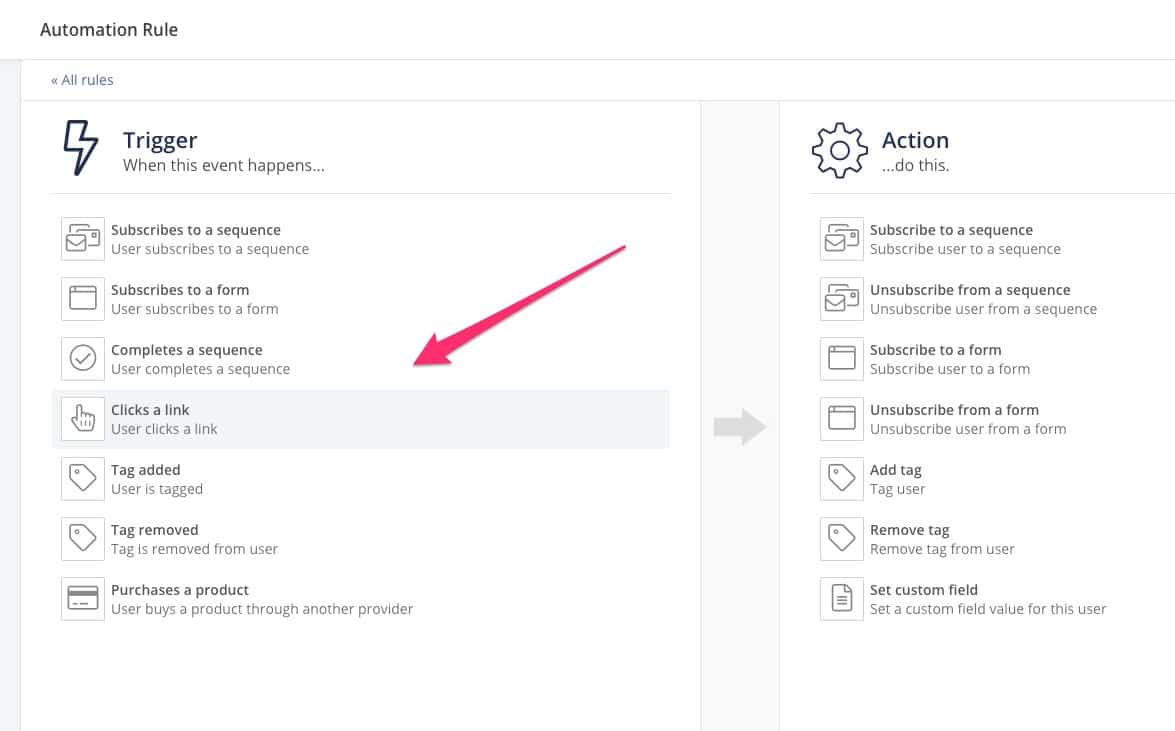
In the left panel, choose ‘Clicks a link’:
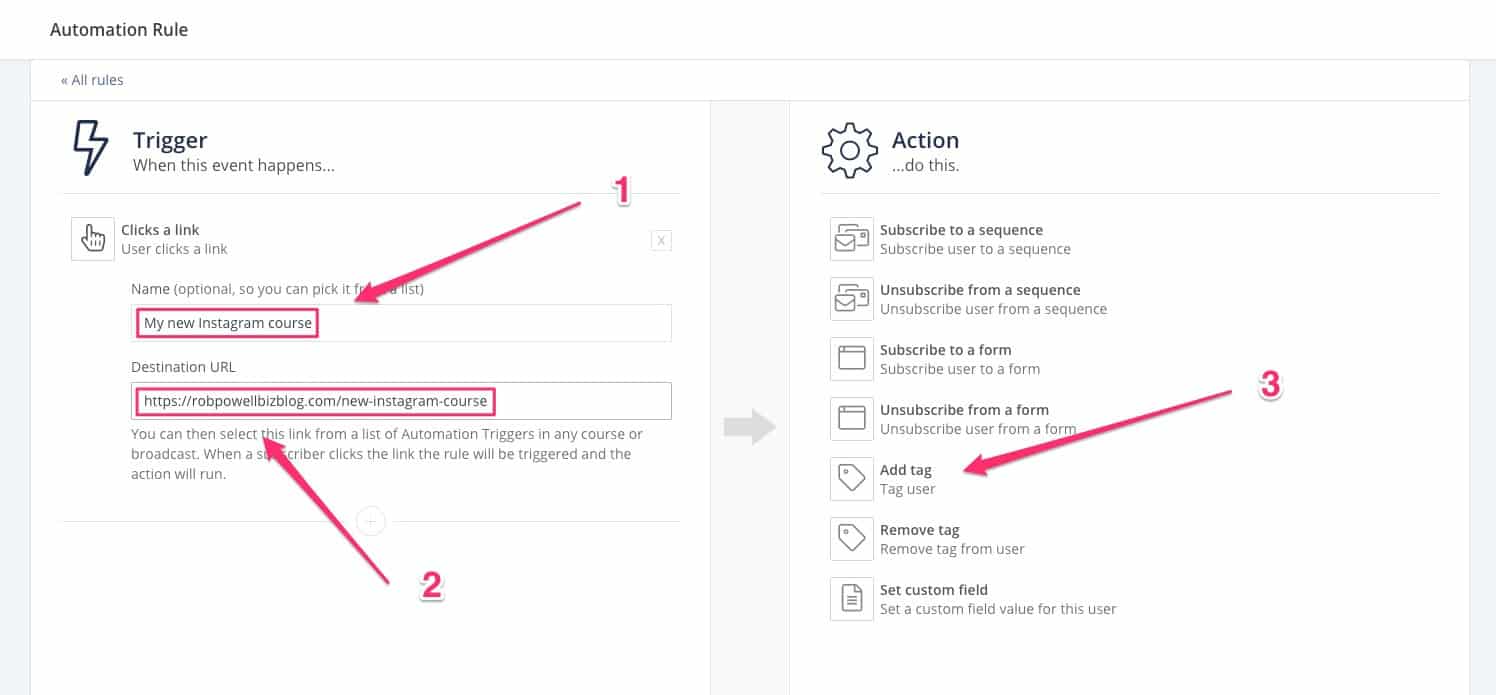
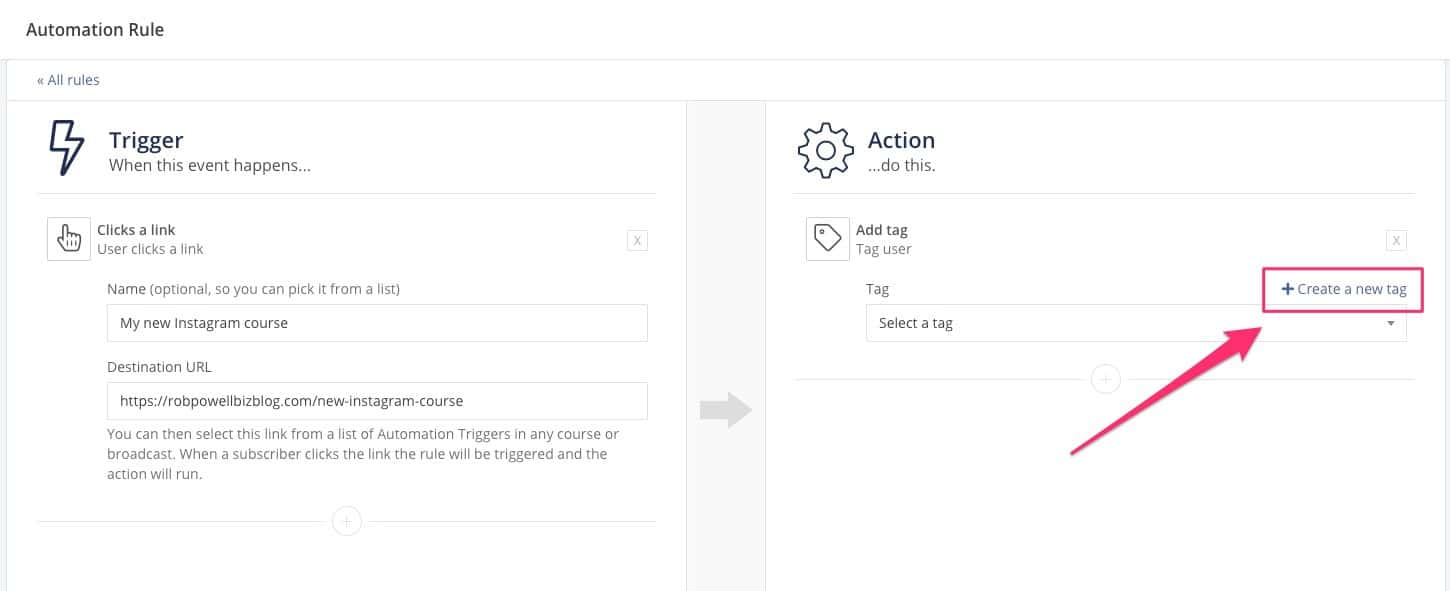
Give your link trigger a name and a destination URL (this is where your subscribers can get more information about your proposed Instagram course). And then, in the right-side panel, click on ‘Add tag’:
Click ‘Create a new tag’:
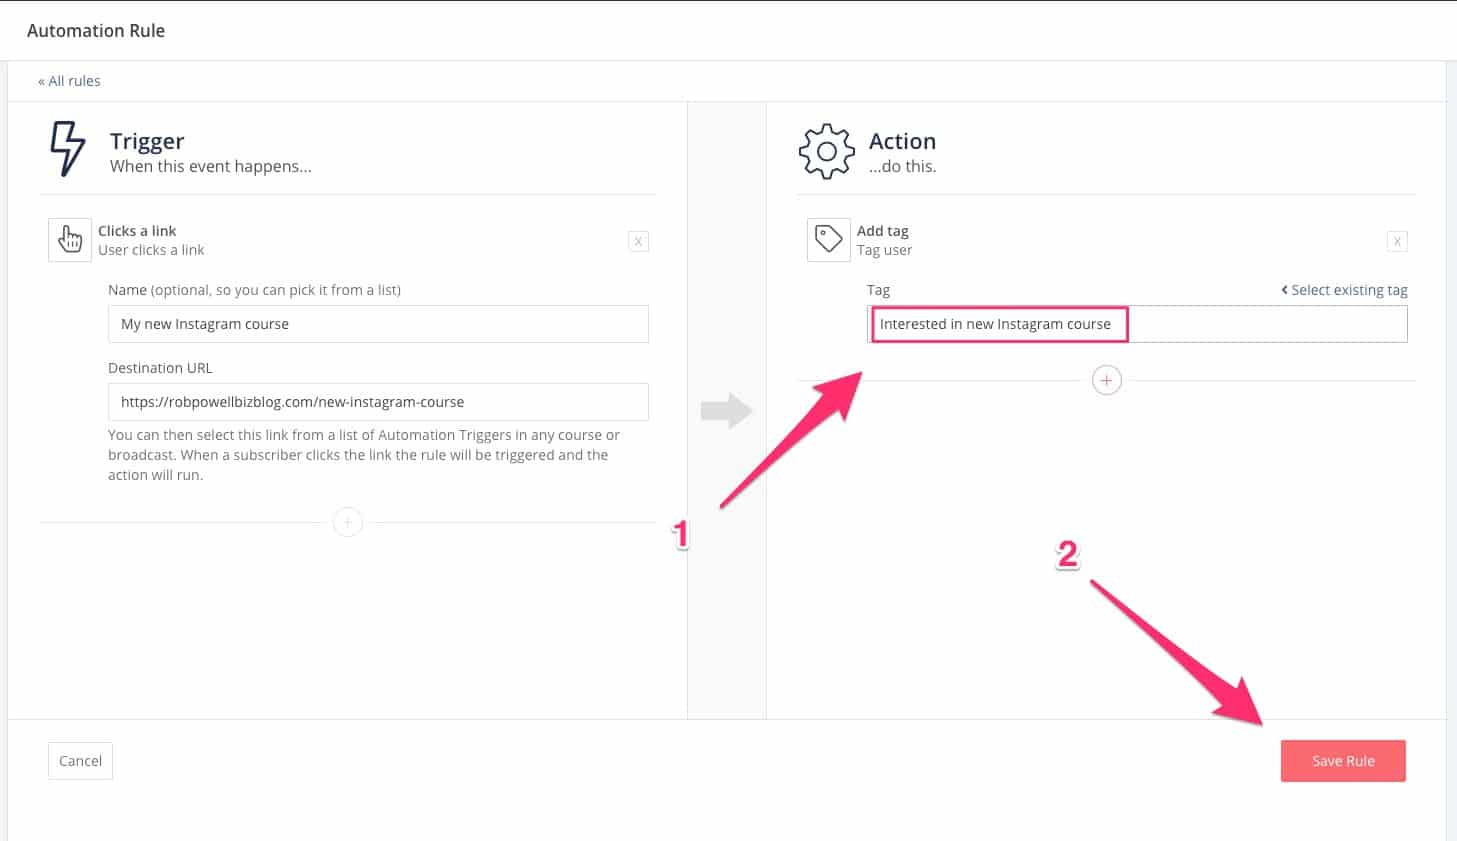
Give your new tag a name and then click ‘Save Rule’:
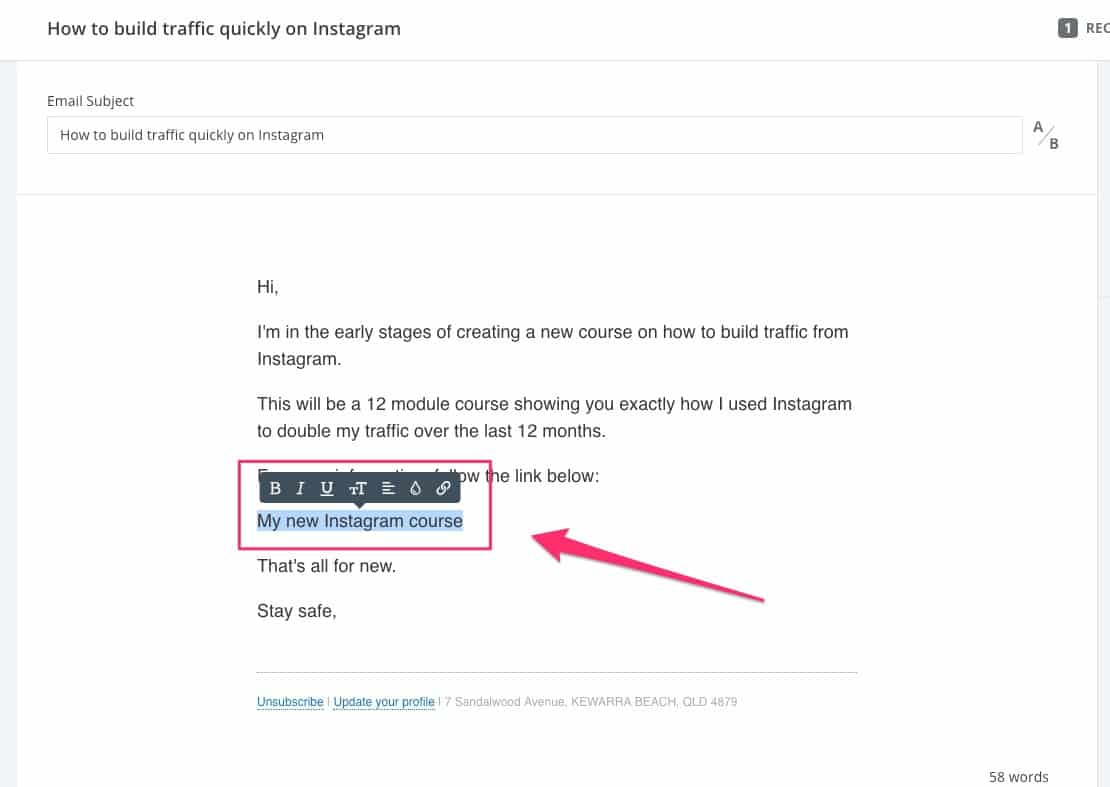
Here’s how to use your link trigger in an email.
Create a new broadcast and compose your message. Then highlight the text where you want to add the link trigger:
In the dialog box that opens up, click the blue ‘Link Triggers’ button:
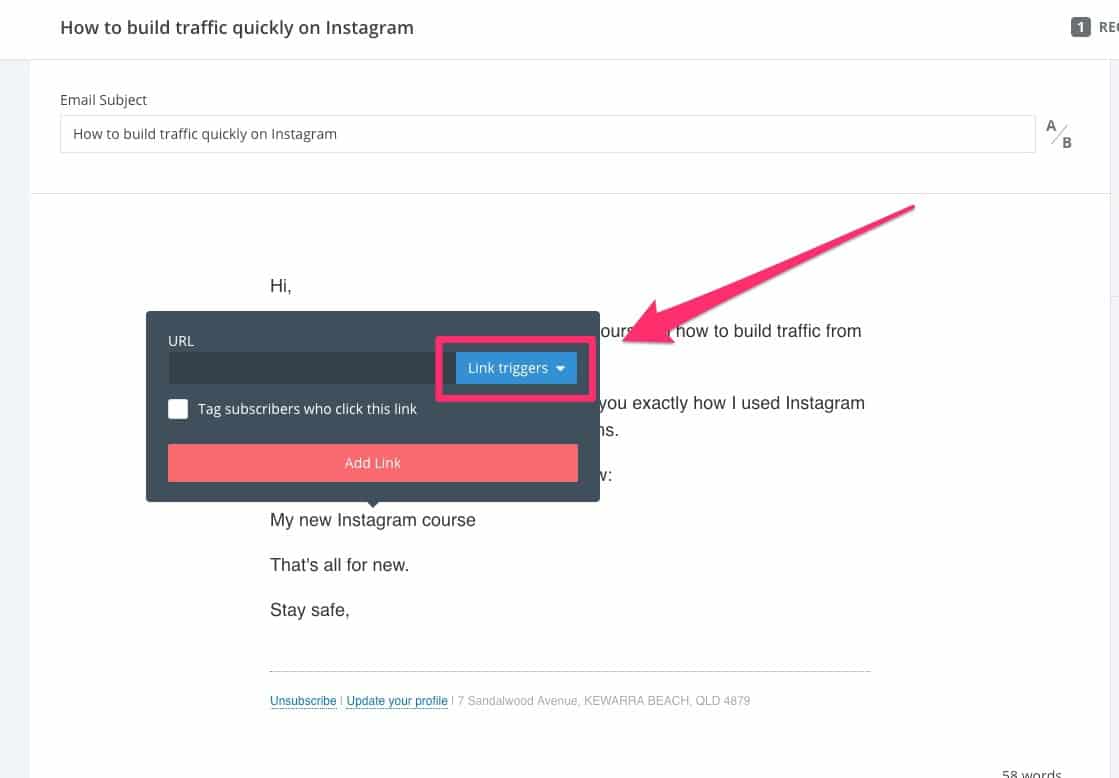
Then select the link trigger you just created:
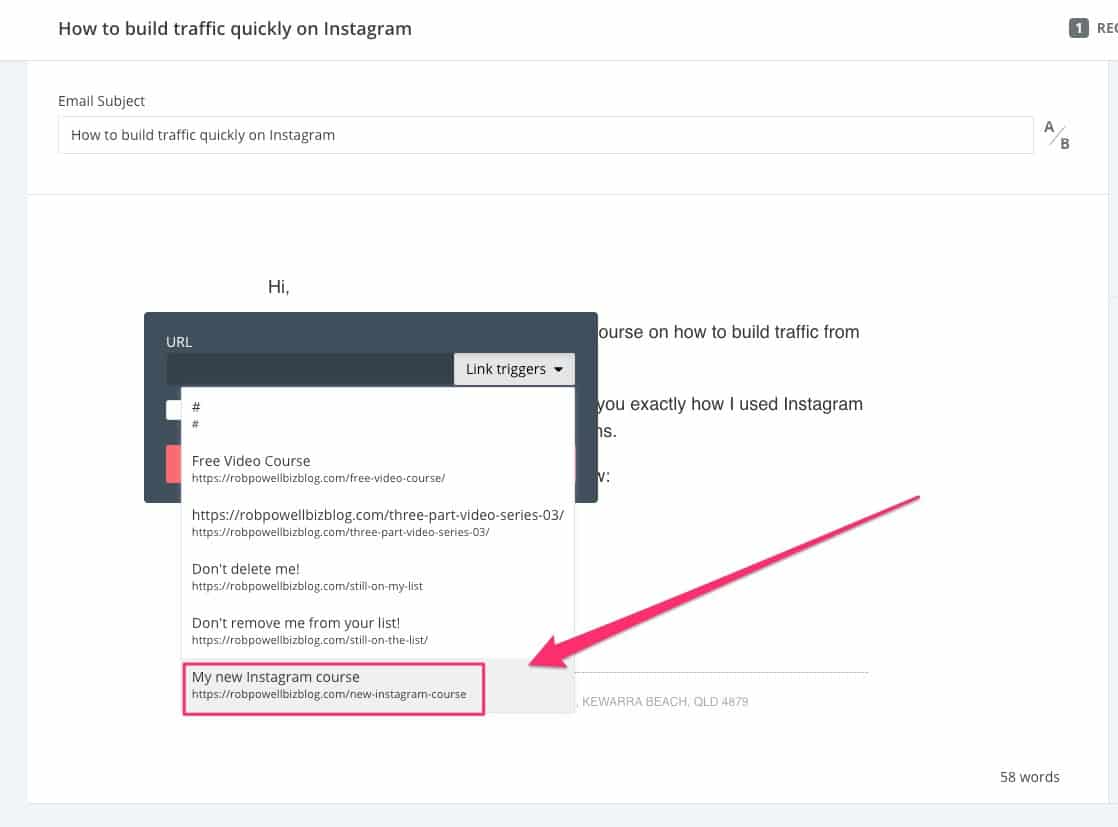
And that’s it – people who click on that link will now be tagged as ‘Interested in new Instagram course’.
When your course is ready to launch, instead of emailing your entire list, you can just email those subscribers who expressed an interest.
Conclusion
You should now be able to get started with ConvertKit and create your first optin forms, email sequences, and email segments.
Here’s a re-cap of what we have covered in this guide on how to use ConvertKit:
- create an opt-in form
- connect opt-in forms with third-party lead capture tools
- use ConvertKit’s ‘Incentive Email’
- create an email sequence
- connect an email sequence to a form
- connect a form to a lead capture tool
- send an email broadcast
- use the email builder
- create tags and add them to subscribers
- tag purchases on Teachable
- create segments
- create link triggers and use them in email broadcasts
I tried a whole series of different email marketing services before arriving at ConvertKit. And I put off signing up for CK for a long time, as it seemed pricey compared to other EMS solutions.
But my sales increased dramatically after I started using ConvertKit – it has well and truly paid for itself!
Why not give it a test run? You can try out ConvertKit for free at this link.


