Sitecore Headless Next.Js SDK recently brought the feature that makes it possible to have multiple websites from Sitecore content tree being served by the same rendering hoist JSS application. It uses Next.js Middleware to serve the correct Sitecore site based on the incoming hostname.
Why and When to Use the Multisite Add-on
The Multisite Add-on is particularly useful in scenarios where multiple sites share common components or when there is a need to centralize the rendering logic. It simplifies deployment pipelines and reduces infrastructure complexity, making it ideal for enterprises managing a portfolio of websites under a unified architecture. This approach saves resources and ensures a consistent user experience across all sites.
How it works
The application fetches site information at build-time, not at runtime (for performance reasons). Every request invokes all Next.js middleware. Because new site additions are NOT frequent, fetching site information at runtime (while technically possible) is not the best solution due to the potential impact on visitor performance. You can automate this process using a webhook to trigger automatic redeployments of your Next.js app on publish.
Sitecore provides a relatively complicated diagram of how it works (pictured below), but if you do not get it from the first look, do not worry as you’ll get the understanding after reading this article.
Technical Implementation
There are a few steps one must encounter to make it work. Let’s start with the local environment.
Since multisite refers to different sites, we need to configure hostnames. The Main site operates on main.localhost hostname, and it is already configured as below:
.\.env
    RENDERING_HOST=main.localhost
.\docker-compose.override.yml
    PUBLIC_URL: "
For the sake of the experiment, we plan to create a second website served by second.localhost locally. To do so, let’s add a new environmental variable to the root .env file (SECOND_HOST=second.localhost) and introduce some changes to init.ps1 script:
$renderingHost = $envContent | Where-Object { $_ -imatch "^RENDERING_HOST=.+" }
$secondHost = $envContent | Where-Object { $_ -imatch "^SECOND_HOST=.+" }
$renderingHost = $renderingHost.Split("=")[1]
$secondHost = $secondHost .Split("=")[1]
down below the file we also want to create SSL certificate for this domain by adding a line at the bottom:
& $mkcert -install
# & $mkcert "*.localhost"
& $mkcert "$xmCloudHost"
& $mkcert "$renderingHost"
& $mkcert "$secondHost"
For Traefic to pick up the generated certificate and route traffic as needed, we need to add two more lines at the end of .\docker\traefik\config\dynamic\certs_config.yaml file:
tls:
  certificates:
    - certFile: C:\etc\traefik\certs\xmcloudcm.localhost.pem
      keyFile: C:\etc\traefik\certs\xmcloudcm.localhost-key.pem
    - certFile: C:\etc\traefik\certs\main.localhost.pem
      keyFile: C:\etc\traefik\certs\main.localhost-key.pem
    - certFile: C:\etc\traefik\certs\second.localhost.pem
      keyFile: C:\etc\traefik\certs\second.localhost-key.pem
If you try initializing and running – it may seem to work at first glance. But navigating to second.localhost in the browser will lead to an infinite redirect loop. Inspecting the cause I realized that occurs due to CORS issue, namely that second.localhost does not have CORS configured. Typically, when configuring the rendering host from docker-compose.override.yml we provide PUBLIC_URL environmental variable into the rendering host container, however, that is a single value and we cannot pass multiple.
Here’s the more descriptive StackOverflow post I created to address a given issue
To resolve it, we must provide the second host in the below syntax as well as define CORS rules as labels into the rendering host, as below:
labels:
  - "traefik.enable=true"
  - "traefik.http.routers.rendering-secure.entrypoints=websecure"
  - "traefik.http.routers.rendering-secure.rule=Host(`${RENDERING_HOST}`,`${SECOND_HOST}`)"
  - "traefik.http.routers.rendering-secure.tls=true"
  # Add CORS headers to fix CORS issues in Experience Editor with Next.js 12.2 and newer
  - "traefik.http.middlewares.rendering-headers.headers.accesscontrolallowmethods=GET,POST,OPTIONS"
  - "traefik.http.middlewares.rendering-headers.headers.accesscontrolalloworiginlist=
  - "traefik.http.routers.rendering-secure.middlewares=rendering-headers"
Once the above is done, you can run the PowerShell prompt, initialize, and spin up Sitecore containers, as normal, by executing init.ps1 and up.ps1 scripts.
Configuring Sitecore
Wait until Sitecore spins up, navigate to a site collection, right-click it, and add another website calling it Second running on a hostname second.localhost.
Make sure second site uses the same exact application name as main, you can configure that from /sitecore/content/Site Collection/Second/Settings item, App Name field. That ensures the purpose of this exercise is for both sites to reuse the same rendering host application.
You should also make sure to match the values of the Predefined application rendering host fields of /sitecore/content/Site Collection/Second/Settings/Site Grouping/Second and /sitecore/content/Site Collection/Main/Settings/Site Grouping/Main items.
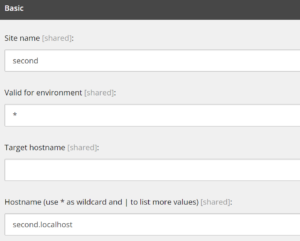
Another important field here is Hostname, make sure to set these fields for both websites:

Now you are good to edit Home item of Second site. Multisite middleware does not affect the editing mode of Sitecore, so from there, you’ll see no difference.
Troubleshooting
If you’ve done everything right, but second.localhost resolves to the Main website, let’s troubleshoot. The very first location to check is .\src\rrh\src\temp\config.js file. This file contains sites variable with the array of sites and related hostnames to be used for the site resolution. The important fact is that a given file is generated at the build time, not runtime.
So, you open it up and see an empty array (config.sites = process.env.SITES || '[]') that means you just need to initialize the build, for example by simply removing and recreating the rendering host container:
docker-compose kill rendering
docker-compose rm rendering -f
docker-compose up rendering -d
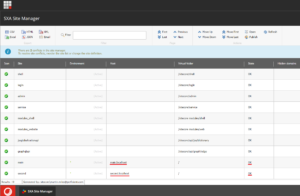
Also, before running the above, it helps to check SXA Site Manager, which is available under the PowerShell Toolbox in Sitecore Desktop. You must see both sites and relevant hostnames there and in the correct order – make sure to move them as high as possible, as this site chain works by “first come – first served” principle.

After rendering host gets recreated (it may take a while for both build and spinning up steps), check the site’s definition at .\src\rrh\src\temp\config.js again. It should look as below:
config.sites = process.env.SITES || '[{"name":"second","hostName":"second.localhost","language":""},{"name":"main","hostName":"main.localhost","language":""}]'
The amount of SXA client site records must match the records from SXA Site Manager. Now, running second.localhost in the browser should show you rendered home page of the second site.
Another technique of troubleshooting is to inspect middleware logs. To do so, create .env.local file at the rendering host app root (if does not exist yet) and add the debugging parameter:
DEBUG=sitecore-jss:multisite
Now, rendering host container logs will expose you the insights into how multisite middleware processes your requests and resolves site contexts, and sets site cookies. Below is a sample (and correct) output of the log:
sitecore-jss:multisite multisite middleware start: { pathname: '/', language: 'en', hostname: 'second.localhost' } +8h
sitecore-jss:multisite multisite middleware end in 7ms: {
  rewritePath: '/_site_second/',
  siteName: 'second',
  headers: {
  set-cookie: 'sc_site=second; Path=/',
  x-middleware-rewrite: '
  x-sc-rewrite: '/_site_second/'
},
  cookies: ResponseCookies {"sc_site":{"name":"sc_site","value":"second","path":"/"}}
} +7ms
The above log is crucial to understanding how multisite middleware works internally. The internal request comes rewrites as < where ‘second‘ is a tokenized site name parameter. If .\src\main\src\temp\config.js file contains the corresponding site record, site gets resolved and sc_site cookie is set.
If you still have the issues of showing up the Second website that resolves to Main website despite the multisite middleware log outputs correct site resolution, that may be likely caused by conflicting with other middleware processors. This would be your number one thing to check especially if you have multiple custom middleware. Miltisie middleware is especially sensitive to the execution order, as it sets cookies. In my case, that problem was because Sitecore Personalize Engage SDK was registered through middleware and also programmed to set its own cookie, and somehow configured with multisite middleware.
In that case, you have to play with order constant within each conflicting middleware (they are all located under .\src\rrh\src\lib\middleware\plugins folder) with the following restart of a rendering host.
Resources Sharing
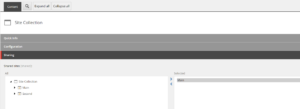
Since the multisite add-on leverages the same rendering host app for the multiple sites that use it, all the components and layouts TSX markups, middleware, and the rest of the resources become automatically available for the second site. However, that is not true by default for the Sitecore resources. We must assign at least one website that will share its assets, such as renderings, partials, layouts, etc across the entire Site Collection. Luckily, that is pretty easy to do at the site collection level:

For the sake of an experiment, let’s make Second website to use Page Designs from the Main site. After the above sharing permission, they are automatically available at /sitecore/content/Site Collection/Second/Presentation/Page Designs item.
Configuring the cloud
Once we make the multisite add-on function well, let’s make the same work in the cloud.
- First of all, check all the changes to the code repository, and trigger the deployment, either from Deploy App, CLI, or your preferred CI/CD
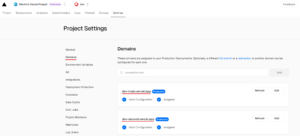
- After your changes arrive at XM Cloud environment – let’s bring the required changes to Vercel, starting with defining the hostnames for the sites:

- After you define the hostnames in Vercel, change the hostname under Site Grouping item for this particular cloud environment to match the above hostname configured earlier in Vercel.
- Save changes and smart publish Site Collection. Publishing takes some time, so please stay patient.
- Finally, you must also do Vercel full re-deployment, to force regenerating
\src\temp\config.jsfile with the hostnames from Experience Edge published at the previous step
Testing
If everything is done right in the previous steps, you can access the published Second website from Vercel by its hostname, in our case that would be Make sure all the shared partial layouts are seen as expected.
When testing 404 and 500 you will see that these are shared between both sites automatically, but you cannot configure them individually per site. This occurs because both are located at .\src\rrh\src\pages\404.tsx and .\src\rrh\src\pages\500.tsx of the same rendering host app and use different internal mechanics rather than generic content served from Sitecore throughout .\src\rrh\src\pages\[[...path]].tsx route. These error pages however could be multi-lingual, if needed.
Hope you find this article useful!
![Uuid 8601bf89 50ab 5913 42ed 4773b05ab2c3[1]](https://blogs.perficient.com/files/uuid-8601bf89-50ab-5913-42ed-4773b05ab2c31-300x294.png)


