Hello Trailblazers!
Dynamic Dashboards in Salesforce are a powerful tool that allows users to view data and metrics based on their individual access levels without needing to create separate dashboards for different users or roles. This feature enhances the customization and personalization of data visualization, making it easier for users to track performance, monitor KPIs, and make data-driven decisions relevant to their specific roles.
In this blog post, we’ll learn:
- What is Dynamic Dashboard?
- Key Features of Dynamic Dashboards.
- Difference between Standard and Dynamic Dashboards.
- Steps to create Dynamic Dashboards.
- Limitations of the Dynamic Dashboard
So let’s get started…
What Are Dynamic Dashboards in Salesforce?
A Dynamic Dashboard in Salesforce allows users to view a dashboard that automatically adjusts based on the logged-in user’s data access and permissions. Unlike traditional dashboards, where data is static and the same for all users, dynamic dashboards adapt based on each user’s security settings, ensuring that sensitive data is only visible to those with the appropriate access.
Key Features of Dynamic Dashboards:
- Personalized Data: Data displayed on the dashboard is personalized based on the logged-in user’s role and access.
- Single Dashboard for Multiple Users: No need to create separate dashboards for each user or role.
- Real-Time Insights: Users can monitor their specific metrics in real-time without viewing data outside their access level.
- Simplified Maintenance: One dashboard serves multiple users, reducing the need to update or manage multiple versions.
Differences Between Standard and Dynamic Dashboards:
|
|
Standard Dashboards |
|
|
|
Shows the same data to all users with dashboard access. | Displays data based on each user’s access and permissions. |
| Customization | Requires separate dashboards for different users. | One dashboard adapts for multiple users. |
|
|
Best for fixed views or team-level dashboards. | Ideal for personal or role-specific data tracking. |
How to Create a Dynamic Dashboard in Salesforce
Creating a dynamic dashboard is straightforward, and the process is similar to creating a standard dashboard, with an additional setting to make it dynamic. Here’s how you can set up a dynamic dashboard:
Step 1: Create a Dashboard in Dashboard Builder
- Navigate to the Dashboard Tab from App Launcher.
- Click “New Dashboard”.
- Select Reports: Dynamic dashboards pull data from reports, so ensure that your reports are set up correctly to capture the relevant data.
- Add various components (charts, tables, metrics) to visualize your data. You can customize each component to display specific data based on the reports you’ve created.

Note: If you would like to learn more about various dashboard components in Salesforce and how they’re created, please follow this link.
Step 2: Set the Dashboard to Dynamic
This is the critical step that transforms a regular dashboard into a dynamic one.
Follow the below steps:
- On the Dashboard Page, click “Edit” located in the top right corner.
- In the dashboard builder, click on the settings icon (gear icon) beside the Save button.
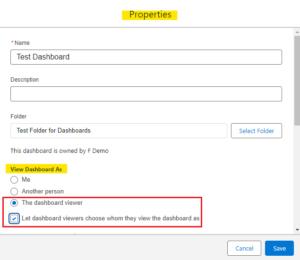
- Scroll down to the ‘View Dashboard as section’.
- You will see an option that says “View dashboard as.” Here, you can define who will be the “running user” for the dashboard.
- Select “Let dashboard viewers choose whom they view the dashboard as”. This option allows the dashboard to dynamically display data based on the logged-in user’s access.
- Click Save to enable the dashboard as dynamic.

- Again click Save on the Dashboard builder page.
- Click Done.
- Refresh the page.
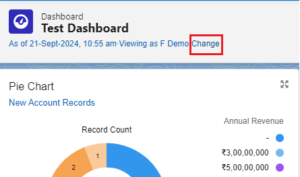
You can see the Change button beside the ‘Viewing as – Current User i.e. F Demo’ as shown in the figure below.
- Click on Change.
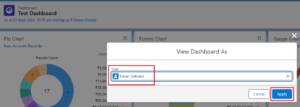
- Select the user from your org – Here I’m selecting another user from my org: Karan Dalwani

- Click on Apply.
- Click Save and refresh the page.
You will notice that the user has been updated, and the dashboard now displays only the data that the user has access to.

The current user has more limited access to Opportunities compared to the previous user. As a result, the Gauge Chart component now displays only the records that the current user has permission to view.
Limitations of the Dynamic Dashboard:
- You can have a Dynamic Dashboard:
- Enterprise Edition: Up to 5 dynamic dashboards.
- Unlimited and Performance Editions: Up to 10 dynamic dashboards.
- Developer Edition: Up to 3 dynamic dashboards.
- Dynamic dashboards cannot be saved in a private folder.
- Dynamic dashboards must be refreshed manually, as scheduled refreshes are not supported.
- Subscriptions to dynamic dashboards are not allowed.
Best Practices for Dynamic Dashboards
- Use Filters to Customize Further: You can add filters to your dynamic dashboards to give users even more control over the data they see. For example, users can filter data based on regions, departments, or time periods.
- Leverage Existing Reports: When creating dynamic dashboards, use existing summary or matrix reports to quickly visualize data. This can save time and effort in building complex data sources from scratch.
- Monitor Performance: Be mindful of the dashboard’s performance. If a dynamic dashboard is pulling large amounts of data or too many components, it may slow down. Simplify where possible to ensure a smooth user experience.
- Test the Dashboard as Different Users: Before deploying a dynamic dashboard, test it by logging in as different users (using the “Login As” feature or test users) to ensure that the data displayed is correct for each role.
Conclusion
Dynamic dashboards in Salesforce are a valuable feature that enables users to view personalized data based on their roles and access levels. This eliminates the need for multiple dashboards while ensuring data security and relevance. By following the steps outlined in this guide, you can easily create and manage dynamic dashboards that provide your team with real-time, customized insights.
Happy Reading !!
The journey of learning never ends; every moment is a chance to grow.
Related Posts:
You Can Also Read:
1.A Comprehensive Guide to Custom Report Type in Salesforce
2.Mastering Salesforce Queues: A Step-by-Step Guide – Part 2
3.How to Assign Records to Salesforce Queue: A Complete Guide
4. An Introduction to Salesforce CPQ
5. Revolutionizing Customer Engagement: The Salesforce Einstein Chatbot


