This ConvertBox review shows you the key features of ConvertBox and compares it with other lead generation platforms. ConvertBox hosts your popups and opt-in forms on its website and sends the leads to your email marketing platform or CRM.
Previously known as ConvertBar, ConvertBox was launched by Dean Saunders and acquired by Josh Bartlett (of ThriveCart) in 2021.
ConvertBox’s main competitors are ConvertPro, Convertful, Poptin, Optimonk, OptinMonster, Sumo, and Thrive Leads.
The two standout features of ConvertBox are (a) the simplicity of the interface and (b) the lifetime pricing.
I’ve been using ConvertBox for just over three months, so this review is based on personal experience.
In this review, I’ll be examining ConvertBox in terms of the following features:
- Dashboard
- Form Types
- Customization
- Integrations
- Display and Targeting
- Analytics
- Pricing
- Support
So, let’s get started!
Scoring of ConvertBox Features
Dashboard
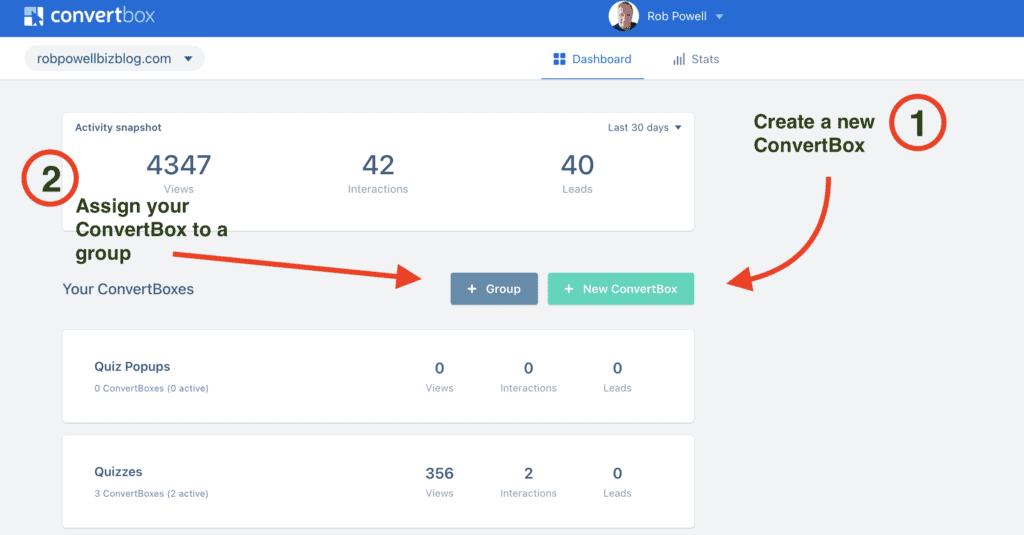
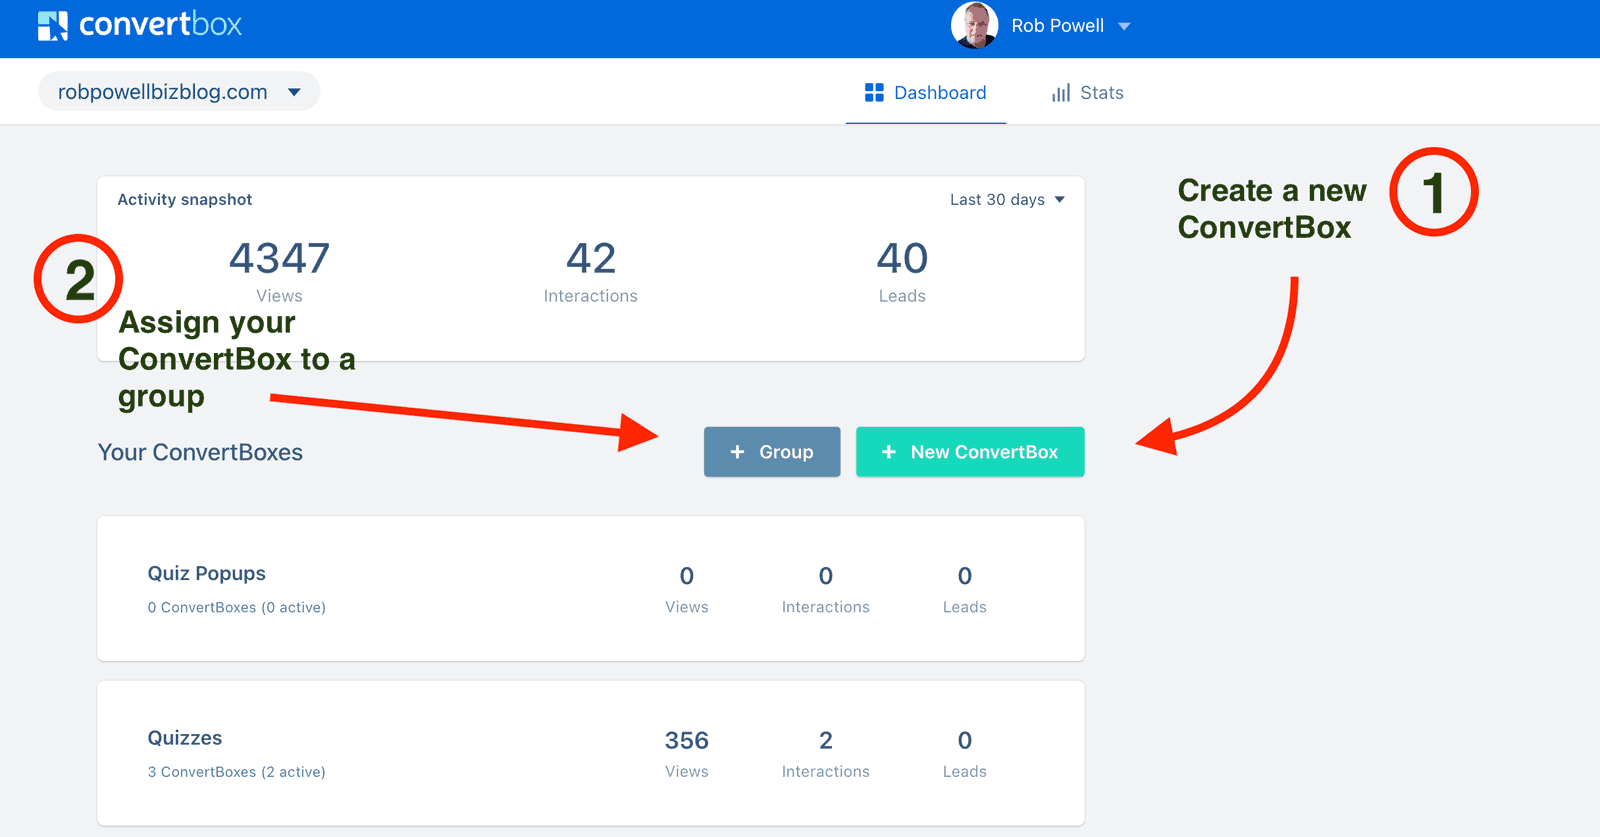
The first thing that strikes you about the ConvertBox dashboard is how simple and uncluttered it is.
Anyone who has used a popup generator before will know how complicated these platforms can be. For me, simplicity always wins the day when it comes to software platforms.
When you first open the dashboard, there are just two actions you can take: create a new ConvertBox (a ConvertBox is an opt-in form) and assign it to a group:
Dashboard score: 85%
Form Types
Once you have created a new ConvertBox, you’ll be asked what type of form you want – an overlay or an embedded form.
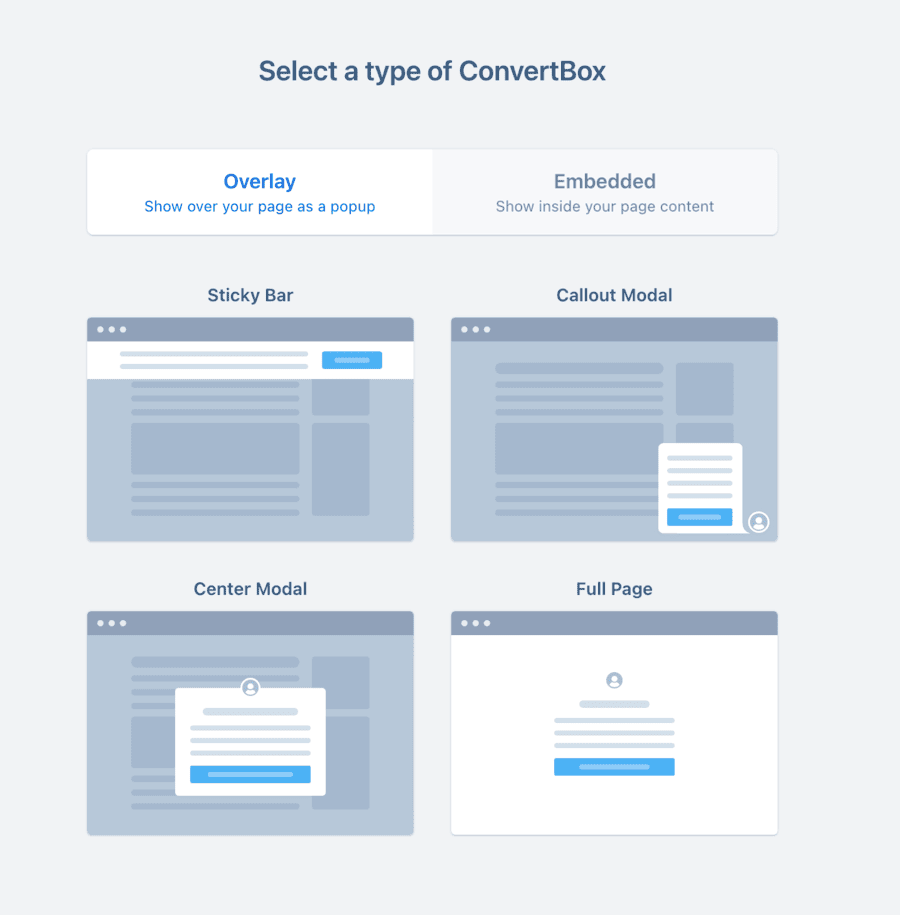
Overlays are opt-in forms that pop up or slide in on your web page. Embedded opt-ins are forms that you place in the blog post or page itself.
If you choose overlay, you have four options:
- Sticky bar
- Center Modal
- Callout Modal
- Full Page
A Center Modal is a regular popup, while a Callout Modal is a slide-in. A Sticky Bar is a fixed horizontal bar that appears at the top or the bottom of a web page, and a Full Page is an opt-in form that takes over the entire web page.
With embedded forms, ConvertBox has a really cool feature.
Traditional embed codes offer only one code per opt-in form. Wherever you embed that code, it will display just one form.
But with ConvertBox’s ‘embed areas,’ you can display various ConvertBoxes within the same area. You can also set conditions for when those ConvertBoxes display.
For example, you could designate an embed area as “Blog page at bottom” and integrate the embed code into the footer of your blog. Within this area, you can display multiple ConvertBoxes, each tailored to engage visitors at different stages of their sales journey.
These ConvertBoxes can coexist within the same area but will activate only if the predefined conditional rules are satisfied for each respective ConvertBox.
This lets you deliver dynamic messages and offers on your pages according to your visitor’s stage in the sales journey.
Form Types score: 75%
Templates
On the next screen, you have the option to pick a template or start from scratch:
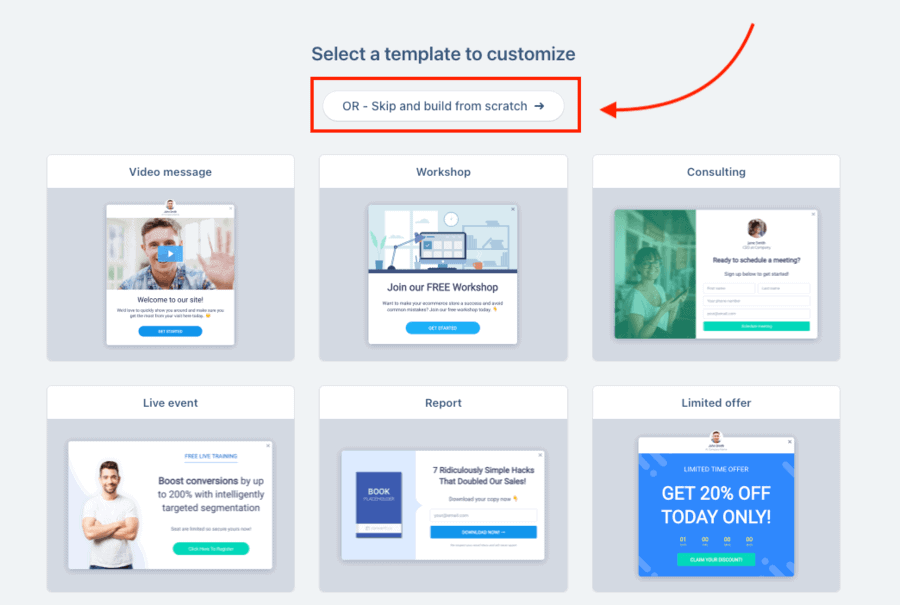
If you want to save time, the best strategy here is to pick a template that approximates what you want and then customize it.
Templates score: 70%
Customization
After choosing your template (or the start-from-scratch option), you’ll then be taken to the drag-and-drop editor:
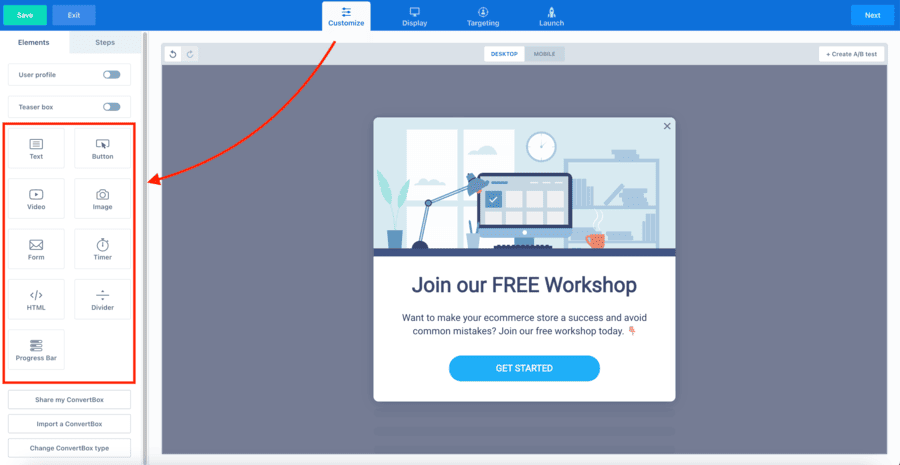
You can delete any of the elements in a template and replace them by dragging the tiles from the left side menu onto your ConvertBox.
The elements you can use to build your opt-in form are:
- Text
- Button
- Video
- Image
- Form
- Timer
- HTML
- Divider
- Progress Bar
In addition to ‘elements,’ you also have a tab called ‘Steps’:
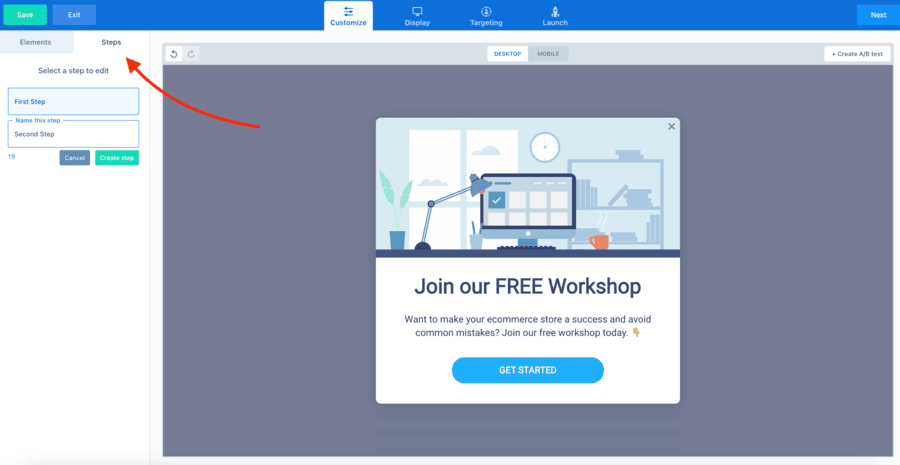
This is where you define how your ConvertBox will work.
If you want to keep it simple, you can have a one-step form, which would be a single box with a CTA and an email field.
Or you can create a two-step opt-in where the visitor first clicks on a button before getting to the email collection stage.
The key part of your ConvertBox is the ‘form’ element:
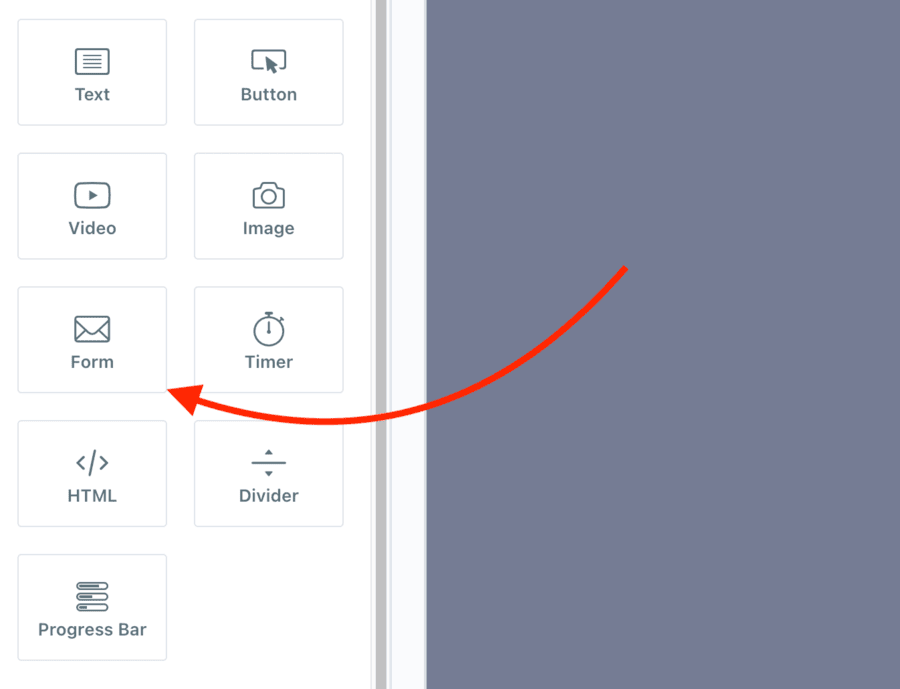
Drag the ‘Form’ tile onto your ConvertBox and then click on the form itself. You’ll then be taken to a menu containing a button for ‘Form Settings’:
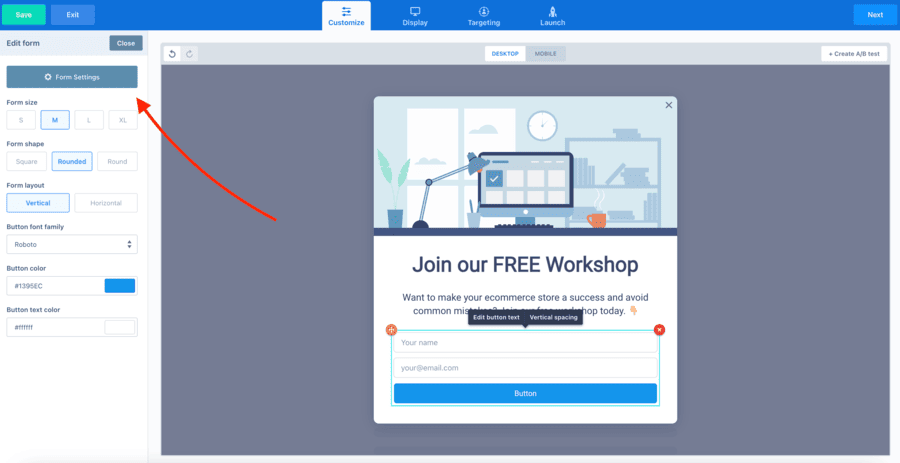
Customization score: 75%
Integrations
When you click on ‘Form Settings,’ a new screen appears with tabs for Fields, Actions, and Integrations.
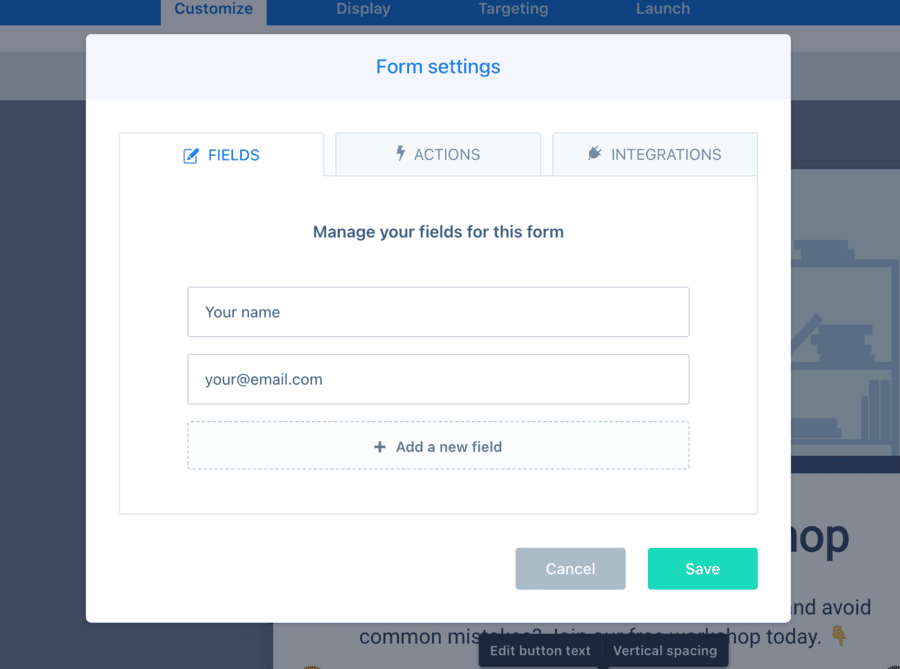
‘Fields’ is where you decide how much information you want to collect from the subscriber (email, name, address, etc).
In the ‘Actions’ tab, you choose what you want to happen when the button is clicked:
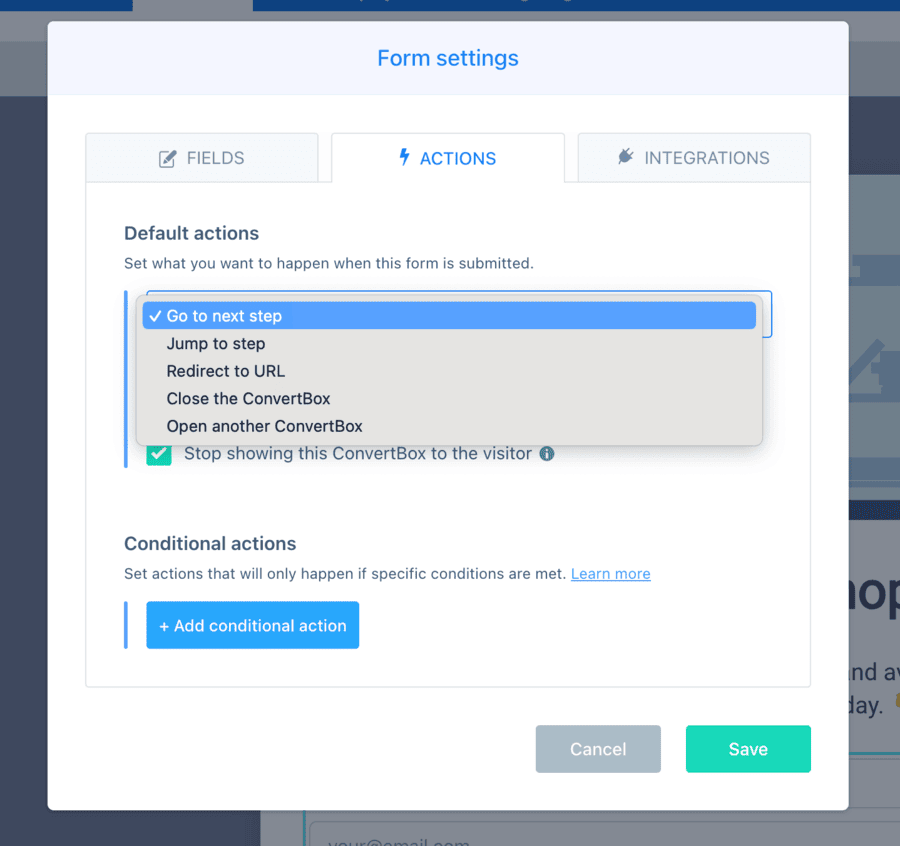
The action might be going to the next step of your ConvertBox (if you have a two-step opt-in), or it might be re-directing to a URL, closing the ConvertBox, or opening another ConvertBox.
You can also set a conditional action. This is an action that will only happen if a specified condition is met. For example, you can set it so that the action only happens if a quiz score is within a certain range:
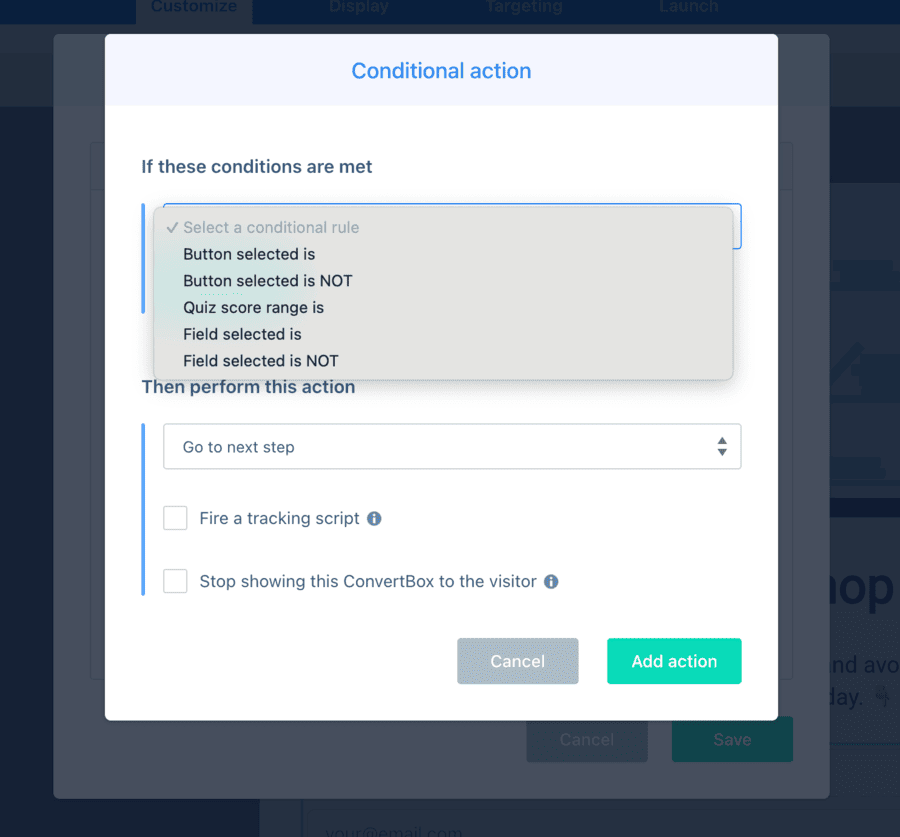
The ‘Integrations’ tab is where you connect the ConvertBox to your email marketing platform or CRM.
Once you have connected to a third-party platform, you’ll see various possible actions, such as adding the person to a list, adding them to an automation, tagging them with a tag, etc:
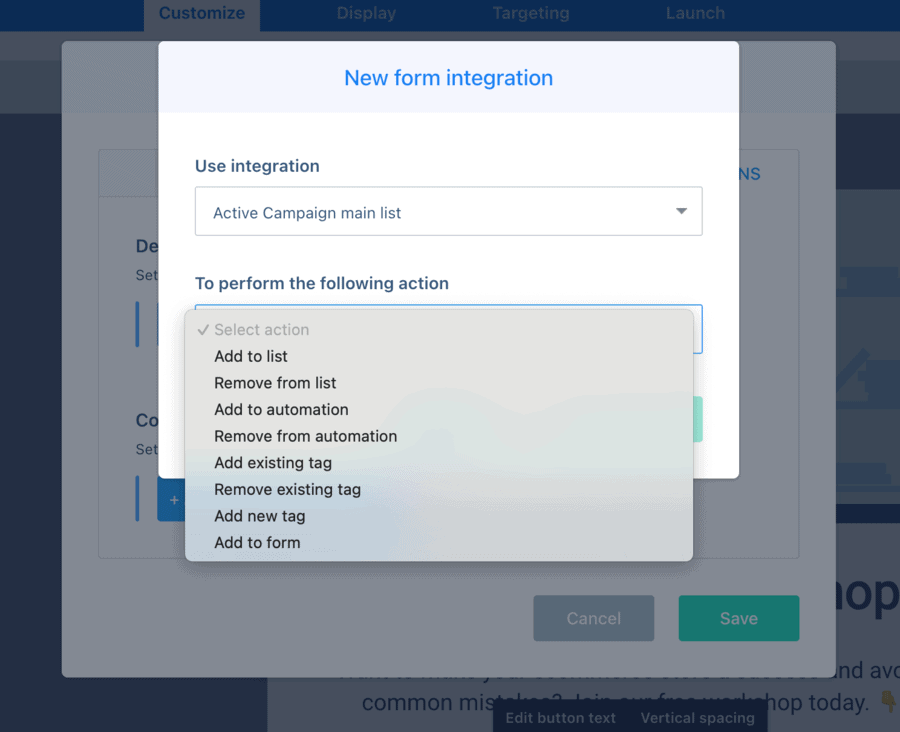
This is a very simple and easy-to-understand integration interface and is one of the strong points of ConvertBox.
Integrations score: 85%
Display and Targeting
In the top menu bar, next to ‘Customize’ are ‘Display’ and ‘Targeting’.
‘Display’ is where you decide how often the popup appears, and ‘Targeting’ is where you decide who sees it.
Under Display, you can set the following:
- Triggers
- Frequency
- Location
‘Triggers’ gives you various options for displaying your ConvertBox. These include:
- page scroll
- period of no activity
- page abandonment
- clicking a link on the page
‘Frequency’ is where you tell ConverBox how many times you want your form to appear during a session and the maximum number of times it can appear during a single session.
On the ‘Location’ tab, you can choose where you want your ConvertBox to appear. This can be an exact URL, a URL containing a particular word, a WordPress category, or a WordPress tag:
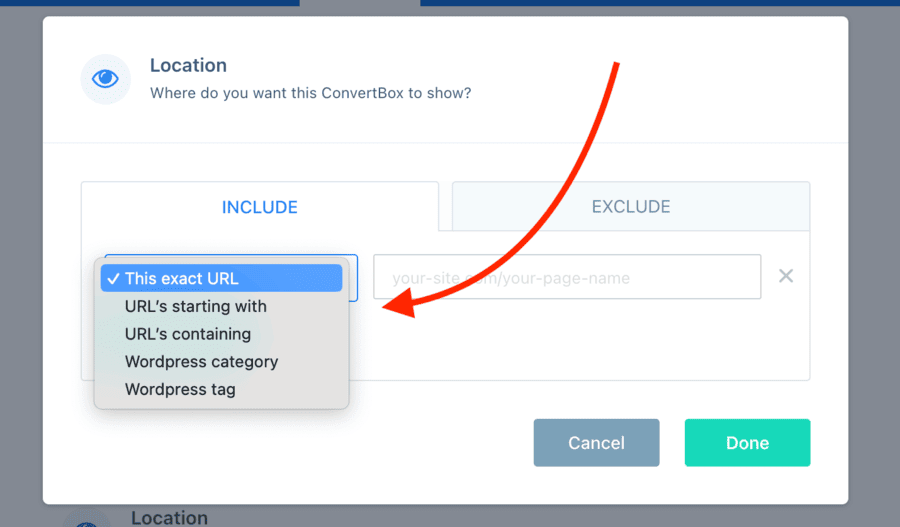
ConvertBox gives you a very granular level of control over where the popup appears – this is something I really like about ConvertBox.
Under Targeting, you can choose to show your ConvertBox to everyone or specific visitors.
If you want to show your form only to specific visitors, there’s an impressive range of conditions to choose from, including:
- what pages they have visited
- whether they have visited a specific page
- where they are geographically located
- whether their cookie value contains a particular keyword
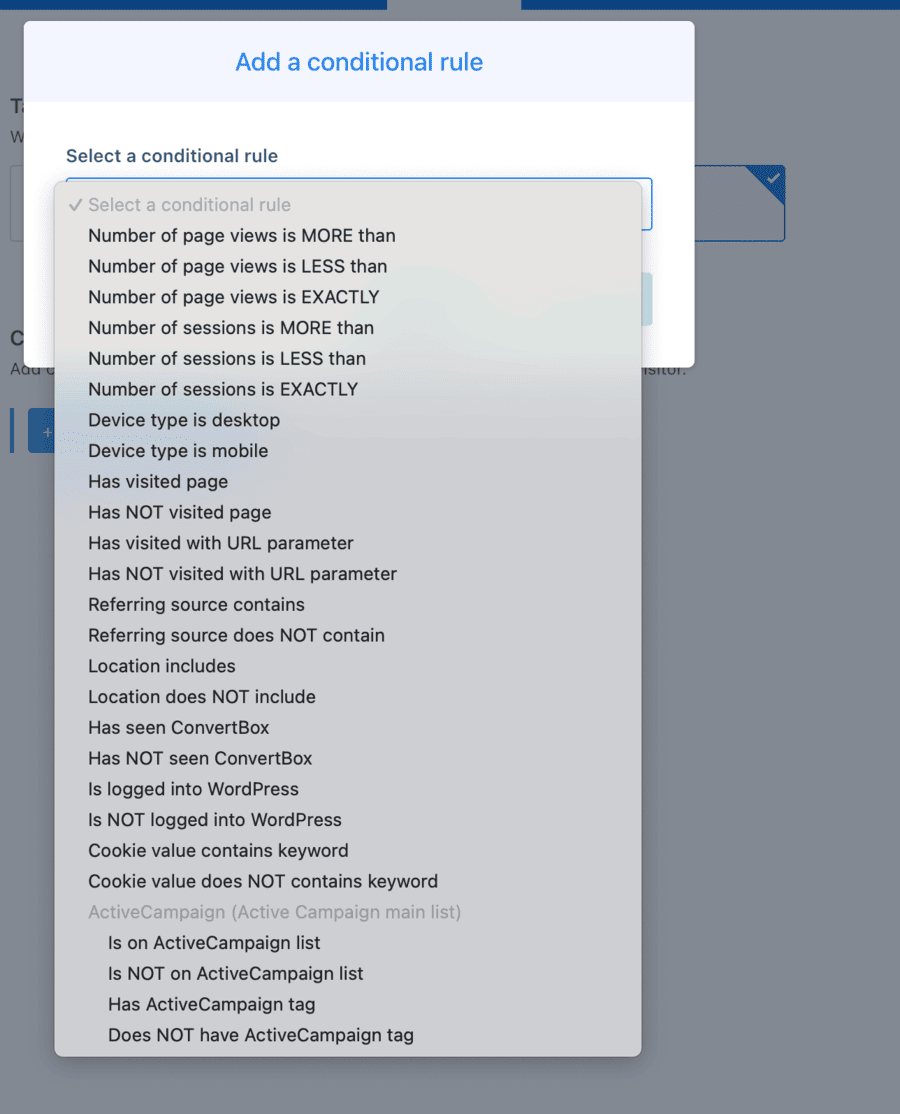
I should point out that the range of options you see will depend partly on the third-party platform that you connect to.
Display and Targeting score: 85%
Analytics
The analytics screen gives you a snapshot of the performance of your ConvertBoxes using the following criteria:
- Views
- Interactions
- Interaction rate
- Leads
- Lead conversion rate
You can see these stats for a specific ConvertBox or a group of ConvertBoxes:
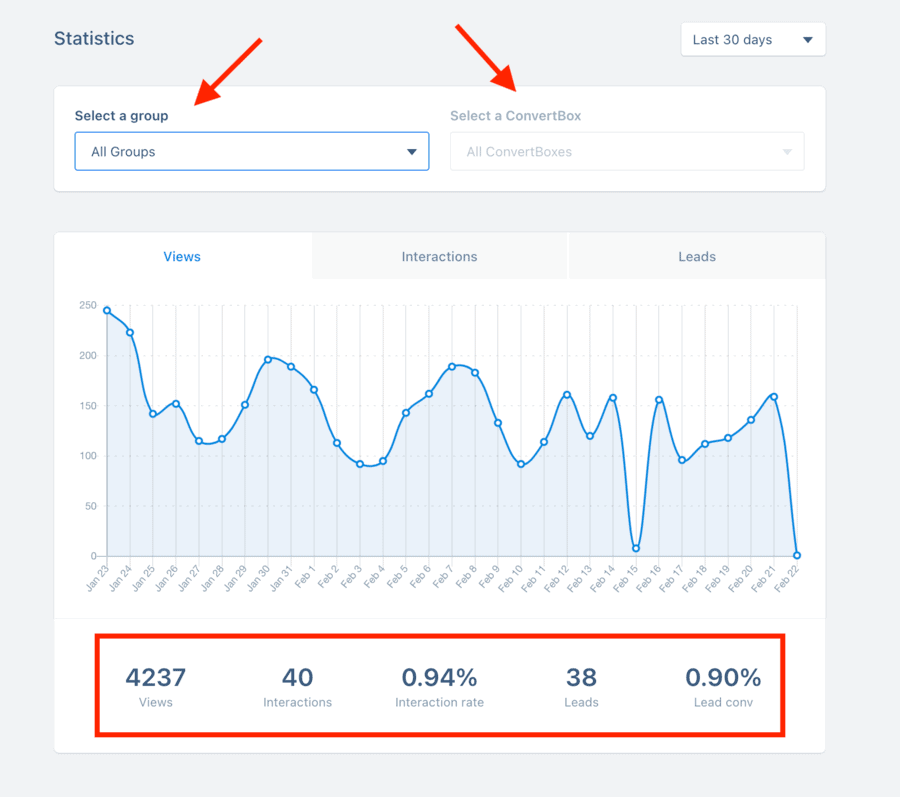
Some people might find these analytics a bit basic, but I like the simplicity of the display – it shows you at a glance how your opt-ins are performing without having to scroll through half a dozen graphs.
Analytics score: 70%
Pricing
Pricing is a feature where ConvertBox stands out from all its competitors because it only offers a lifetime fee of $495.
For bloggers on a budget, that’s a big outlay in one go.
But it does have advantages.
Over a 5-year period, ConvertBox works out at $99 per year.
By comparison, OptinMonster is $348 p/year, Poptin is $240 p/year, and Optimonk is $468 p/year.
I don’t know if ConvertBox plans to change the pricing to monthly/annual fees, but if they do, I suspect the annual fee would be comparable to Optin Monster or Optimonk.
Price Comparison Chart – ConvertBox vs Other Lead Gen Platforms
| Feature | Price |
| ConvertBox | $495 (lifetime) |
| OptinMonster | $348 p/year |
| Thrive Leads | $299 p/year |
| Poptin | $240 p/year |
| Convertful | $228 p/year |
Pricing score: 80%
Customer Support
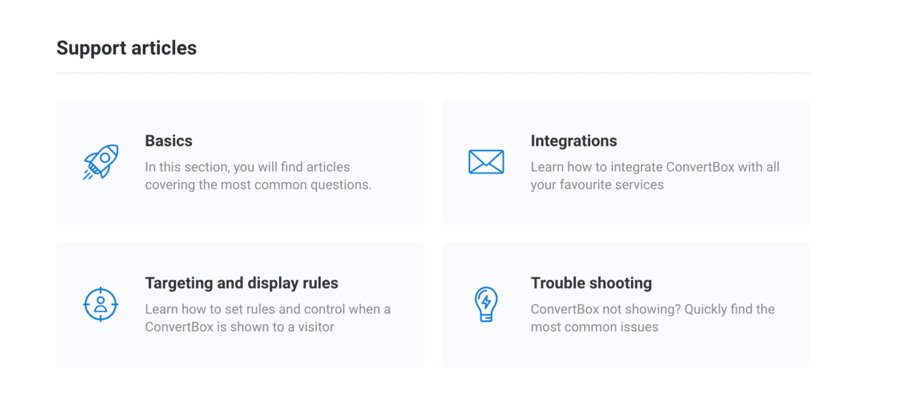
ConvertBox has a solid collection of support articles covering basics, integrations, targeting and display rules, and troubleshooting:
They also have online training videos on basic topics and advanced topics:
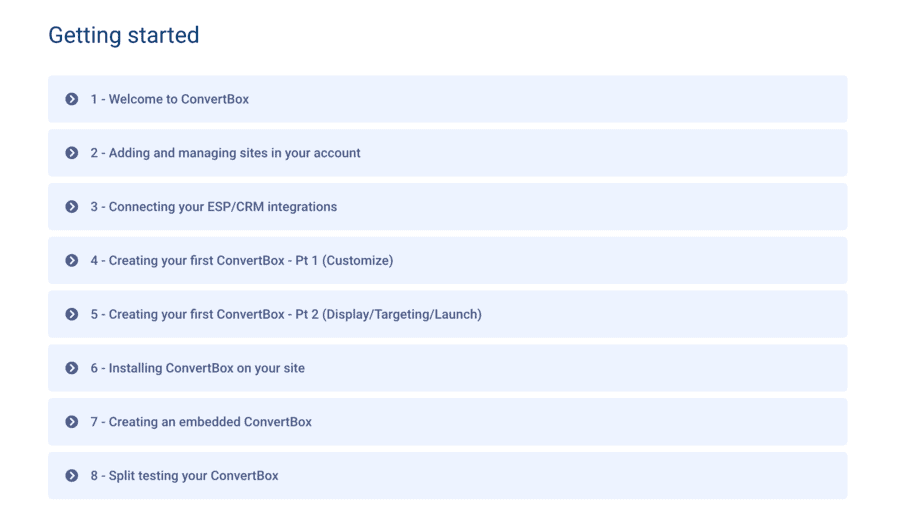

For help with a specific issue, there’s an online form where you can open a support ticket. Unfortunately, there is no live chat and no telephone support.
But the platform works so well and intuitively that you probably won’t need any help. I’ve been using it for three months and haven’t yet run into any problems.
Customer Support score: 75%
How Does ConvertBox Compare With Other Lead Generation Platforms?
In this section, I’ll compare ConvertBox with the two lead generation platforms that I have used in the past: Optin Monster and Thrive Leads.
ConvertBox vis OptinMonster
Opt-ins and Templates: OptinMonster provides more opt-ins and templates than ConvertBox. OptinMonster offers over 80+ templates, whereas ConvertBox has over 25+ templates.
TruLead Feature for Spam Filtering: OptinMonster includes a TruLead feature to filter out spam and increase email deliverability, which ConvertBox lacks. Users might need to use external email service providers or services like Zero Bounce with ConvertBox to validate emails.
Ease of Use: ConvertBox is simple to understand, and there’s hardly any learning curve. It was designed to be easy to use. By contrast, OptinMonster requires some learning curve due to its many features.
Segmentation Funnels: ConvertBox’s ‘Segmentation Funnels’ are a standout feature and allow for highly personalized offers tailored to individual needs. OptinMonster can achieve similar outcomes through targeting, triggers, and campaign setup, but the process is cumbersome compared to ConvertBox.
ConvertBox vs Thrive Leads
Reliability: Thrive Leads can be glitchy. I’ve often spent hours trying to determine why a popup was not firing in Thrive Leads. In my experience, the popups in ConvertBox work the first time.
Ease of Use: ConvertBox’s interface is easier to understand, with a less cluttered and more modern layout than Thrive Leads, which can become complicated, especially when managing multiple LeadBoxes and Lead Groups.
Better for Multiple Sites: ConvertBox offers convenient form management, particularly for users with multiple sites. You can easily duplicate and move forms across sites with ConvertBox. In Thrive Leads, you would have to export them and then import them as a Zip file, which involves extra steps.
Performance and Compatibility: Thrive Leads, being a WordPress plugin, can slow down your site or conflict with other plugins on your site. Additionally, it accumulates log file information, which has to be deleted periodically if you want your site to perform at its best.
Visitor Targeting: ConvertBox offers feature-rich visitor targeting capabilities, allowing you to target visitors based on a whole range of conditional rules such as autoresponder tag, cookie value, and visitor location. There is nothing as granular as this in Thrive Leads.
Features Comparison Chart – ConvertBox vs Other Lead Gen Software
| Feature | ConvertBox | OptinMonster | Thrive Leads | Poptin | Convertful |
| Lead capture forms | Yes | Yes | Yes | Yes | Yes |
| Multiple Step opt-ins | Yes | Yes | Yes | Yes | Yes |
| Drag and drop builder | Yes | Yes | Yes | Yes | Yes |
| Split testing | Yes | Yes | Yes | Yes | Yes |
| Onsite retargeting | Yes | Yes | No | No | Yes |
| Analytics | Yes | Yes | Yes | Yes | Yes |
| Conditional integrations | Yes | No | Yes | No | No |
| Segmentation | Yes | Yes | Yes | Yes | Yes |
| Scroll trigger | Yes | Yes | Yes | Yes | Yes |
| Inactivity trigger | Yes | Yes | Yes | Yes | Yes |
| Page abandonment trigger | Yes | Yes | Yes | Yes | Yes |
| Clicked link trigger | YesYes | Yes | Yes | Yes | Yes |
| Page-level targeting | Yes | YesYes | Yes | Yes | Yes |
| Location targeting | Yes | Yes | No | Yes | No |
| Intelligent targeting | Yes | Yes | No | No | No |
| Countdown timers | Yes | Yes | Yes | Yes | Yes |
| Custom form fields | Yes | Yes | Yes | Yes | Yes |
| Personalized messages | Yes | Yes | No | No | Yes |
| Mobile Editing | Yes | Yes | Yes | Yes | Yes |
| Quizzes | Yes | No | No | No | No |
| Skip Logic | Yes | No | No | No | No |
| Spam Filtering | No | Yes | No | No | No |
Get ConvertBox for a lifetime fee!
Avoid recurring subscriptions and get this powerful lead-generation platform for a one-time fee of just $495
Get ConvertBox – lifetime fee >>
ConvertBox Alternatives
There are various alternatives to ConvertBox – these are the ones I would recommend.
Best for easy setup

Optin Monster
OptinMonster is a powerful lead-generation tool that helps businesses convert website visitors into subscribers and customers through customizable pop-ups, forms, and other marketing tools.
Pros
Easy to set up
Good support
Pre-designed campaigns
Cons
Analytics could be improved
Doesn’t integrate with some CRMs
Expensive if you want the advanced features
Best for Thrive Themes users
Thrive Leads
Thrive Leads is a comprehensive email list-building plugin for WordPress that offers a wide range of customizable opt-in forms and targeting options to maximize conversions
Pros
Large variety of templates
Uses Thrive Architect
Good A/B testing
Cons
May slow down your site
Limited tagging options
Complex interface
Best for user interface

Convertful
Convertful is a versatile conversion optimization platform that enables website owners to create and deploy personalized and engaging lead capture forms, pop-ups, and widgets to increase conversions and grow their email lists effectively.
Pros
Easy-to-use
Good support
Nice looking templates
Cons
Limited integrations
Analytics could be improved
No live chat
Summary
This ConvertBox review has examined ConvertBox’s key features in detail and how it compares with its competitors.
I’ve been using ConvertBox for three months now, and I **** how easy it is to use.
I’m also impressed with the level of targeting you can achieve. The skip logic that segments users based on their answers is particularly useful. I also like the granular way it integrates with ActiveCampaign, giving me lots of options for displaying my popups based on the behavior of my visitors.
The lifetime pricing is a hefty outlay and made me think twice. But I’m also glad I have no recurring subscription fees. Over a 3- to 5-year period, ConvertBox will be more affordable than its competitors.
In short, ConvertBox is up there with the best lead generation software and is good value for money.
Frequently Asked Questions (FAQ)
What is a lead generation popup?
A lead generation popup is a type of window or dialog box that appears on a website with the purpose of capturing information from visitors, typically their contact details such as name and email address.
These popups are commonly used by businesses and marketers to generate leads, which are potential customers interested in their products or services.
Lead generation popups often offer something of value to the visitor in exchange for their information, such as a discount, a free ebook, a webinar registration, or access to exclusive content.
By collecting contact information through these popups, businesses can build their email lists and initiate further communication with leads, nurturing them through the sales funnel.
The design and timing of lead generation popups can vary, but they are typically placed on web pages to maximize visibility and engagement without disrupting the user experience too much.
They are a popular tool in digital marketing for converting website traffic into leads and, ultimately, customers.
What is a lead magnet popup?
A lead magnet popup is a specific type of popup used in digital marketing to attract potential leads and encourage them to provide their contact information.
Unlike traditional popups that may simply ask for generic information, lead magnet popups offer something valuable in exchange for the visitor’s details.
The “lead magnet” refers to the incentive or offer provided to entice visitors to take action. This could be anything from a free ebook, a downloadable checklist, a discount code, a webinar registration, access to exclusive content, or a free trial of a product or service.
Lead magnet popups typically appear when a visitor performs a specific action on a website, such as spending a certain amount of time on a page, scrolling to a certain point, or attempting to exit the site.
The timing and targeting of these popups are often carefully planned to maximize their effectiveness without being overly intrusive.
The goal of a lead magnet popup is not only to capture the visitor’s contact information but also to provide them with immediate value, thereby increasing the likelihood that they will engage further with the brand and eventually become paying customers.
What are the four steps of the lead generation process?
The lead generation process typically involves several steps to turn a potential customer (a lead) into someone who is interested in your product or service and willing to provide their contact information for further engagement. Here are the four main steps:
Attracting Attention: This involves generating interest and drawing potential leads to your business. This can be done through various marketing channels such as content marketing, social media, search engine optimization (SEO), advertising, and more. The goal is to make your target audience aware of your brand and what you offer.
Offering Value: Once you have the attention of your audience, the next step is to provide them with something of value in exchange for their contact information. This could be a lead magnet such as a free ebook, a discount code, a webinar, or any other valuable content or offer that addresses the needs or pain points of your target audience.
Capturing Information: With the value proposition in place, you need to capture the contact information of your leads. This usually involves forms or opt-in boxes where visitors can enter their details, such as name and email address, in exchange for the offer. It’s important to keep these forms simple and easy to fill out to minimize friction.
Nurturing Leads: Once you’ve captured the contact information, the final step is to nurture these leads through further engagement and follow-up. This often involves email marketing, where you can continue to provide valuable content, build relationships, and guide leads through the sales funnel toward making a purchase decision.
By following these steps, businesses can effectively generate leads and convert them into paying customers over time.


